Let me set the scene: it was a rainy Tuesday, the kind that makes you stare at the clock and wonder if coffee alone can rescue your mood. I had brewed a pot of dark espresso, the aroma curling around the kitchen like a warm blanket, and my roommate dared me to create a dessert that could actually keep up with that intensity. Spoiler alert: I accepted the challenge, and what emerged from the oven was nothing short of a chocolate‑espresso love child that could convert even the most staunch vanilla fan. I’ll be honest — I ate half the batch before anyone else got to try it, and that’s a confession I’m willing to own because the flavor was that unforgettable.
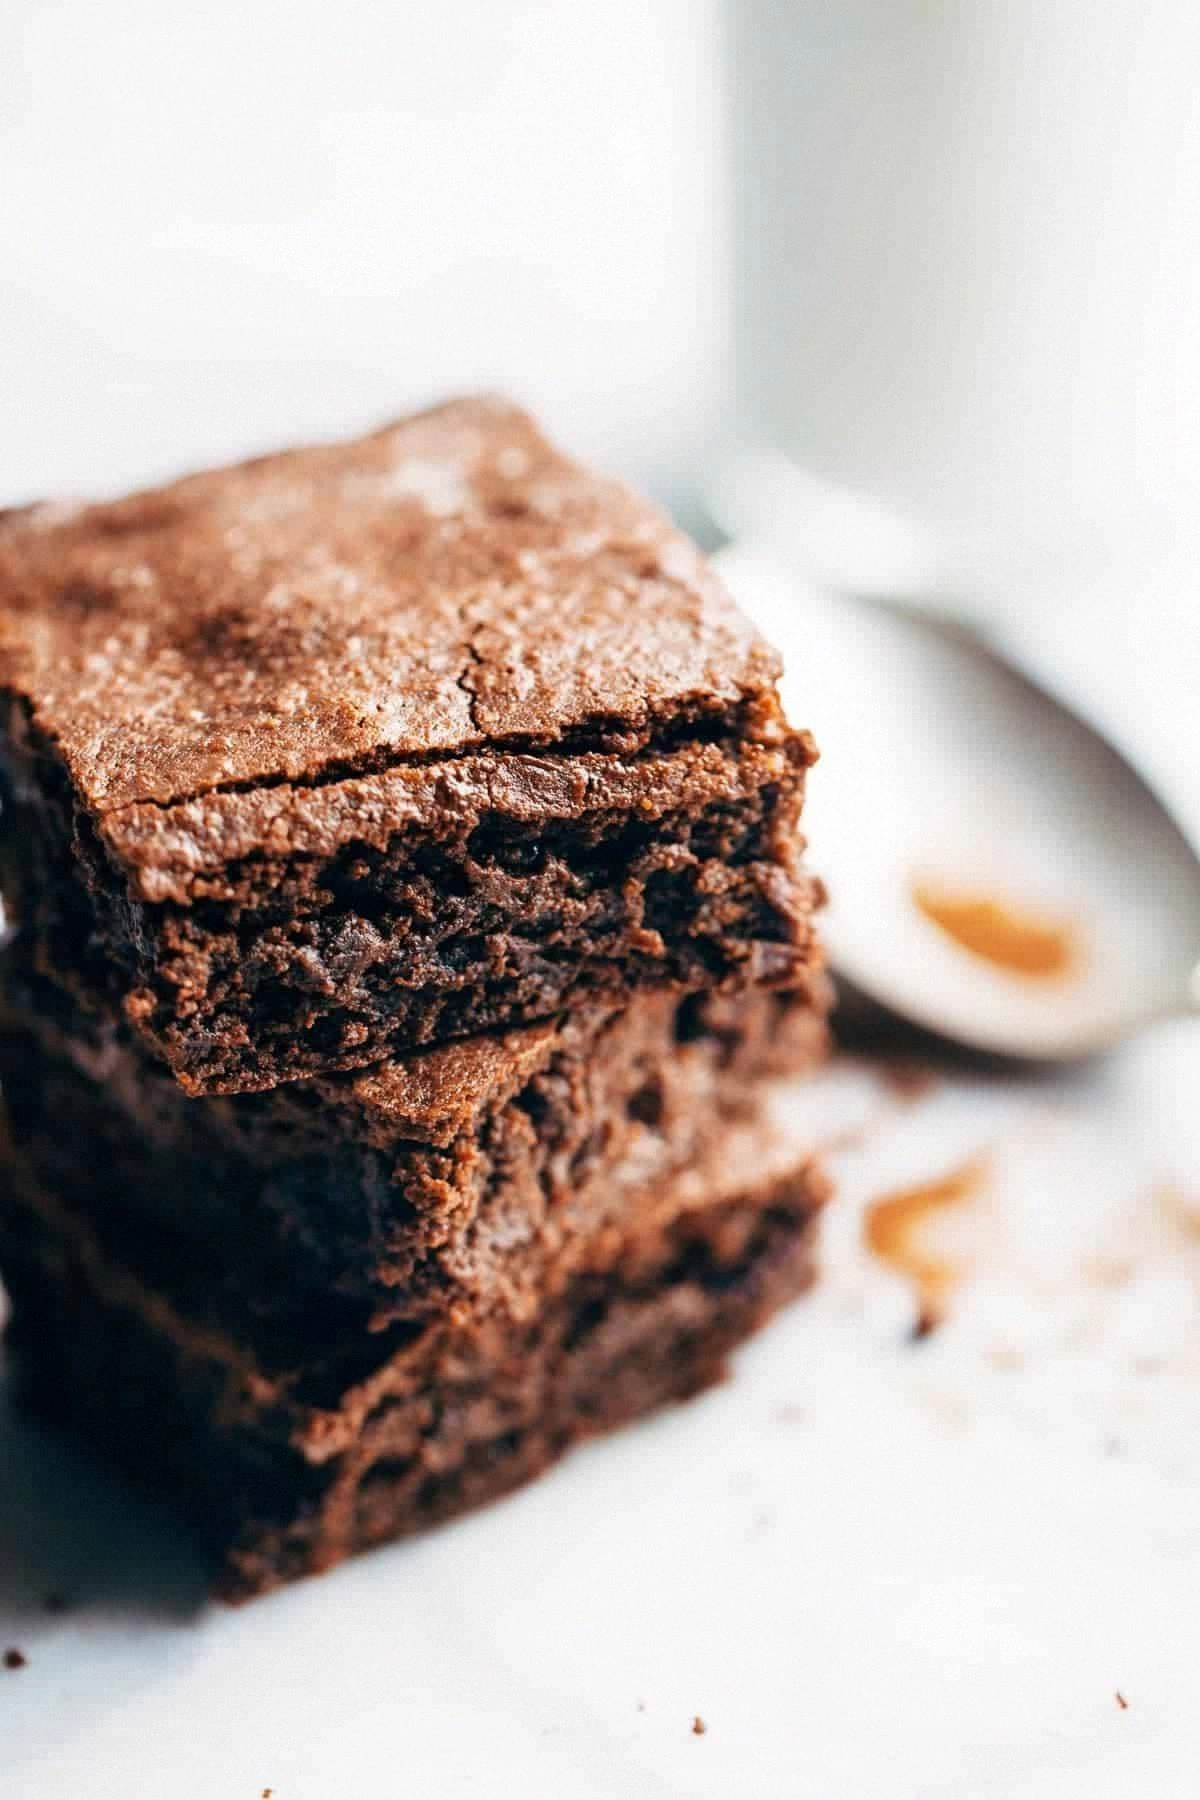
Picture this: a glossy, deep‑brown surface that catches the light just right, the edges crisped to a delicate snap that shatters like thin ice, and the interior—a fudgy, almost buttery core that melts on your tongue while a subtle espresso bite dances on the palate. The smell? Imagine a barista’s secret stash wafting through the air, mingling with the sweet perfume of caramelized sugar; it’s a scent that makes you want to inhale deeply and never leave the kitchen. When you bite into it, the first thing you notice is the crunch of the top, quickly giving way to a velvety texture that’s richer than a triple‑shot latte, yet somehow lighter than you’d expect from a brownie packed with chocolate.
Most brownie recipes out there either drown you in cocoa or leave you with a bland, cake‑like crumb. Most get the balance of coffee and chocolate completely wrong, treating espresso as an afterthought rather than the star of the show. This version, however, is built on a foundation of just six ingredients, each chosen for maximum impact and minimum fuss. The secret? A generous dose of espresso powder that’s dissolved in melted butter, creating a glossy, fragrant base that coats the flour and cocoa like velvet, while the sugar caramelizes just enough to give those coveted crackly edges.
Now, I’m about to hand you the playbook for the ultimate espresso brownie—no fancy equipment, no obscure pantry items, just pure, unadulterated decadence. I dare you to taste this and not go back for seconds. Let me walk you through every single step — by the end, you’ll wonder how you ever made it any other way.
What Makes This Version Stand Out
- Intense Flavor: The espresso isn’t just a whisper; it’s a bold, aromatic kick that elevates the chocolate to new heights. The coffee’s natural bitterness perfectly counterbalances the sugar, creating a sophisticated taste that feels like a gourmet dessert without the pretension.
- Fudgy Texture: By using melted butter as the liquid carrier for the espresso, the batter stays glossy and dense, giving you that melt‑in‑your‑mouth fudginess that’s often missing in bakers’ attempts at “chewy”.
- Simplicity: Only six ingredients, all pantry staples. No need to hunt for exotic spices or special flours—just grab what you already have and you’re set.
- Visual Appeal: The glossy top and crackly edges make these brownies look as good as they taste, perfect for impressing guests or snapping that Instagram shot that makes everyone ask for the recipe.
- Crowd Reaction: Serve these at a gathering and watch people’s eyes widen as the chocolate‑espresso aroma hits them. Expect immediate requests for the recipe and a line forming for seconds.
- Ingredient Quality: Using high‑quality espresso powder and real unsweetened cocoa makes a world of difference. The bitterness of good espresso shines through, while the cocoa provides depth without overwhelming the coffee notes.
- Even Baking: The method of mixing wet and dry components separately, then combining, ensures a uniform crumb and prevents those dreaded dry spots.
- Make‑Ahead Potential: These brownies keep beautifully at room temperature for days, and they even improve in flavor after a night of resting, allowing you to prep ahead for parties.
Alright, let's break down exactly what goes into this masterpiece...
Inside the Ingredient List
The Flavor Base
Espresso Powder (2 tbsp): This is the heart‑and‑soul of the brownies. Dissolving it in melted butter extracts its essential oils, turning the butter into a coffee‑infused elixir that seeps into every crumb. If you skip it, you’ll end up with a plain chocolate brownie—good, but not unforgettable. For a slightly milder coffee note, you can substitute instant coffee granules, but the depth will be less pronounced.
The Texture Crew
Unsweetened Cocoa Powder (½ cup): The cocoa provides the dark, rich chocolate flavor that pairs with the espresso. Choose a Dutch‑process cocoa for smoother bitterness or natural cocoa for a brighter, slightly acidic edge. Skipping cocoa turns this into a coffee cake, which is a whole different dessert direction.
All‑Purpose Flour (2 cups): The flour gives structure without making the brownies cakey. Using cake flour would create a lighter crumb, while bread flour would make them overly dense. If you’re gluten‑free, a 1‑to‑1 blend of rice flour and tapioca starch works surprisingly well.
The Unexpected Star
Butter (1 cup, melted): Melted butter carries the espresso’s flavor throughout the batter and contributes to that glossy finish. Use unsalted butter so you can control the salt level precisely. If you’re dairy‑free, clarified coconut oil is a viable swap, though the flavor will shift toward a tropical note.
The Final Flourish
Sugar (1 cup): Granulated sugar caramelizes during baking, giving those coveted crackly edges. Brown sugar would add moisture and a hint of molasses, which could mask the espresso’s nuance. If you prefer a less sweet brownie, reduce the sugar to ¾ cup, but be prepared for a slightly drier texture.
Eggs (2 large): Eggs bind the batter and add richness. They also help create that tender crumb we all love. If you’re vegan, replace each egg with a “flax egg” (1 tbsp ground flaxseed + 3 tbsp water) and expect a slightly denser result.
Everything's prepped? Good. Let's get into the real action...

The Method — Step by Step
Preheat your oven to 350°F (175°C) and line a 9×13‑inch baking pan with parchment paper, letting the paper hang over the edges for an easy lift later. While the oven warms, melt the butter in a medium saucepan over low heat, then whisk in the espresso powder until fully dissolved. You’ll notice the butter turning a deeper amber, releasing that intoxicating coffee scent—That sizzle when it hits the pan? Absolute perfection.
Kitchen Hack: Add the espresso powder to the butter while it’s still warm, not hot, to avoid a bitter burnt taste.In a large mixing bowl, whisk together the flour, cocoa powder, and a pinch of salt until no lumps remain. The dry mixture should look like a dark, velvety sand; this visual cue tells you the cocoa is fully incorporated. If you’re using a gluten‑free blend, give it an extra minute of whisking to ensure even distribution.
In a separate bowl, beat the sugar and eggs together until the mixture turns pale and slightly thickened—about 2 minutes with an electric mixer on medium speed. This aeration step is crucial because it introduces air that will help the brownies stay tender, not dry.
Slowly pour the warm espresso‑butter into the egg‑sugar mixture, whisking continuously. You’ll see the batter become glossy and silky; this is the moment where the coffee truly marries the sugar, creating a caramel‑coffee perfume that fills the kitchen. Watch out: If the butter is too hot, it can scramble the eggs—keep the temperature low.
Watch Out: Make sure the butter isn’t scorching hot; a temperature around 120°F (49°C) is ideal.Now, gently fold the dry flour‑cocoa mixture into the wet batter using a rubber spatula. Scrape the bottom of the bowl, lift, and turn over—this folding action prevents over‑mixing, which could develop gluten and make the brownies tough. The batter should be thick, glossy, and just barely flowing.
Pour the batter into the prepared pan, smoothing the top with the back of a spoon or an offset spatula. Here’s a pro tip: tap the pan lightly on the counter three times to release any stubborn air bubbles, ensuring an even crumb.
Slide the pan into the preheated oven and bake for 25‑30 minutes. Around the 20‑minute mark, start checking the edges—they should begin to pull away from the sides of the pan, and the surface will develop a thin, crackly crust. Insert a toothpick into the center; it should come out with a few moist crumbs but no wet batter—this is the sweet spot.
Once done, remove the pan and let the brownies cool in the pan for at least 15 minutes. This cooling period allows the crumb to set, making it easier to lift the parchment and cut clean squares. While you wait, savor the lingering espresso aroma that now fills the entire kitchen.
After cooling, lift the brownies using the parchment overhang, transfer to a cutting board, and slice into generous squares. For that perfect presentation, wipe the blade between cuts so each piece stays crisp and clean. Serve warm with a glass of cold milk or a shot of espresso for an extra kick.
Kitchen Hack: Store cut squares in an airtight container with a slice of bread on top; the bread will keep them moist for up to three days.
That's it — you did it. But hold on, I've got a few more tricks that'll take this to another level...
Insider Tricks for Flawless Results
The Temperature Rule Nobody Follows
Never bake brownies straight from a cold fridge. Let the batter sit at room temperature for 10 minutes before sliding it into the oven; this ensures even heat penetration and prevents the edges from over‑crisping while the center stays undercooked. I once tried to speed things up by popping a chilled pan straight into the oven—let's just say the result was a burnt perimeter and a gummy middle.
Why Your Nose Knows Best
The moment the brownies start to smell like toasted espresso and caramel is your cue to start checking them. Trust that aromatic signal more than the clock. If you hear a faint “crackle” from the top, that’s the sound of the edges forming that coveted crackly crust.
The 5‑Minute Rest That Changes Everything
After you pull the brownies from the oven, resist the urge to cut immediately. Let them rest for exactly five minutes on the pan; this short pause allows the steam to redistribute, locking in moisture and giving you that perfect fudgy interior. Skipping this step leads to crumbly squares that fall apart on the plate.
Butter Temperature Mastery
When melting butter for the espresso infusion, keep the heat low and melt it just until it’s liquid. Over‑heated butter can separate, causing a greasy texture that ruins the crumb. A gentle melt preserves the butter’s emulsified structure, ensuring a smooth batter.
Espresso Powder Quality Check
Use a fresh, high‑quality espresso powder for maximum flavor. If the powder has been sitting in a pantry for years, it may have lost aromatic potency, resulting in a bland brownie. A quick sniff test—if it still smells like coffee, it’s good to go.
Creative Twists and Variations
This recipe is a playground. Here are some of my favorite ways to switch things up:
Mocha Swirl
Before baking, swirl in a tablespoon of melted dark chocolate mixed with a dash of extra espresso powder. Use a knife to create marbled ribbons; the result is a visual and flavor contrast that feels like a coffee shop’s signature mocha brownie.
Nutty Crunch
Fold in ½ cup of toasted chopped hazelnuts or almonds into the batter. The nuts add a pleasant crunch and a buttery note that complements the coffee’s bitterness perfectly.
Spiced Espresso
Introduce a pinch of ground cinnamon and a hint of cayenne pepper to the dry ingredients. This subtle heat amplifies the espresso’s warmth, creating a brownie that’s perfect for chilly evenings.
White Chocolate Espresso
Replace half of the cocoa powder with high‑quality white chocolate chips. The sweet, creamy pockets melt into pockets of coffee‑infused butter, delivering a delightful sweet‑and‑bitter dance.
Gluten‑Free Version
Swap the all‑purpose flour for a 1‑to‑1 gluten‑free blend and add a tablespoon of xanthan gum to maintain structure. The texture remains fudgy, and the coffee flavor shines just as brightly.
Vegan Delight
Replace butter with coconut oil and use flax eggs. The brownies will have a faint coconut undertone that pairs surprisingly well with the espresso, making a fully plant‑based treat.
Storing and Bringing It Back to Life
Fridge Storage
Place the cooled brownies in an airtight container and store them in the refrigerator for up to five days. The cool environment keeps the crumb firm and preserves the espresso’s aromatic profile. Before serving, let them sit at room temperature for 15 minutes to regain that soft, melt‑in‑your‑mouth feel.
Freezer Friendly
Wrap a single layer of brownies in parchment, then seal the entire batch in a freezer‑safe zip‑top bag. They’ll keep for up to three months. When you’re ready to enjoy, thaw them in the fridge overnight, then warm gently in a 300°F oven for 8‑10 minutes.
Best Reheating Method
To revive that fresh‑out‑of‑the‑oven texture, microwave a single square for 10‑12 seconds, or place a slice on a baking sheet and warm in a 350°F oven for 5 minutes. Add a tiny splash (about a teaspoon) of water to the pan before reheating; the steam will bring back the fudgy interior without drying it out.