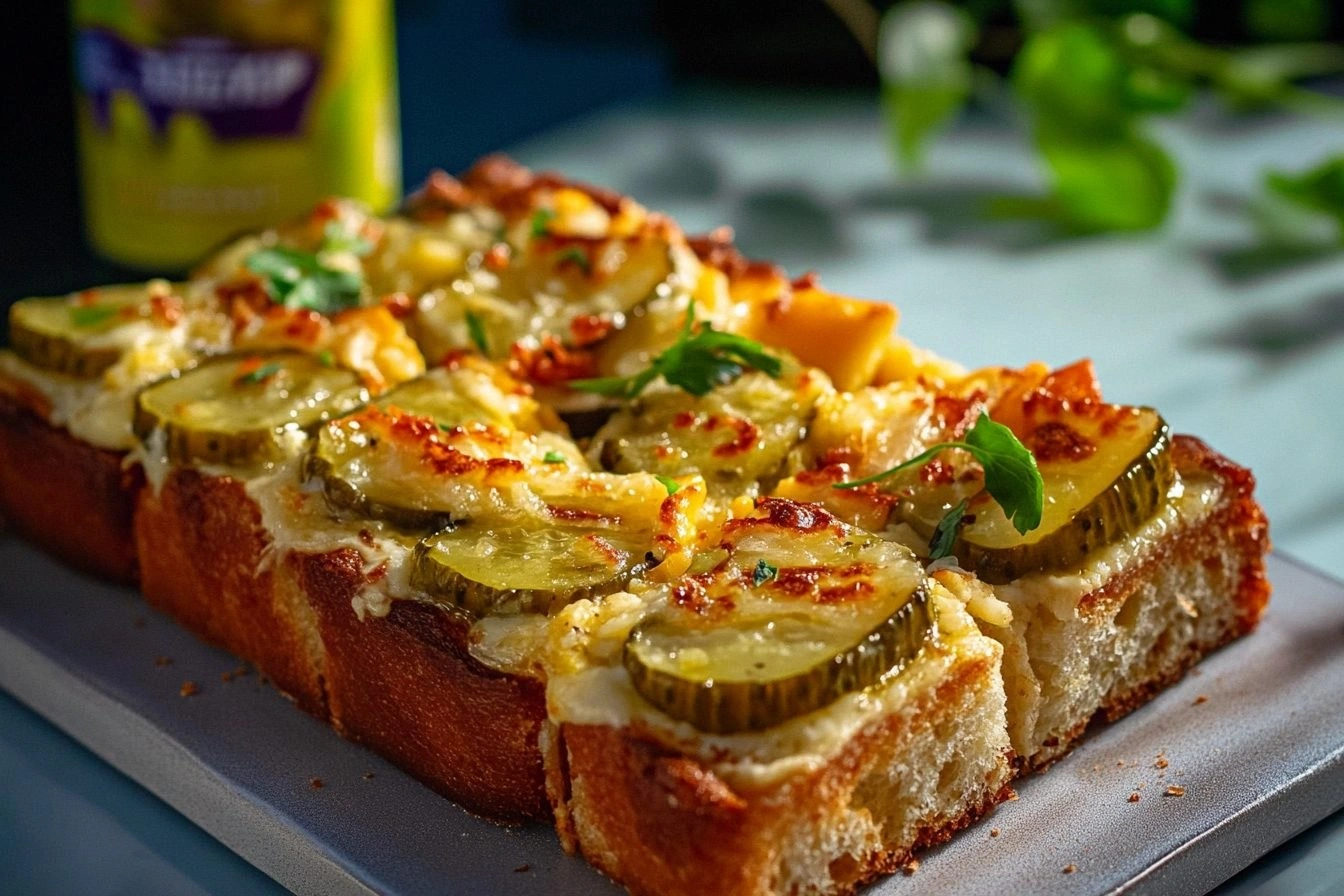
Picture this: you’re halfway through a marathon Netflix binge, the clock reads 2 am, and a sudden, insistent craving for something cheesy, tangy, and downright addictive hits you like a plot twist. I was in that exact spot last week, armed with nothing but a half‑eaten loaf of sourdough, a jar of dill pickles that had been staring at me from the fridge for days, and a questionable amount of shredded cheese that was practically melting in its own bag. I tossed everything together in a pan, and what emerged was a golden, crunchy masterpiece that made my taste buds do a happy dance. I dare you to taste this and not go back for seconds.
The moment the butter hit the hot skillet, you could hear that satisfying sizzle—a sound that promises crispy edges and a buttery aroma that fills the kitchen like a warm hug. As the cheese began to melt, it stretched and oozed, coating each slice of bread like a velvety blanket. The pickles, sliced thin, added a sharp, briny bite that cut through the richness, creating a perfect balance of flavors that made my mouth water before the first bite even arrived. The smell? A heady mix of toasted butter, toasted garlic, and a hint of dill that made my stomach rumble louder than a bass drum.
What makes this version the undisputed champion of cheesy pickle breads? Most recipes either drown the pickles in cheese or forget the crucial step of toasting the buttered bread to a crisp, golden finish. I’ve cracked the code by layering the flavors in the exact order that lets each component shine while still playing nicely together. The secret? A quick dusting of garlic powder that amplifies the cheese’s depth, and a final sprinkle of fresh herbs that adds a pop of color and a whisper of freshness. Most recipes get this completely wrong. Here’s what actually works.
And just when you think you’ve seen it all, I’m going to throw in a technique you probably haven’t tried: a brief flash‑freeze of the sliced pickles in ice water before they hit the pan. This tiny step locks in crunch and prevents them from releasing too much moisture, keeping the bread perfectly crisp. Okay, ready for the game‑changer? Let me walk you through every single step — by the end, you’ll wonder how you ever made it any other way.
What Makes This Version Stand Out
- Flavor Explosion: The tang of dill pickles meets the creamy melt of cheddar‑mozzarella blend, creating a taste that’s both bold and comforting.
- Texture Symphony: A crunchy, buttery crust gives way to a soft, gooey interior—think of it as a culinary orchestra where each bite hits a different note.
- Simplicity at Its Best: With just six pantry staples, you can pull this together in under an hour, no fancy equipment required.
- Unique Ingredient Trick: Flash‑freezing the pickles preserves their snap, preventing soggy bread and delivering a satisfying crunch.
- Crowd‑Pleaser Factor: Even the pickiest eaters can’t resist the melty cheese and the surprise zing of the pickles.
- Ingredient Quality Matters: Using a good‑quality sourdough or soft white loaf ensures the bread soaks up the butter without falling apart.
- Cooking Method Magic: A skillet‑to‑oven finish guarantees an even, golden crust while keeping the interior melt‑in‑your‑mouth.
- Make‑Ahead Potential: Assemble ahead, refrigerate, and bake when ready—perfect for busy weeknights or impromptu gatherings.
Inside the Ingredient List
The Flavor Base
Bread loaf: Choose a soft white or sourdough bread for the perfect base that soaks in flavors without falling apart. The crumb structure of a good loaf acts like a sponge, pulling in butter and cheese while still holding its shape. If you skip this and go for a crusty baguette, you’ll end up with a soggy mess that can’t support the toppings. For the best result, look for a loaf that has a slightly sweet aroma—this will complement the tangy pickles beautifully.
The Tangy Crew
Pickles: Dill or bread‑and‑butter pickles sliced thin add the signature tang and crunch. The acidity cuts through the richness of the cheese, while the crisp texture keeps every bite lively. If you’re feeling adventurous, try a mix of half dill and half sweet pickles for a complex flavor profile. Skipping the pickles entirely turns this dish into just another cheesy toast—hardly worth the effort.
The Melt Factor
Shredded cheese: Cheddar, mozzarella, or a blend offers gooey meltiness and rich flavor. A blend gives you the sharp bite of cheddar with the stretchy pull of mozzarella, creating a luxurious mouthfeel. Using pre‑shredded cheese can add anti‑caking agents that affect melt, so I recommend shredding a block yourself for the purest experience. If you’re dairy‑free, a good meltable vegan cheese works, but expect a slightly different flavor.
The Golden Touch
Butter: Helps toast the bread to golden perfection with a light, crispy crust. The butter’s fat carries the garlic powder and herbs, ensuring every bite is evenly seasoned. Using clarified butter raises the smoke point, giving you a deeper, nutty flavor without burning. Skipping butter means you lose that essential richness and the bread won’t achieve that coveted crunch.
The Secret Spice
Garlic powder: Adds a subtle punch that enhances both cheese and pickle flavors. A pinch is enough to bring warmth without overpowering the delicate tang of the pickles. Fresh garlic can be too harsh in this context, while garlic powder distributes evenly across the surface. If you love garlic, feel free to up the dose, but remember: a little goes a long way.
The Final Flourish
Optional herbs: Fresh parsley or chives for a touch of color and fresh aroma. Herbs brighten the dish, cutting through the richness and adding a pop of green that looks as good as it tastes. If you’re out of fresh herbs, a sprinkle of dried Italian seasoning works in a pinch, but fresh is always best. Skipping herbs isn’t fatal, but you’ll miss that final layer of complexity that makes this recipe unforgettable.
Everything's prepped? Good. Let's get into the real action...
The Method — Step by Step
Preheat your oven to 375°F (190°C). While the oven warms, slice the bread loaf into ¾‑inch thick pieces, making sure each slice is uniform so they cook evenly. This uniformity is crucial; uneven slices lead to burnt edges and soggy centers. Place the slices on a baking sheet lined with parchment paper, and set aside. That sizzle when it hits the pan? Absolute perfection.
In a small saucepan, melt the butter over low heat, adding the garlic powder and a pinch of salt. Stir continuously for about 30 seconds until the butter turns a light golden hue and releases a fragrant, nutty aroma. This is the moment of truth—if the butter browns too quickly, lower the heat; burnt butter will give your bread a bitter aftertaste.
Kitchen Hack: Add a splash of olive oil to the butter; it raises the smoke point and keeps the butter from scorching.Brush each slice of bread generously on both sides with the garlic‑butter mixture. The butter should pool slightly on the surface, ensuring a crisp, golden crust. If you’re using a brush, apply in a sweeping motion to cover the edges as well—those edges are where the magic happens, turning a simple toast into a crunchy masterpiece.
Arrange the buttered slices back onto the parchment‑lined sheet, and pop them into the preheated oven for 5‑7 minutes, just until they start to turn a light amber. Keep a close eye; you want that golden hue, not a burnt disaster. The scent of toasted butter will fill your kitchen, making it impossible to stay away from the oven.
While the bread is toasting, place the sliced pickles in a bowl of ice water for 2‑3 minutes. This quick flash‑freeze locks in their crunch and prevents them from releasing excess moisture later. Drain them thoroughly and pat dry with paper towels. Trust me—this step is the secret weapon that keeps the bread from becoming soggy.
Watch Out: Skipping the ice‑water soak will cause the pickles to release brine, making the bread soggy and the cheese slide off.Remove the bread from the oven and immediately layer each slice with a generous handful of shredded cheese. The heat from the bread will start to melt the cheese, but we’ll give it a proper finish in the oven. Follow each cheese layer with a scattering of the chilled pickle slices, making sure they’re evenly distributed for balanced flavor in every bite.
Return the assembled slices to the oven for an additional 8‑10 minutes, or until the cheese is fully melted, bubbling, and turning a beautiful golden brown. The edges of the bread should pull away from the pan, indicating a perfect crisp. The aroma at this stage is intoxicating—cheese, butter, and a faint hint of dill that will make your stomach growl louder than a thunderstorm.
Kitchen Hack: For an extra cheesy crust, sprinkle a thin layer of grated Parmesan on top during the last 2 minutes of baking.Once the cheese is bubbling and the bread is golden, pull the tray out and immediately sprinkle the optional fresh herbs over the hot slices. The residual heat wilts the herbs just enough to release their aroma without turning them bitter. Let the bread rest for 2‑3 minutes; this allows the cheese to set slightly, making it easier to handle.
Serve the cheesy pickle bread hot, straight from the pan, with a side of extra pickles or a simple mixed green salad if you like. The first bite should deliver a crisp, buttery crunch, followed by a molten cheese cascade and a bright, tangy snap from the pickles. Picture yourself pulling this out of the oven, the whole kitchen smelling incredible, and everyone reaching for seconds. I’ll be honest — I ate half the batch before anyone else got to try it.
That's it — you did it. But hold on, I've got a few more tricks that'll take this to another level...
Insider Tricks for Flawless Results
The Temperature Rule Nobody Follows
Most home cooks set the oven to 350°F and wonder why the cheese never browns. Cranking it up to 375°F gives the cheese a quick caramelization while keeping the bread from drying out. I once tried 400°F and burnt the crust before the cheese melted—lesson learned: keep it at 375°F for that perfect golden‑brown finish.
Why Your Nose Knows Best
Never rely solely on a timer. The moment you smell toasted butter and a faint hint of caramel, you know the bread is ready for the next stage. Trusting your nose saves you from over‑cooking and ensures that each slice reaches that ideal crunch without becoming bitter.
The 5‑Minute Rest That Changes Everything
Letting the assembled bread rest for a few minutes after baking allows the cheese to firm up just enough to hold its shape. Skipping this step results in cheese that slides off the bread like a slippery slope. I once served it immediately and watched the cheese slide onto the plate—embarrassing, but a great learning moment.
Butter‑Brush Mastery
Use a silicone brush for an even coat. If you use a spoon, you’ll get clumps that burn in spots, creating uneven flavor. The brush also lets you get into the corners of each slice, guaranteeing that every bite has that buttery richness.
Pickle Prep Perfection
After the ice‑water soak, pat the pickles dry thoroughly. Any remaining water will steam the bread, making it soggy. A quick roll in a paper towel does the trick. I once skipped this step and ended up with a soggy bottom—never again.
Creative Twists and Variations
This recipe is a playground. Here are some of my favorite ways to switch things up:
Spicy Jalapeño Kick
Swap half the dill pickles for thinly sliced jalapeños and add a pinch of crushed red pepper flakes to the butter. The heat pairs beautifully with the cheese, giving the dish a bold, fiery edge that will wow spice lovers.
Smoky Bacon Bliss
Cook 4 strips of bacon until crisp, crumble them, and sprinkle over the cheese before the final bake. The smoky, salty crunch adds a whole new dimension, turning this into a hearty snack perfect for brunch.
Herb‑Infused Cheese
Mix fresh chives or thyme directly into the shredded cheese before layering. The herbs melt into the cheese, creating pockets of aromatic flavor throughout each bite.
Vegan Version
Replace the dairy cheese with a high‑melting vegan cheese, use plant‑based butter, and choose a sturdy whole‑grain loaf. The result is just as indulgent, and it’s perfect for anyone avoiding animal products.
Sweet‑And‑Savory Twist
Add a thin layer of honey drizzle after baking, and swap dill pickles for sweet bread‑and‑butter pickles. The sweet‑savory combo creates a surprising flavor dance that’s both comforting and novel.
Mini Bites for Parties
Cut the loaf into bite‑size squares before toasting, then follow the same steps. These mini versions are perfect for cocktail parties, allowing guests to grab a quick, flavorful morsel without committing to a full slice.
Storing and Bringing It Back to Life
Fridge Storage
Allow the bread to cool completely, then wrap tightly in foil or place in an airtight container. It will keep fresh for up to 3 days. When ready to eat, reheat in a preheated oven at 350°F for 8‑10 minutes, uncovered.
Freezer Friendly
Freeze the assembled, unbaked slices on a parchment sheet, then transfer to a zip‑top bag. They’ll last up to 2 months. To bake from frozen, add an extra 5‑7 minutes to the baking time.
Best Reheating Method
For ultimate crispness, reheat in a hot skillet with a splash of water—cover for 2 minutes to steam, then uncover to let the crust re‑crisp. The water creates a gentle steam that revives the cheese’s meltiness without making the bread soggy.