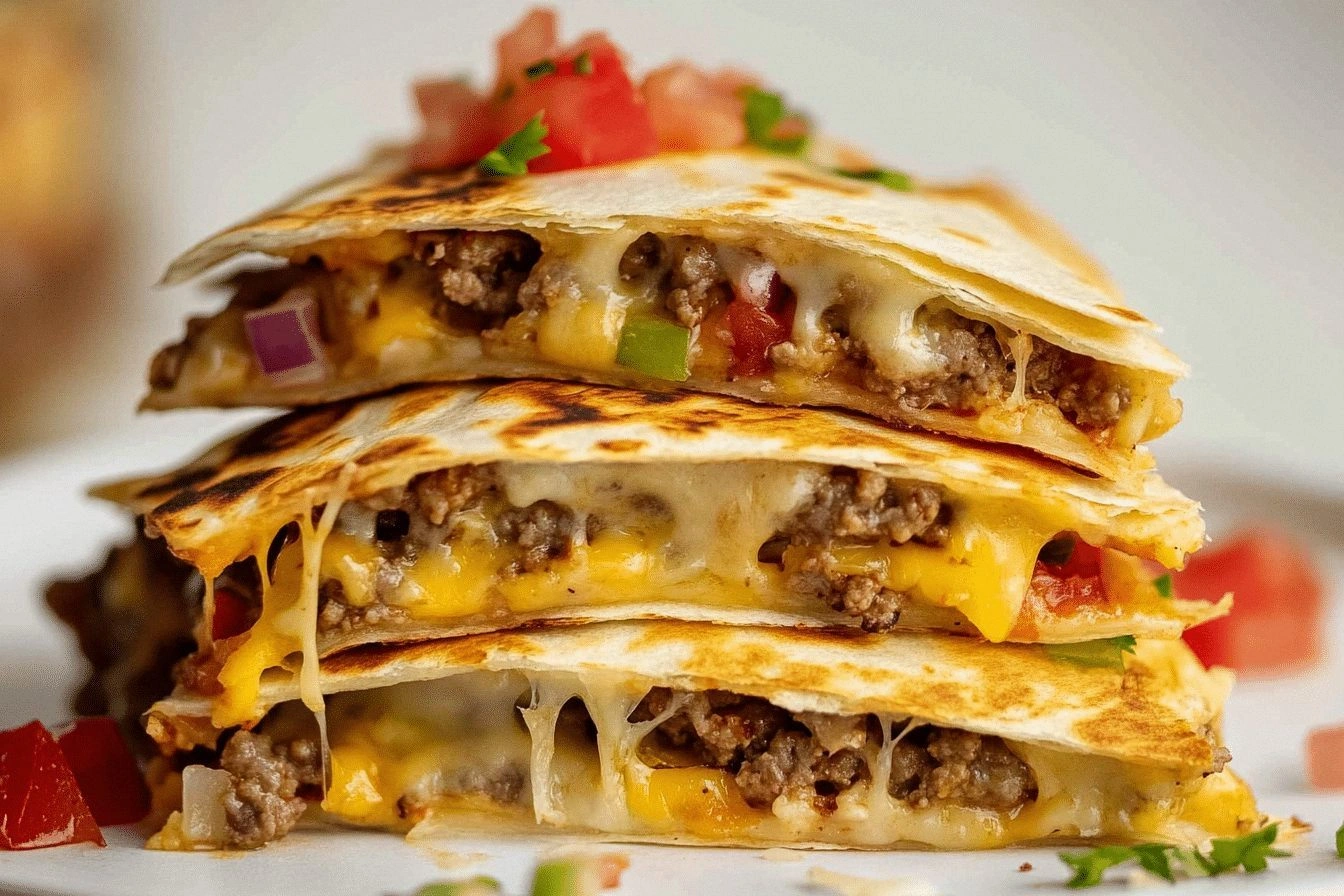
I was standing in my kitchen at 2 a.m., half‑asleep, half‑hangry, when the neon sign of a late‑night drive‑through flickered outside my window. My brain was screaming, “Give me a burger, give me a taco, give me something that can’t decide!” In a moment of reckless genius I grabbed the nearest ground beef, a handful of shredded cheddar, and a stack of flour tortillas, slamming them together in a pan. The result? A glorious mash‑up that tasted like a carnival of comfort foods colliding in the best possible way. I dared myself to call it a quesadilla, but it was so much more—think cheeseburger meets Mexican street‑food, with a crisp that shatters like thin ice.
Picture this: the sizzling sound of beef hitting a hot skillet, the caramelized onions turning a deep amber, the cheese melting into a glossy river that pools in the creases of the tortilla. The aroma wafts through the apartment, a heady mix of savory meat, sweet onion, and buttery dough that makes the whole house feel like a five‑star diner. When you finally pull the golden‑brown masterpiece out of the oven, the whole kitchen is buzzing with that toasty, buttery scent that makes your stomach do somersaults. The first bite is a symphony—crunchy edges that crackle, a juicy, seasoned patty that sings, and a creamy cheese stretch that feels like a warm hug.
Most recipes out there try to shoe‑horn a burger into a tortilla, but they either sog the wrap or leave the meat dry. This version, however, flips the script by baking the assembled quesadilla until the tortilla reaches a perfect, crackly crisp while the interior stays juicy and gooey. I’m not talking about a soggy mess that falls apart the second you lift it; I’m talking about a bite‑size masterpiece that holds together like a well‑engineered sandwich, yet crumbles delightfully at the edges. The secret? A quick sear on the stovetop, followed by a short bake that locks in moisture and creates that irresistible crunch.
And now for the curveball: I’m throwing a dash of smoked paprika into the seasoning blend, a tiny pinch of brown sugar, and a splash of Worcestershire sauce that adds depth you never expected from a quesadilla. This isn’t just a shortcut dinner; it’s a culinary adventure that will make you question why you ever settled for ordinary. I dare you to taste this and not go back for seconds. Let me walk you through every single step — by the end, you’ll wonder how you ever made it any other way.
What Makes This Version Stand Out
- Flavor Explosion: The blend of seasoned beef, caramelized onion, and sharp cheddar creates a layered taste that hits every palate note, from salty to sweet to smoky.
- Texture Triumph: A crisped tortilla edge that shatters like thin ice meets a melt‑in‑your‑mouth interior, delivering crunch and creaminess in perfect harmony.
- Simplicity: Fewer than ten ingredients, one pan, and a quick bake—no fancy equipment, just pure, honest cooking.
- Unique Twist: The smoked‑paprika‑brown‑sugar‑Worcestershire secret adds depth that most “cheeseburger quesadilla” recipes completely miss.
- Crowd‑Pleaser: Kids love the cheesy pull, adults love the gourmet flavor—this dish gets rave reviews from every age group.
- Ingredient Quality: Using fresh, high‑fat ground beef and real sharp cheddar makes the difference between “meh” and “wow”.
- Baking Magic: The final bake locks in juices, creates that coveted crunch, and eliminates sogginess that plagues stovetop‑only attempts.
- Make‑Ahead Friendly: Assemble ahead, freeze, then bake straight from the freezer for a quick weeknight win.
Inside the Ingredient List
The Flavor Base
Ground beef is the heart of this dish, providing protein and a savory backbone that carries every other flavor. I always reach for an 80/20 blend because the fat renders beautifully, keeping the patty juicy and giving the tortilla that rich, buttery finish. Skipping the beef or using a leaner grind will result in a dry interior and a lack of that satisfying mouthfeel. If you’re vegetarian, try a mix of crumbled tempeh and mushrooms; it won’t be identical, but the umami still shines.
The Texture Crew
Flour tortillas are the perfect wrapper: they’re pliable enough to fold, yet sturdy enough to hold up under the oven’s heat. Look for tortillas that are a little thicker (around 6‑mm) for extra crunch; the thin ones tend to tear when you flip them. If you can, give them a quick brush of melted butter before baking—this creates that golden, crackling edge we all crave. A quick tip: store tortillas in a zip‑top bag with a damp paper towel for 10 minutes before using; they’ll be supple and less likely to crack.
The Unexpected Star
Cheddar cheese isn’t just a melty filler; it adds a sharp, tangy bite that cuts through the richness of the beef. Opt for a sharp or extra‑sharp cheddar for maximum flavor impact—mild cheddar will melt, but it won’t give you that punch. If you’re feeling adventurous, blend half cheddar with a bit of pepper jack for a subtle heat that dances on the tongue. Remember, cheese that’s pre‑shredded often contains anti‑caking agents that can affect melt; grate your own for the smoothest stretch.
The Final Flourish
Seasoning is the silent hero that elevates this dish from good to unforgettable. A blend of salt, black pepper, smoked paprika, a pinch of brown sugar, and Worcestershire sauce creates a sweet‑smoky‑savory profile that mirrors a classic cheeseburger. If you love heat, add a pinch of cayenne or a dash of hot sauce; if you prefer a herbaceous note, throw in dried oregano or thyme. The key is to season the beef while it’s browning, allowing the spices to toast and release their aromatics.
Optional toppings—lettuce, tomatoes, pickles, jalapeños—are the finishing touches that add crunch, acidity, and a burst of freshness. They’re not required for the core flavor, but they transform the quesadilla into a full‑on burger experience. When adding them, do it after the bake so the veggies stay crisp and don’t wilt under the heat. And yes, you can drizzle a little mayo or a quick chipotle aioli for an extra layer of decadence.
Everything's prepped? Good. Let's get into the real action...
The Method — Step by Step
Preheat your oven to 425°F (220°C). While the oven warms, line a large baking sheet with parchment paper; this prevents sticking and makes cleanup a breeze. I like to set a timer for the preheat so I don’t waste any precious minutes—this is the moment of truth where the kitchen starts to smell like a promise.
Heat a large cast‑iron skillet over medium‑high heat and add a tablespoon of olive oil. Toss in the diced onion and sauté until it turns a translucent gold, about 3‑4 minutes. The sizzle when it hits the pan? Absolute perfection. Add the ground beef, breaking it up with a wooden spoon, and let it brown without stirring for the first two minutes—this develops a beautiful crust.
Once the beef is nicely browned, sprinkle the seasoning blend (2 tsp salt, 1 tsp pepper, 1 tsp smoked paprika, ½ tsp brown sugar, 1 tsp Worcestershire sauce) over the meat. Stir thoroughly, letting the spices toast for another minute; you’ll notice a fragrant cloud rise—your nose knows best.
When the meat is fully cooked (no pink remaining), turn off the heat and let the mixture rest for two minutes. This pause allows the juices to redistribute, preventing a dry bite later. If you’re feeling daring, stir in a handful of chopped fresh cilantro for a bright pop.
Lay out four large flour tortillas on a clean surface. Evenly distribute the beef mixture across the center of each tortilla, spreading it to a ½‑inch thickness. Sprinkle a generous handful of shredded cheddar over the meat, then fold the tortilla in half, pressing gently to seal the edges.
Brush the top side of each folded quesadilla with melted butter or a light drizzle of olive oil. This will give you that coveted golden‑brown sheen once baked. Place the quesadillas on the prepared baking sheet, spacing them a couple of inches apart.
Slide the sheet into the preheated oven and bake for 8‑10 minutes, or until the tortillas are puffed, golden, and the cheese is bubbling. Halfway through, rotate the sheet for even browning. When you pull them out, the edges should pull away from the pan, signaling that perfect crunch.
Let the quesadillas rest for two minutes before slicing—this short rest keeps the cheese from oozing everywhere. Slice each into three wedges, drizzle with a quick chipotle mayo if you like, and top with optional lettuce, tomato, pickles, or jalapeños. Serve immediately while the crust is still singing.
That's it — you did it. But hold on, I've got a few more tricks that'll take this to another level...
Insider Tricks for Flawless Results
The Temperature Rule Nobody Follows
Most home cooks set the oven to “bake” and forget about the power of high heat. Cranking the oven to 425°F creates a rapid steam burst inside the tortilla, which puffs it up and locks in moisture. If you lower the temperature, you’ll end up with a limp, soggy wrap. Trust me, I tried 375°F once—my quesadilla resembled a sad pancake. Keep that heat high and you’ll get that restaurant‑grade crunch.
Why Your Nose Knows Best
When the cheese starts to bubble and turn a light amber, that’s your cue to check the edges. The moment you smell a nutty, toasted aroma, the quesadilla is ready to come out. Relying on a timer alone can lead to over‑cooking; your nose is a more precise instrument. I’ve found that the scent of caramelized onions mixing with melted cheddar is the ultimate green light.
The 5‑Minute Rest That Changes Everything
After the bake, let the quesadillas sit for exactly five minutes. This short rest lets the cheese set slightly, making the wedges easier to cut and preventing the filling from spilling out. It also allows the steam inside to redistribute, keeping the interior moist while the exterior stays crisp. Skipping this step is a rookie mistake; you’ll end up with a mess on your plate and a frustrated appetite.
Butter Brush vs. Oil Spray
I used to spray the tortillas with cooking oil, but the butter brush gives a richer flavor and a deeper golden color. The milk solids in butter caramelize, adding a subtle nutty note that oil can’t replicate. If you’re watching calories, a light mist of olive oil works, but don’t expect the same depth of flavor. This is a tiny tweak that makes a massive difference in taste perception.
Freezing for Future Feasts
Assemble the quesadillas, wrap each tightly in foil, and freeze them raw. When you’re ready, bake them straight from the freezer at 425°F for 12‑14 minutes. The result is just as crisp as fresh‑made, and you’ll have a quick dinner solution that feels like a treat. This method also prevents the dreaded “cheese separates” problem because the cheese stays locked in during the freeze‑bake cycle.
Creative Twists and Variations
This recipe is a playground. Here are some of my favorite ways to switch things up:
Southwest Sunrise
Swap cheddar for pepper jack, add black beans and corn to the beef mixture, and finish with a drizzle of avocado crema. The result is a bright, zesty bite that feels like a sunrise over the desert. Perfect for brunch or a lazy weekend lunch.
BBQ Bacon Blast
Stir a tablespoon of BBQ sauce into the cooked beef, crumble cooked bacon on top, and use smoked gouda instead of cheddar. The smoky, sweet, and salty combo will have your guests asking for the recipe before the first bite is even finished.
Mediterranean Magic
Replace the ground beef with ground lamb, add a pinch of cinnamon and cumin, and sprinkle crumbled feta instead of cheddar. Top with a spoonful of tzatziki after baking for a cool, creamy contrast. This version transports you straight to a sun‑kissed Greek taverna.
Spicy Jalapeño Pop
Dice fresh jalapeños into the onion‑beef sauté, and mix in a spoonful of chipotle in adobo sauce. Use a blend of Monterey Jack and cheddar for extra melt. Serve with a side of cool sour cream to balance the heat.
Breakfast Bonanza
Swap the beef for scrambled eggs and breakfast sausage, add a dash of hot sauce, and use a sharp cheddar‑cheddar blend. Top with a spoonful of salsa and a sprinkle of green onions. This turns the dish into a hearty, all‑day breakfast that still satisfies that burger craving.
Storing and Bringing It Back to Life
Fridge Storage
Allow the quesadillas to cool completely, then wrap each tightly in plastic wrap and store in an airtight container. They’ll stay fresh for up to three days. When you’re ready to eat, reheat in a preheated 375°F oven for 8‑10 minutes; the crust will regain its crispness.
Freezer Friendly
As mentioned earlier, assemble the quesadillas, wrap each in foil, then place them in a zip‑top freezer bag. They’ll keep for up to two months. To reheat, bake straight from frozen at 425°F for 12‑14 minutes, or thaw overnight in the fridge and bake for 8‑10 minutes.
Best Reheating Method
The oven is your best friend for reheating—avoid microwaves, which make the tortilla rubbery. For an extra‑crisp finish, spray a light mist of water on the tortilla before reheating; the steam helps the interior stay moist while the exterior crisps up again. A quick tip: if you’re in a hurry, a hot skillet with a thin layer of butter for 2‑3 minutes per side works wonders too.