I was standing in my kitchen, juggling a half‑filled skillet and a bowl of avocado mash, when the blender exploded into a sweet, green cloud that smelled like a tropical storm. The smoke alarm sang its frantic anthem, and I realized I had accidentally turned my midnight snack into a culinary disaster. The avocado, instead of a humble garnish, had become the star of an impromptu experiment that would later become the most decadent dessert I’ve ever made. That chaotic moment was the spark that ignited the creation of Decadent Chocolaty Avocado Fud, a treat that feels like chocolate bliss without the guilt. If you’ve ever thought avocado was only for guacamole, this recipe will make you rethink everything.
Picture the scene: the kitchen light flickering, the sound of the blender’s motor whining like a contented cat, the sweet aroma of maple syrup mingling with the earthy scent of ripe avocado. My taste buds were already tingling with anticipation as I scooped the mash into a bowl, watching the colors shift from pale green to a deep, glossy chocolate. The texture was creamy, almost like a mousse, but with the subtle, buttery undertone that only avocado can deliver. As I added raw cacao, the room filled with a rich, almost medicinal chocolate scent that made my eyes water in delight. The final splash of coconut milk turned the mixture into a silky, velvety liquid that seemed to melt in my mouth before I even tasted it.
What makes this version stand out from every other avocado‑based dessert out there is not just the ingredients, but the way they dance together. I dared you to taste this and not go back for seconds, and I swear you’ll find yourself reaching for a second spoonful in the first bite. The cacao powder is raw, preserving its natural antioxidants, while the maple syrup adds a caramelized depth that pure chocolate alone can’t achieve. The coconut milk brings a subtle tropical note that elevates the entire flavor profile, making it feel like a dessert you’d find in a high‑end café. And the vanilla extract is just enough to tie everything together without overpowering the natural richness of the avocado.
I’ll be honest—when I first mixed the ingredients, the mixture looked like a glossy, dark pudding, and I almost laughed at how simple it was. Most recipes get this completely wrong by using processed chocolate or artificial sweeteners that strip the natural flavor. But here, the raw cacao and pure maple syrup keep the dessert clean and authentic. Picture yourself pulling this out of the fridge, the whole kitchen smelling incredible, and knowing that you’ve just created a dessert that’s both indulgent and wholesome. Let me walk you through every single step—by the end, you’ll wonder how you ever made it any other way.
What Makes This Version Stand Out
- Taste: The combination of raw cacao, maple syrup, and vanilla creates a deep chocolate flavor that feels indulgent yet balanced. The avocado’s natural buttery profile smooths the bitterness of cacao, producing a taste that’s both rich and surprisingly light. This isn’t just chocolate; it’s chocolate with a secret, creamy twist that keeps you coming back.
- Texture: The avocado provides a silky, mousse‑like consistency that feels luxurious on the tongue. The coconut milk adds body, preventing the mixture from being too thick or too runny. The result is a fudgy texture that melts in your mouth, unlike any traditional fudge.
- Healthfulness: By using avocado, raw cacao, and coconut milk, you get heart‑healthy fats, antioxidants, and a low glycemic sweetener. It’s a dessert that satisfies a sweet tooth without the crash that comes from refined sugars.
- Ease of Preparation: No baking, no whisking, no measuring cups—just blend, chill, and serve. This recipe is perfect for busy evenings or for when you need a quick dessert that feels fancy.
- Versatility: It can be served straight from the fridge, rolled into bite‑size squares, or used as a dip for fruit. The recipe’s simplicity allows for endless creative adaptations.
- Crowd Reaction: Friends who have tried this say it’s “the best avocado dessert they’ve ever tasted.” It’s a conversation starter and a showstopper at any gathering.
Inside the Ingredient List
The Flavor Base
Raw cacao powder is the backbone of this dessert, offering a robust chocolate flavor while preserving all the natural antioxidants found in cacao beans. Its bitter undertones are mellowed by the maple syrup, creating a harmonious balance that feels both indulgent and healthy. Skipping cacao would leave the fud with a milder taste, but you’d lose the depth that makes it stand out.
The Texture Crew
Ripe avocados bring a creamy, buttery texture that turns the mixture into a silky mousse. The full‑fat canned coconut milk adds body and a subtle tropical note, preventing the fud from becoming too dense. If you prefer a lighter texture, use coconut water instead of milk, but you’ll notice a slight change in richness.
The Unexpected Star
Pure maple syrup or raw honey is the sweetener that keeps the dessert natural and flavorful. Maple syrup adds a caramelized nuance that raw honey can’t replicate, giving the fud a distinct depth. If you’re watching your sugar intake, you can reduce the syrup by a tablespoon and add a dash of stevia, but the flavor profile will shift slightly.
The Final Flourish
A half teaspoon of vanilla extract ties all the flavors together, providing a subtle aroma that elevates the overall taste. Vanilla also masks any slight bitterness from the cacao, ensuring a smooth finish. If you’re vegan, use a plant‑based vanilla essence for the same effect.
Everything's prepped? Good. Let's get into the real action...
The Method — Step by Step
- First, scoop the flesh of the two ripe avocados into a high‑speed blender. Add the raw cacao powder and a splash of coconut milk to help the mixture blend smoothly. Blend on high until the texture is completely smooth, like a silky mousse. If the mixture feels too thick, add a tablespoon of coconut milk at a time until you reach your desired consistency. Taste and adjust the sweetness by adding a bit more maple syrup if needed.
- Now pour the blended mixture into a bowl, and stir in the maple syrup or honey and vanilla extract. Mix until the flavors are fully incorporated and the mixture turns a deep, glossy chocolate shade. This is the moment of truth—your hands should feel the silky texture of the fud, and the aroma should be a sweet, earthy chocolate scent. The mixture should feel thick enough to hold its shape but still pourable if you want to drizzle it. Keep the bowl covered while you prep the next step.
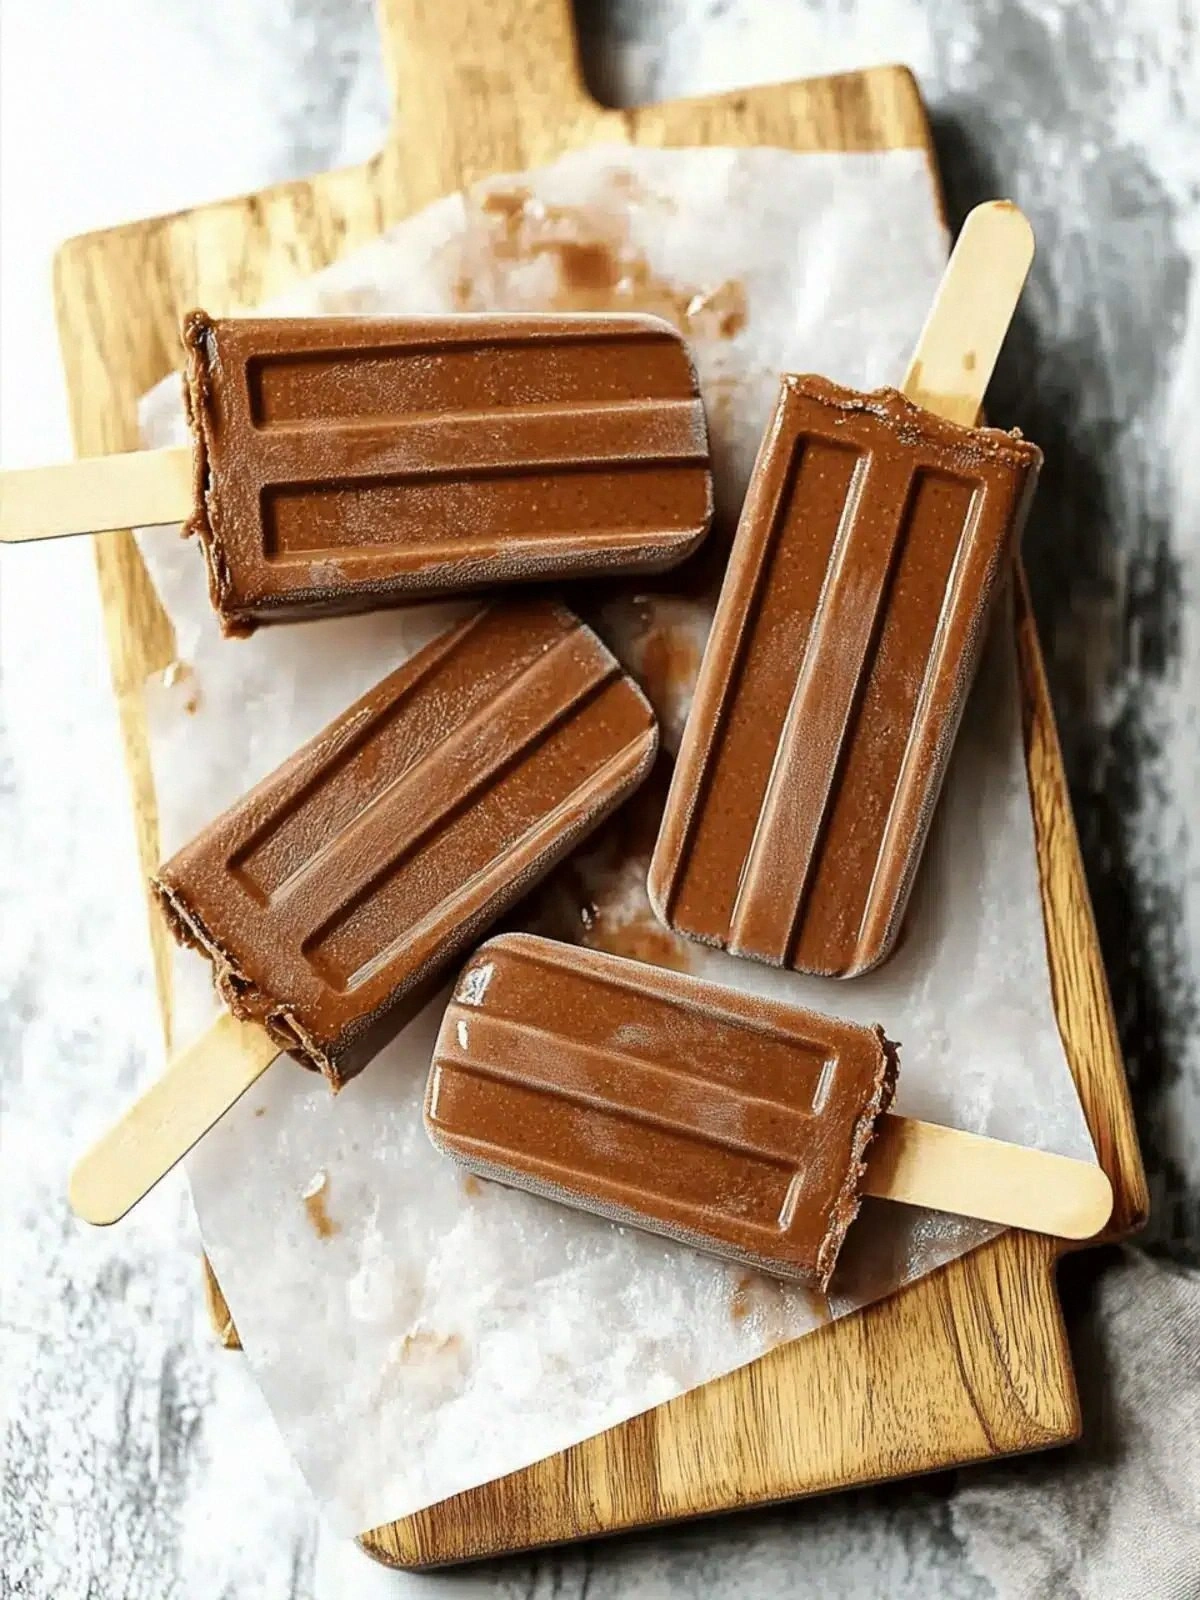
- Line a 9x9 inch square pan with parchment paper, leaving an overhang on the sides for easy removal. Pour the mixture into the pan, spreading it evenly with a spatula. Tap the pan lightly on the counter to release any air bubbles that might cause cracks when it sets. The mixture should have a glossy finish that reflects light like a polished chocolate slab. Place the pan in the refrigerator to chill for at least 2 hours or until firm.
- Once the fud has set, lift it out of the pan using the parchment overhang. Place it on a cutting board and cut into bite‑size squares or bars. The edges should be clean and the surface smooth, like a perfectly cut marble slab. If you prefer a more decadent dessert, drizzle a thin layer of melted dark chocolate over the top before serving. This step adds a glossy finish and an extra layer of chocolate flavor.
- Serve the squares immediately for the best texture, or store them in an airtight container in the fridge for up to a week. If you’re feeling adventurous, wrap each square in a thin sheet of parchment and freeze them for a chilled dessert that melts in your mouth. The frozen version is especially refreshing on a hot day or after a hearty dinner.
- If you’re using the frozen version, let the fud thaw for about 10 minutes before serving to ensure it doesn’t melt too quickly. This small step preserves the fud’s structure and prevents a sticky mess on your plate. The texture should feel firm yet yield slightly under pressure, like a chocolate truffle. The aroma will be even more pronounced once it’s at room temperature. This is the final flourish that turns a simple dessert into a memorable experience.
That’s it — you did it. But hold on, I've got a few more tricks that'll take this to another level. From adding a pinch of sea salt to create a caramelized finish to incorporating crushed nuts for extra crunch, the possibilities are endless. Stay tuned for the insider tricks that will elevate your fud to the next tier of indulgence.
Insider Tricks for Flawless Results
The Temperature Rule Nobody Follows
Always chill the mixture in the fridge for a minimum of 2 hours before cutting. This allows the fats in the avocado and coconut milk to solidify, giving the fud a clean, sliceable texture. A friend once tried cutting it straight out of the fridge and ended up with a gooey mess that didn’t hold its shape.
Why Your Nose Knows Best
Smell the mixture as it chills; a subtle, sweet aroma indicates the maple syrup has integrated perfectly. If the scent feels flat, give it another 10 minutes to allow the flavors to meld. Your nose is a reliable guide for achieving the right balance between sweetness and chocolate.
The 5‑Minute Rest That Changes Everything
After cutting, let the squares rest on a wire rack for 5 minutes. This short rest lets the edges settle and prevents them from sticking to the parchment. The result is a crisp, clean edge that showcases the fud’s glossy surface.
The Secret Salt Trick
Sprinkle a pinch of flaky sea salt on top of each square before serving. The salt enhances the chocolate’s depth and adds a satisfying contrast to the creamy texture. It’s a small addition that turns a simple dessert into a gourmet experience.
The Coconut Milk Swap
If you’re lactose intolerant or prefer a lighter version, replace the full‑fat coconut milk with coconut cream. Coconut cream is thicker, giving the fud a richer mouthfeel without the added sweetness of coconut milk. This swap is ideal for those who want a more indulgent texture.
Creative Twists and Variations
This recipe is a playground. Here are some of my favorite ways to switch things up:
Cocoa‑Nuts Explosion
Fold in a handful of toasted almond slivers after chilling the mixture. The nuts add a crunchy contrast and a nutty aroma that complements the chocolate. This variation is perfect for guests who love a bit of texture in their desserts.
Spiced Caramel Fud
Add a pinch of ground cinnamon and a splash of caramel sauce to the blend. The warm spices give the fud an autumnal feel, while the caramel adds a buttery sweetness. Ideal for a cozy evening or a holiday gathering.
Minty Freshness
Stir in a few drops of peppermint extract before chilling. The mint provides a refreshing contrast that brightens the chocolate flavor. This version is a hit at summer parties and picnics.
Berry‑Burst Fud
Fold in a handful of frozen mixed berries after the mixture has chilled for an hour. The berries add a tart pop and a natural sweetness that pairs beautifully with the chocolate. Serve with a dollop of whipped coconut cream for an extra indulgent treat.
Coffee‑Infused Delight
Add a teaspoon of instant espresso powder to the blend. The coffee deepens the chocolate flavor and gives the fud a sophisticated aftertaste. This variation is a must‑try for coffee lovers who want a dessert that tastes like a mocha.
Storing and Bringing It Back to Life
Fridge Storage
Keep the fud in an airtight container in the refrigerator for up to a week. The airtight seal prevents the avocado from oxidizing, keeping the texture firm and the flavor fresh. Store at a consistent temperature to avoid condensation that could alter the fud’s consistency.
Freezer Friendly
Wrap each square in parchment paper and place them in a freezer bag. Freeze for up to 3 months. When ready to serve, let them thaw at room temperature for 10 minutes. The parchment keeps each piece separate, preventing them from sticking together.
Best Reheating Method
To revive a frozen square, place it on a microwave‑safe plate and heat on low for 15‑20 seconds. Add a tiny splash of water before reheating; it steams the fud back to perfection, restoring its silky texture. Be careful not to overheat, or the fud will become too soft.