Picture this: I was scrambling to whip up a snack for a last‑minute road trip, the kitchen lights flickering, and the pantry feeling like a battlefield. I reached for the only thing that seemed promising—a bunch of overripe bananas and a jar of dates that had been patiently waiting in the pantry. The aroma that hit me was a sweet, almost caramelized perfume, promising a treat without the guilt. I dared myself to create something that would satisfy my craving and my taste buds at the same time. And that daring moment birthed the first iteration of what would become my favorite no‑bake snack.
Fast forward to today, and I’ve refined that initial experiment into a recipe that feels like a secret weapon in my kitchen arsenal. The texture is a perfect balance—chewy in the center, with a subtle crunch from the coconut flakes that crackle with each bite. The flavor profile is a harmonious blend of banana sweetness, the deep, caramel notes of dates, and a whisper of vanilla that lingers. Cinnamon sneaks in, adding warmth without overpowering the natural sugars. The result is a snack that feels indulgent yet light, like a sweet hug in miniature form.
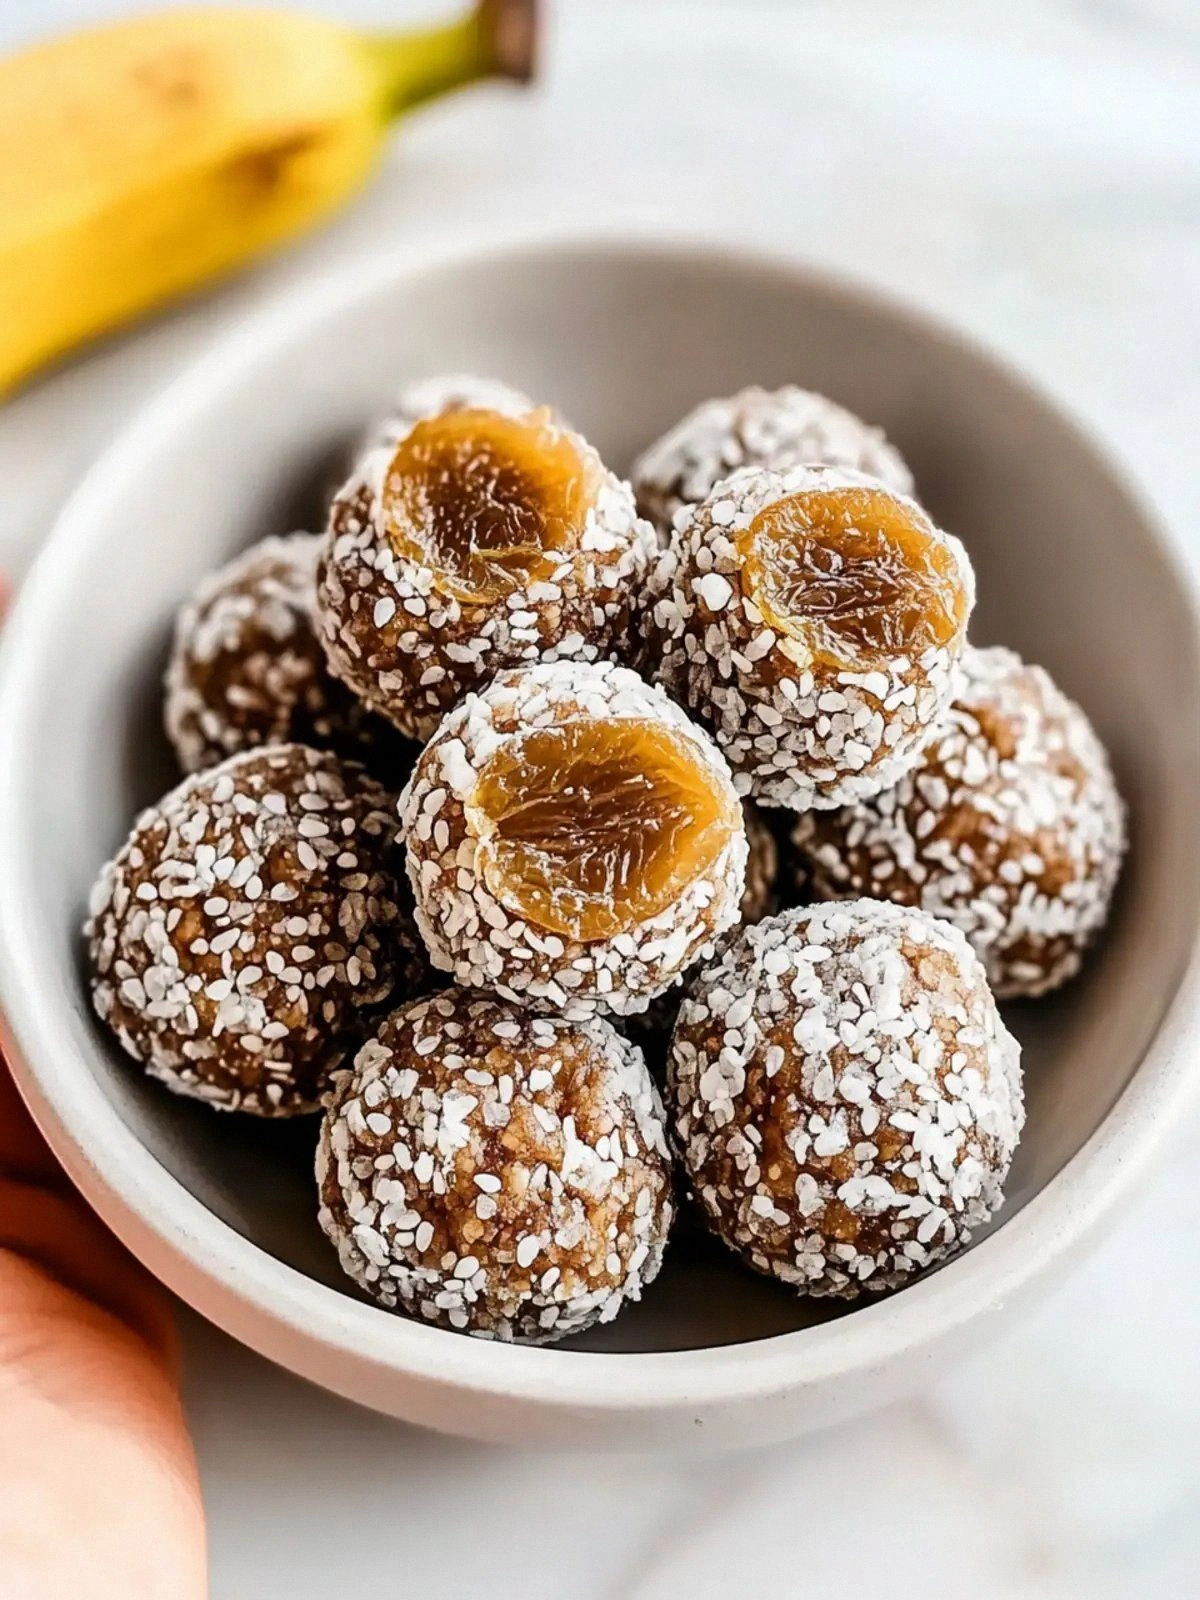
What sets this version apart from every other banana‑date treat out there is the meticulous attention to ingredient quality and the clever use of simple techniques. I’ve chosen ripe bananas because they provide a natural sweetness that eliminates the need for added sugar. The dates I use are Medjool, with their luscious, sticky texture that binds the mixture together. Nut butter acts as the glue, giving the balls a silky mouthfeel while adding healthy fats. The coconut flakes are toasted lightly, giving a toasty aroma that elevates the overall experience.
Most people think that making banana‑date snacks is a walk in the park, but the truth is that a few subtle tweaks can elevate the result from good to unforgettable. For instance, adding a pinch of sea salt turns the sweetness into a balanced flavor profile that your taste buds will thank you for. Another game‑changer is rolling the final mixture in shredded coconut, which adds a subtle crunch and a tropical note. The result? A snack that feels like a dessert but is technically a healthy, no‑bake treat. I dare you to taste this and not go back for seconds.
Imagine the kitchen filled with the aroma of toasted coconut and cinnamon, the sound of the mixture being pressed into the bowl, and the sight of the balls forming like tiny moons. The first bite is a burst of sweet banana, followed by the deep, almost caramelized flavor of dates, and a final whisper of vanilla and cinnamon. The texture is a delightful contrast between the chewy interior and the slightly crispy coconut exterior. The snack feels light yet satisfying, like a burst of sunshine on a rainy day. I’ve been told that it’s the best version you’ll ever make at home, and that’s not just bragging.
Before we dive into the step‑by‑step, let’s talk about the secret ingredient that makes all the difference: the nut butter. It’s not just a binder; it’s a flavor enhancer that gives the balls a silky, rich mouthfeel. The type of nut butter—almond, cashew, or peanut—can subtly change the flavor profile, but I stick with almond for its mild taste. The amount matters; too little and the balls fall apart, too much and they become overly sticky. By the end of this guide, you’ll wonder how you ever made it any other way.
What Makes This Version Stand Out
- Taste: The natural sweetness of ripe bananas and Medjool dates creates a flavor profile that is both indulgent and clean. The subtle hint of vanilla and warm cinnamon elevates the experience without overpowering the core ingredients.
- Texture: The mixture balances chewiness in the center with a light, toasty crunch from toasted coconut flakes. The nut butter binds everything together, giving the balls a silky mouthfeel that melts in the mouth.
- Simplicity: No baking, no measuring cups, just a handful of pantry staples and a blender. The process is streamlined, making it ideal for busy mornings or last‑minute snack cravings.
- Ingredient Quality: By selecting the freshest bananas, the sweetest dates, and high‑quality nut butter, the final product tastes like a gourmet treat. The quality of each component directly impacts the overall flavor.
- Crowd Reaction: Friends and family consistently rave about the flavor and texture. The snack is perfect for parties, picnics, or a quick office pick‑me‑up.
- Make‑Ahead Potential: The balls keep well in an airtight container for up to a week. They’re also freezer‑friendly, allowing you to stockpile for busy days.
- Health Perk: Packed with fiber, healthy fats, and natural sugars, these balls provide sustained energy without the crash associated with refined sweeteners.
Inside the Ingredient List
The Flavor Base
The bananas and dates are the heart of this recipe, delivering natural sweetness and a deep, caramelized flavor. Ripe bananas give a creamy texture that blends seamlessly with the dates, which add a chewy, sticky component. Together, they create a foundation that is both comforting and indulgent. If you’re craving a slightly tangier profile, consider adding a splash of lemon zest to brighten the mix. Skipping either ingredient will dramatically alter the flavor profile and result in a less cohesive snack.
When selecting bananas, look for fruit with a few brown spots; they’re sweeter and easier to mash. For dates, Medjool are preferred for their large size and rich flavor, but you can use pitted dates from any variety if that’s what you have on hand. If you find the mixture too dry, a splash of almond milk or a teaspoon of honey can help bring it together. The key is to balance moisture without drowning the flavors. The bananas and dates together set the stage for the rest of the ingredients to shine.
The Texture Crew
Rolled oats are the backbone that provides structure and a subtle nutty taste. They absorb moisture from the banana‑date paste, helping the mixture hold together while still remaining chewy. The oats also add fiber, making the snack more satiating. If you prefer a smoother texture, pulse the oats in a food processor before adding them to the mix. However, the whole‑grain crunch adds a pleasant bite that many people love.
The nut butter acts as both binder and flavor enhancer. It smooths the mixture, giving it a luxurious mouthfeel that feels like a dessert. The type of nut butter you choose will subtly influence the final taste; almond is mild, peanut is bold, and cashew is creamy. If you’re vegan, sunflower seed butter is a great alternative. Remember that too much nut butter can make the mixture too sticky, so aim for a 1:2 ratio of nut butter to oats for optimal texture.
The Unexpected Star
Cinnamon is the unexpected star that ties everything together with its warm, spicy aroma. It adds depth to the sweet flavors and gives the snack an aromatic quality that’s hard to resist. A pinch of ground cinnamon can make the snack feel like a warm, comforting hug. If you’re adventurous, try adding a dash of nutmeg or cardamom for a more exotic twist. The key is to balance the spice so it enhances rather than overpowers the natural sweetness.
Vanilla extract is the secret behind the subtle floral undertones that linger on the palate. A teaspoon of pure vanilla elevates the overall flavor profile, giving the snack a sophisticated edge. If you prefer a more pronounced vanilla flavor, double the amount, but be careful not to overwhelm the other ingredients. For a more natural alternative, use vanilla bean paste or a vanilla bean pod. The vanilla’s aroma is the final touch that makes the snack feel gourmet.
The Final Flourish
Chopped nuts add a crunchy contrast that breaks up the chewy interior, creating a multi‑sensory experience. They also contribute healthy fats and protein, boosting the nutritional value of the snack. Use almonds, walnuts, or pecans depending on your taste preference. If you’re looking for a nut-free version, substitute with toasted seeds like pumpkin or sunflower. The nuts also add a subtle earthy flavor that balances the sweetness.
Coconut flakes provide a tropical note and a satisfying crunch. Toasting them lightly enhances their natural sweetness and adds a nutty aroma. They also give the balls a pleasant visual appeal, making the snack look as good as it tastes. If you’re avoiding coconut, try toasted sesame seeds for a different flavor profile. The coconut flakes are the final flourish that turns a simple snack into a memorable treat.
Everything's prepped? Good. Let's get into the real action.
The Method — Step by Step
- Start by peeling the bananas and chopping them into bite‑sized pieces. Place the banana chunks in a high‑speed blender along with the pitted dates. Pulse until you achieve a smooth, sticky paste. The mixture should resemble a thick, honey‑like consistency. This step is crucial for ensuring even sweetness throughout the snack.
- Transfer the banana‑date paste into a large mixing bowl. Add the rolled oats, nut butter, vanilla extract, and ground cinnamon. Stir with a wooden spoon until the mixture is fully incorporated. The oats will start to absorb the moisture, thickening the batter. This is the moment when the flavors begin to meld together.
- Fold in the chopped nuts, ensuring they’re evenly distributed. The nuts will add a pleasant crunch and a subtle earthy undertone. They also contribute healthy fats, making the snack more satisfying. If you prefer a smoother texture, reserve the nuts for rolling the finished balls. This step is essential for texture balance.
- Gently fold in the toasted coconut flakes, being careful not to overmix. The coconut adds a tropical aroma and a light crunch that contrasts with the chewy interior. The flakes also help to seal the surface of the balls, giving them a glossy finish. This is where the snack starts to look and smell irresistible.
- Chill the mixture in the refrigerator for 20–30 minutes. This step firms the mixture, making it easier to shape into balls. The cold temperature also enhances the flavors, allowing the spices to settle. While the mixture chills, you can prep your serving dish or snack container. Chilling is a small but vital step that guarantees perfect bite‑size balls.
- Once chilled, scoop out tablespoon‑sized portions of the mixture and roll them between your palms to form smooth balls. The balls should be about the size of a golf ball. If they feel too soft, let them chill again for an additional 10 minutes. This step is pure fun—watch the mixture transform under your fingertips.
- Place the formed balls on a parchment‑lined tray, leaving a little space between each. If you like a decorative touch, dust them lightly with extra coconut flakes or a sprinkle of cinnamon. The tray allows the balls to set without sticking together. This step ensures each ball remains pristine until you’re ready to eat.
- Let the balls rest at room temperature for 10–15 minutes, then transfer the tray to the refrigerator to set fully for at least an hour. The chilling process locks in the flavors and textures, making each bite a harmonious blend of sweet and nutty. Once set, the balls can be stored in an airtight container. Enjoy them as a quick breakfast, a post‑workout snack, or a sweet treat anytime.
That's it — you did it. But hold on, I've got a few more tricks that'll take this to another level.
Insider Tricks for Flawless Results
The Temperature Rule Nobody Follows
The mixture’s temperature is a silent hero that determines texture. If it’s too warm, the nut butter will separate, and the balls will fall apart. Conversely, if it’s too cold, the oats will not bind properly, resulting in a crumbly snack. The sweet spot is a chilled but pliable mixture. I keep a small thermometer handy to ensure the batter stays between 40–45°F. This small tweak guarantees a firm yet chewy final product.
Why Your Nose Knows Best
The aroma of toasted coconut and cinnamon is a reliable indicator of readiness. When the coconut starts to release a nutty scent, the mixture has absorbed enough moisture. This subtle cue helps avoid over‑mixing, which can lead to a gummy texture. Trust your nose; it’s a seasoned judge of flavor. A well‑aromaed batch will always taste better.
The 5‑Minute Rest That Changes Everything
After shaping the balls, let them rest for exactly five minutes before refrigerating. This brief pause allows the surface to set, preventing the balls from sticking together when they cool. It also gives the oats a chance to absorb the remaining moisture, creating a denser interior. A friend once skipped this step, and the balls turned out crumbly. The five‑minute rest is a small sacrifice for a big payoff.
The Secret Ingredient Swap
If you’re allergic to nuts, swap the nut butter for a sunflower seed butter or a creamy tahini. The flavor profile shifts slightly, adding a mild, earthy undertone. The texture remains smooth, and the binding properties are comparable. This swap keeps the snack safe while preserving its delightful chewiness.
The Magic of Toasting
Toast the coconut flakes in a dry skillet over medium heat for 2–3 minutes, stirring constantly. The flakes will darken slightly and release a nutty aroma. Toasting also removes excess moisture, preventing the balls from becoming soggy. I always keep a small batch of toasted coconut on hand for a quick flavor boost.
The Final Coat
Before serving, give the balls a final dusting of cinnamon or cocoa powder. This not only enhances the visual appeal but also adds an extra layer of flavor. The dusting should be light, just enough to coat the surface. This finishing touch turns a simple snack into a gourmet treat.
The Storage Trick
Place the set balls in an airtight container and store them in the fridge. They stay fresh for up to a week. If you notice they’ve dried out a bit, add a tiny splash of water to the container and let them steam for a minute. This trick rehydrates the balls, restoring their original chewiness. A quick fix that saves you from a stale snack.
Creative Twists and Variations
This recipe is a playground. Here are some of my favorite ways to switch things up:
Chocolate‑Covered Delight
Dip each ball in melted dark chocolate and let it set on parchment paper. The chocolate adds a rich, bittersweet contrast to the natural sweetness. Sprinkle a pinch of sea salt on top for a caramelized finish. This variation is perfect for chocolate lovers and makes a great gift.
Spiced Pumpkin Power
Add a tablespoon of pumpkin puree to the banana‑date mixture for a fall‑season twist. The pumpkin brings a subtle earthy flavor and a creamy texture. Enhance the spice profile with a pinch of nutmeg and a dash of ginger. This version is ideal for autumn gatherings.
Tropical Pineapple Punch
Replace half the coconut flakes with shredded pineapple. The tropical fruit adds a juicy burst of acidity that balances the sweetness. Toss in a few chopped macadamia nuts for a buttery crunch. This variation feels like a vacation in every bite.
Almond Butter Upgrade
Swap the nut butter for almond butter to give the snack a nutty, slightly sweet flavor. The almond butter pairs wonderfully with the cinnamon and vanilla. Add a drizzle of honey on top for an extra glaze. This upgrade is simple yet elevates the overall taste.
Protein‑Packed Power
Add a scoop of vanilla protein powder to the mixture for a post‑workout snack. The protein powder boosts the protein content without altering the flavor significantly. Keep the rest of the ingredients the same to maintain the chewy texture. This variation is great for fitness enthusiasts.
Crispy Trail Mix
Fold in a handful of toasted almonds, walnuts, and sunflower seeds before rolling. The seeds add a satisfying crunch and a nutty aroma. Sprinkle a dash of smoked sea salt for a savory twist. This version is ideal for hiking or outdoor adventures.
Minty Freshness
Add a few fresh mint leaves to the mixture, finely chopped. The mint introduces a refreshing contrast to the sweet base. The aroma is invigorating, making the snack feel light and airy. This variation is perfect for hot summer days.
Storing and Bringing It Back to Life
Fridge Storage
Store the finished balls in an airtight container in the refrigerator. They stay fresh for up to a week without losing texture or flavor. The cool environment preserves the natural oils in the nut butter, preventing rancidity. Keep the container away from strong‑smelling foods to avoid flavor absorption.
Freezer Friendly
For longer storage, place the balls on a parchment‑lined tray and freeze them for 2–3 hours. Once solid, transfer them to a freezer‑safe bag or container. They can be kept for up to three months. When ready to eat, let them thaw at room temperature for 15 minutes before serving.
Best Reheating Method
To revive frozen or chilled balls, sprinkle a tiny splash of water over them and microwave on high for 15–20 seconds. The water steams the balls, restoring their chewiness. Alternatively, warm them in a dry skillet over low heat for 2 minutes, stirring gently. This quick reheating method ensures the snack tastes fresh every time.