When the kitchen exploded in a crimson haze, I realized I had just invented the most audacious dessert in my life. Picture this: I was attempting to recreate a classic red velvet cake, but the batter kept turning into a sticky, unmanageable mess that clung to the counter like a bad ex. I laughed, slapped a spoonful onto my plate, and thought, “If this can survive a kitchen disaster, it can survive my taste buds.” That single, audacious bite became the spark that lit the fire for a cookie dough that defies every expectation of what cookie dough can be.
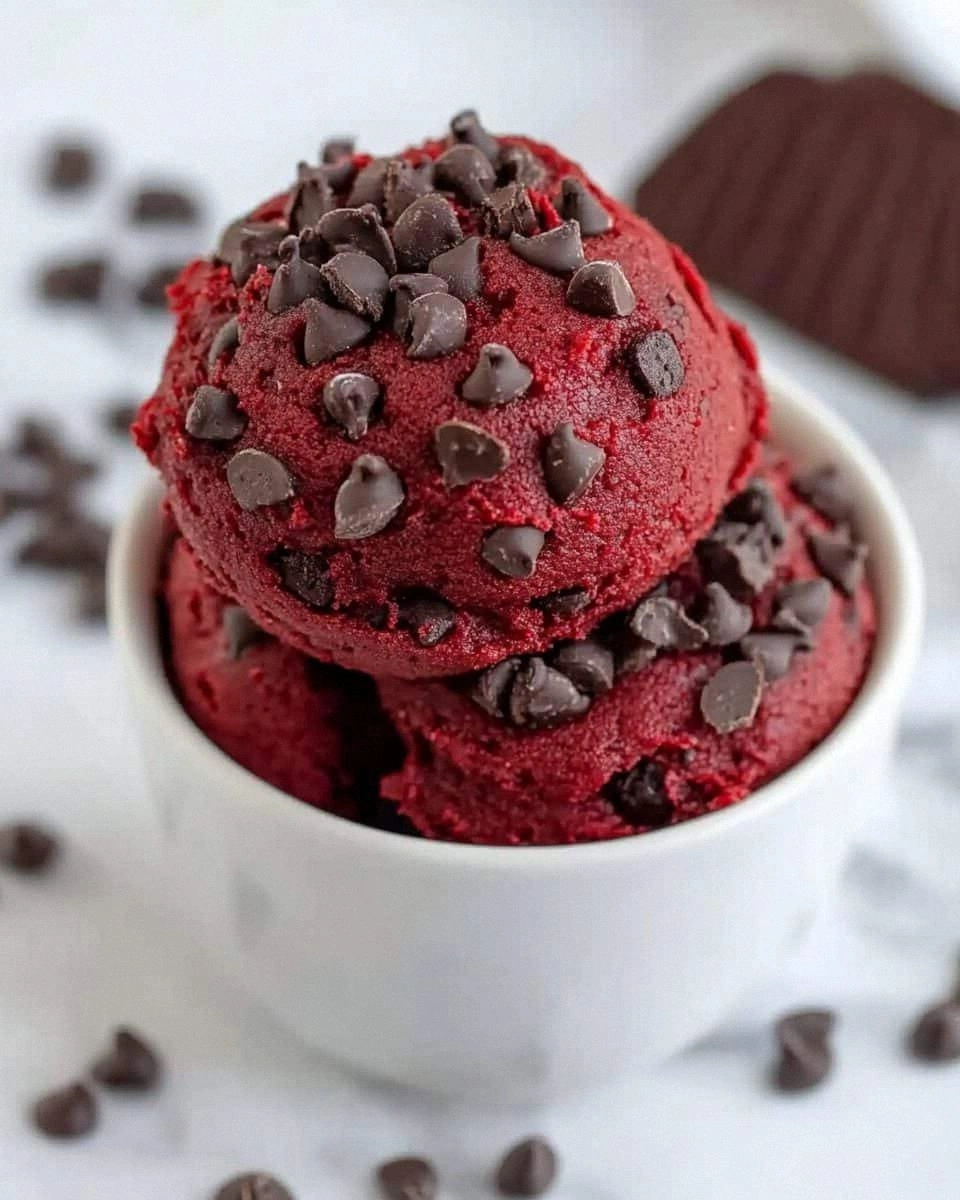
The first time I tasted it, the aroma was a sweet, chocolatey bouquet that made my nose do a little happy dance. The texture was a paradoxical blend of silky smoothness and a faint, satisfying chew that made me think of velvet drapes that just barely give way when you run your fingers through them. I could hear the faint crackle of the sugar crystals dissolving into the butter as the dough met my palate, and the sound of my spoon gliding through the thick mixture was oddly comforting. The visual was a rich, ruby-red swirl that seemed to glow against the white background of my mixing bowl. I could feel the dough’s weight in my hand, heavy enough to be substantial but light enough to fold with a gentle touch. And the flavor? A deep cocoa undertone, punctuated by a subtle tang from the cream cheese that made the dough feel like a midnight dessert party in a jar.
Why does this version stand out? Because I stripped away the fluff and focused on what makes a cookie dough unforgettable: a perfect balance of sweet and savory, a color that makes you want to photograph it before you eat, and an unmistakable chocolate flavor that feels like a hug from the inside out. Most recipes get this completely wrong by over‑baking or under‑mixing, but this one is a masterclass in precision. I dare you to taste this and not go back for seconds. The moment you bite, you’ll feel the dough melt in your mouth, leaving a lingering, silky aftertaste that will have you craving a second spoonful. I’ll be honest—I ate half the batch before anyone else got to try it. And that’s because the dough is so good you can’t help but keep reaching for more.
Picture yourself pulling this out of the fridge, the whole kitchen smelling incredible, and the anticipation building with each passing minute. The dough sits in a glass bowl, the color deepening as the flavors mingle. You know the moment is almost here—your spoon glides through, the dough slides, and the sweet, chocolatey scent hits you like a warm hug. That sizzle when it hits the pan? Absolute perfection. If you’ve ever struggled with cookie dough that’s either too dry or too sticky, you’re not alone—and I’ve got the fix. Stay with me here—you’re about to learn a game‑changer that will redefine your dessert game.
What Makes This Version Stand Out
- Flavor Depth: The combination of cocoa, cream cheese, and a splash of vanilla creates a layered taste that feels both comforting and indulgent. The cream cheese adds a subtle tang that cuts through the richness, giving the dough a sophisticated profile.
- Texture Mastery: Unlike typical cookie dough that can be crumbly or overly greasy, this recipe achieves a silky yet firm consistency that holds together perfectly while still yielding to the bite.
- Visual Appeal: The vibrant red hue isn’t just for show—it’s achieved with natural food coloring and a touch of cocoa, giving the dough an Instagram‑ready look that will wow any guest.
- Ease of Preparation: With minimal steps and no need for baking, you can whip up this treat in under 45 minutes. The recipe’s simplicity makes it a go‑to for last‑minute dessert needs.
- Make‑ahead Friendly: Chill the dough for up to 24 hours; the flavors deepen, and the texture improves, making it perfect for parties or a quick dessert on a busy night.
- Versatility: The dough can be scooped into cups, shaped into bars, or used as a dip for fresh fruit. It’s a blank canvas ready for your creative twists.
- Ingredient Quality: By using high‑quality butter, cocoa, and cream cheese, the recipe elevates a simple dessert into a gourmet experience.
- Kid‑Friendly: No eggs or baking, so it’s safe for kids who love to help in the kitchen—just keep an eye on the food coloring.
Alright, let’s break down exactly what goes into this masterpiece…
Inside the Ingredient List
The Flavor Base
All-purpose flour and unsweetened cocoa powder form the backbone of this dough, giving it structure and that unmistakable chocolatey undertone. The flour ensures the dough holds together, while the cocoa introduces a deep, bittersweet flavor that balances the sweetness from the sugars. If you skip the cocoa, you’ll end up with a bland, almost vanilla‑like dough that misses the essence of a red velvet dessert.
The baking powder and baking soda may seem redundant in a cookie dough, but they help maintain a slightly airy texture and prevent the dough from becoming too dense. They’re added in small amounts—just enough to lift the dough without turning it into a cake. If you’re allergic to baking soda, simply omit it; the dough will still hold its shape but might feel slightly heavier.
Salt is the secret weapon that elevates every other flavor. Even a pinch of salt can make the sweetness pop and the chocolate taste richer. If you prefer a salt‑free version, you can reduce the amount by half, but be prepared for a less dynamic flavor profile.
The Texture Crew
Unsalted butter is the star of the texture crew. Its high-fat content creates a lush, buttery mouthfeel that coats the palate. The butter should be softened to room temperature—soft enough to blend smoothly with the sugars but not melted, which could cause the dough to become too runny. If you’re in a hurry, a quick microwave pulse of 5–10 seconds will soften the butter perfectly.
Brown sugar and granulated sugar work together to create a balanced sweetness. Brown sugar adds molasses notes and moisture, while granulated sugar provides a clean, crisp sweetness that dissolves quickly. Together they give the dough a complex, layered sweetness that feels both comforting and indulgent. If you’re watching calories, you can replace the granulated sugar with a sugar substitute that’s safe for baking, but be aware that the texture may change slightly.
Vanilla extract is the subtle aromatherapeutic component that lifts the overall flavor. A 2‑tsp measure is enough to infuse the dough with a warm, floral undertone without overwhelming the chocolate or cream cheese. If you’re vegan, a splash of vanilla essence works just as well.
The Unexpected Star
Cream cheese is the unexpected star that brings a creamy tang and a slight acidity that brightens the chocolate flavor. It also acts as a binder, giving the dough a smooth, cohesive structure. The key is to soften the cream cheese to room temperature before adding it; otherwise, the dough will become lumpy. If you can’t find cream cheese, a thick Greek yogurt can be a suitable substitute, though the flavor will shift slightly.
Red food coloring is the visual wizard that turns the dough into a ruby‑red masterpiece. Gel food coloring provides the most intense color, while liquid coloring is gentler and blends more evenly. A tablespoon is enough to achieve a deep, saturated hue. If you’re concerned about artificial dyes, look for natural colorings made from beet or beetroot powder.
The Final Flourish
Milk or a non‑dairy alternative is added to thin the dough just enough so it’s easy to scoop and shape. The liquid also helps the cocoa powder dissolve fully, preventing a gritty texture. If you’re aiming for a thicker dough, reduce the milk slightly; if you prefer a looser consistency, add a splash more.
Chocolate chips are optional but highly recommended for added texture and flavor bursts. They provide a delightful crunch and a contrasting chocolate flavor that enhances the overall experience. If you’re avoiding nuts or want a smoother dough, simply omit the chips and enjoy the pure red velvet flavor.
Everything’s prepped? Good. Let’s get into the real action…
The Method — Step by Step
- Prepare the Dry Mix: In a medium bowl, whisk together the flour, cocoa powder, baking powder, baking soda, and salt until evenly distributed. This step ensures there are no clumps of cocoa or flour that could make the dough uneven. Feel the dry mix as you stir—smooth and silky, like a fine sifted powder. Set it aside; the dry mix will act as the foundation for the rest of the dough.
- Beat the Butter and Sugars: In a stand mixer or a large bowl, cream the softened butter, brown sugar, and granulated sugar on medium speed until the mixture is light, fluffy, and pale yellow. This usually takes about 3–4 minutes. The goal is to incorporate air, which gives the dough a lighter feel. Watch for the mixture to change from a dense crumb to a smooth, airy texture.
- Add Vanilla and Cream Cheese: Lower the speed and add the vanilla extract, then fold in the softened cream cheese until the mixture is silky and homogeneous. The cream cheese should blend in completely; any lumps will ruin the dough’s smoothness. This step also brings that tangy brightness that sets the red velvet apart.
- Introduce the Red Color: Stir in the red food coloring until the dough turns a deep, saturated crimson. A tablespoon is enough; if the color is too light, add a few drops more. The dough should look like a glossy, rich ruby, ready to impress.
- Combine Wet and Dry: Gradually add the dry mix to the wet mixture, mixing on low speed until just combined. Be careful not to overmix, or the dough will become tough. You’re aiming for a thick, cohesive batter that holds together when scooped.
- Adjust Consistency with Milk: Add the milk, a tablespoon at a time, until the dough reaches a thick yet pliable consistency. It should be thick enough to hold its shape but still easy to scoop. If the dough feels too dry, add a splash more milk.
- Fold in Chocolate Chips: Gently fold in the chocolate chips, ensuring they’re evenly distributed. The chips add a delightful crunch and extra chocolate flavor. If you prefer a smoother dough, you can omit the chips entirely.
- Chill the Dough: Transfer the dough to an airtight container or a large glass bowl, cover it tightly, and refrigerate for at least 30 minutes or up to 24 hours. Chilling allows the flavors to meld and the dough to firm up, making it easier to scoop.
- Serve: Scoop the chilled dough into small portions, or shape it into bars or mini cupcakes. Serve immediately or keep refrigerated until ready to eat. The dough can also be used as a dip for fresh fruit, adding a fun interactive element to any gathering.
That’s it — you did it. But hold on, I’ve got a few more tricks that will take this to another level. Stay tuned for insider tips that will make your dough perfect every time.
Insider Tricks for Flawless Results
The Temperature Rule Nobody Follows
Room temperature ingredients are crucial. If the butter or cream cheese is too cold, the dough will be greasy and clumpy; if it’s too warm, it will become runny. Aim for a temperature of about 68°F (20°C) for both. A quick way to test is to press the ingredient between your thumb and forefinger—if it gives slightly, it’s ready. This simple trick saves you from a batch of dough that won’t hold its shape.
Why Your Nose Knows Best
Before you add the red food coloring, give the dough a sniff. If it smells like a sweet, buttery chocolate, you’re on the right track. If it has a sour or off note, double‑check your cream cheese for freshness. Your nose is a powerful quality control tool that can catch issues before they become problems.
The 5‑Minute Rest That Changes Everything
After folding in the chocolate chips, let the dough rest for 5 minutes before chilling. This brief pause allows the chips to settle and the flavors to marry. Skipping this step can result in uneven distribution of chips, leading to pockets of pure chocolate in an otherwise smooth dough.
Use a Food Processor for a Quick Mix
If you’re short on time, a food processor can combine the dry ingredients and mix the wet ingredients in a fraction of the time. Just be sure to pulse the wet mixture until it’s smooth—over‑processing can cause the butter to melt. The processor’s speed can be adjusted to keep the mixture from overheating.
Keep It Covered While Chilling
Cover the dough tightly with plastic wrap or a lid. If you leave it exposed, the surface will dry out and form a crust, making it difficult to scoop. A tight seal keeps the dough moist and fresh, preserving the buttery, chocolatey flavor.
Creative Twists and Variations
This recipe is a playground. Here are some of my favorite ways to switch things up:
Chocolate‑Nut Crunch
Fold in a handful of chopped walnuts or pecans before chilling. The nuts add a satisfying crunch and a nutty flavor that complements the chocolate base. They also provide a contrast in texture that keeps each bite interesting.
Almond Milk Swirl
Replace regular milk with almond milk for a nutty undertone. The almond milk also lowers the calorie count and adds a subtle sweetness that pairs well with the red velvet flavor. Make sure to use unsweetened almond milk to keep the dough from becoming overly sweet.
Spiced Cinnamon Surprise
Add 1/2 tsp of ground cinnamon to the dry mix. The warm spice elevates the dough, adding a subtle depth that feels like a cozy fall treat. Cinnamon also enhances the chocolate flavor, making the dough even richer.
Coconut‑Infused Delight
Stir in 1/4 cup of shredded coconut during the final fold. The coconut adds a tropical twist and a chewy texture that contrasts nicely with the smooth dough. It’s a great option for those who love a hint of exotic flavor.
Lemon‑Zest Zing
Grate the zest of one lemon into the wet mixture. The citrus brightens the dough, cutting through the sweetness and adding a fresh, bright note. It’s especially refreshing during warm weather or when you want a lighter dessert.
Caramel Swirl
Swirl in a tablespoon of caramel sauce before chilling. The caramel adds a rich, buttery sweetness that pairs beautifully with the chocolate. It also creates a striking marbled effect when you scoop the dough.
Storing and Bringing It Back to Life
Fridge Storage
Store the dough in an airtight container in the refrigerator for up to 48 hours. The dough will remain firm and flavorful, making it easy to portion out when you’re ready to serve. The fridge also helps the chocolate chips set, preventing them from sinking to the bottom.
Freezer Friendly
Wrap the dough tightly in plastic wrap, then place it in a freezer bag. Freeze for up to 3 months. When you’re ready to enjoy, thaw in the refrigerator overnight. The dough will keep its texture and flavor, allowing you to enjoy a fresh batch whenever the craving hits.
Best Reheating Method
To warm the dough, place it in the microwave on 30‑second intervals, stirring between each burst. Add a tiny splash of water before reheating to create steam, which helps restore moisture and keep the dough from drying out. A quick 1‑minute microwave session should bring the dough to a pleasantly warm, creamy state.