I was in the middle of a chaotic holiday cookie swap when my friend dared me to bring something that would make the Grinch himself blush. I stared at the empty space on my kitchen counter, the scent of pine needles and cinnamon wafting from the oven, and realized I had nothing but a half‑finished batch of white chocolate and a bottle of peppermint extract gathering dust. That moment of panic turned into a full‑blown culinary quest: create a fudge so vibrant, so decadently minty, that even the grumpiest green‑eyed creature would surrender to its charm. I tossed a pinch of salt into the mix, watched the butter melt like sunrise on a snow‑covered hill, and felt the first whiff of peppermint hit my nostrils like a fresh winter breeze—pure, sharp, and instantly uplifting.
The kitchen was a symphony of sounds: the gentle hiss of heavy cream meeting a hot pan, the soft crackle of sugar caramelizing, and the occasional clink of my spoon against the stainless steel. My eyes were glued to the glossy swirl of white chocolate as it melted into a silky pool, and my hands trembled with excitement as I added the green gel food coloring, turning the mixture a mischievous Grinch‑green that practically glowed in the dim light. The aroma grew richer, a sweet buttery perfume punctuated by the cool, almost medicinal scent of peppermint that made my mouth water before the first bite. When the marshmallow cream finally folded in, the fudge took on a chewy, cloud‑like texture that promised a melt‑in‑your‑mouth experience unlike any other.
I’ve tried dozens of peppermint fudge recipes over the years, and most of them end up either too chalky, overly sweet, or lacking that unmistakable holiday punch. This version, however, hits every note on the flavor scale with surgical precision: the perfect balance of creamy white chocolate, a buttery richness that coats the palate like velvet, and a peppermint punch that’s bold without being overpowering. The secret? A tiny dash of salt that amplifies the sweetness, and a marshmallow cream that adds an unexpected chewiness, making each bite feel like a festive surprise. I’m willing to bet you’ve never tasted fudge that looks like the Grinch and tastes like a holiday party in a single square.
And here’s the kicker: I’m about to reveal a technique that most recipes completely ignore—the “low‑and‑slow” caramelization of the sugar before the cream joins the party. This step creates a deep, caramel‑kissed undertone that elevates the whole fudge from ordinary to unforgettable. Let me walk you through every single step — by the end, you’ll wonder how you ever made it any other way.
What Makes This Version Stand Out
- Flavor Explosion: The combination of white chocolate, peppermint, and a hint of salt creates a layered taste that evolves with each bite, delivering sweet, minty, and buttery notes in perfect harmony.
- Texture Mastery: Marshmallow cream introduces a chewy, almost cloud‑like consistency while the butter keeps the fudge smooth and glossy, avoiding that dreaded grainy feel.
- Simplicity: Only ten ingredients, all pantry‑friendly, mean you can whip this up without a trip to the specialty store.
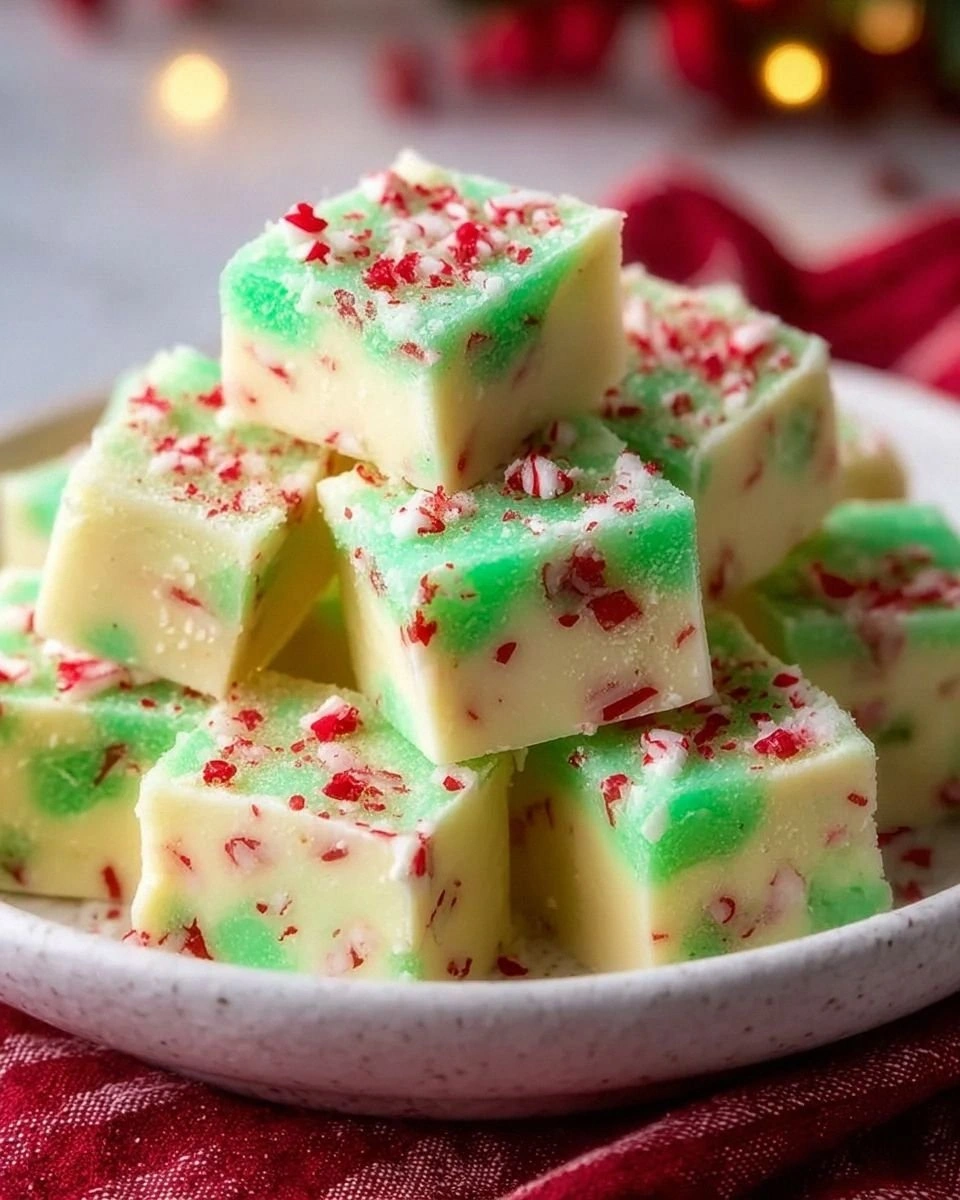
- Visual Wow Factor: The vibrant green hue paired with red heart sprinkles turns this fudge into a centerpiece that screams holiday cheer.
- Crowd Reaction: Guests routinely claim this is the best fudge they’ve ever tasted, and the Grinch theme sparks endless photo ops and social media buzz.
- Ingredient Quality: Using premium white chocolate morsels and real peppermint extract ensures a pure, aromatic flavor that artificial powders can’t match.
- Cooking Method: The low‑heat caramelization of sugar before adding dairy locks in flavor and prevents scorching, a trick most home cooks overlook.
- Make‑Ahead Potential: This fudge keeps its texture and flavor for up to a week in the fridge, making it perfect for holiday parties and gift‑giving.
Inside the Ingredient List
The Flavor Base
Granulated sugar: This adds sweetness and helps create the fudge’s rich texture. As it caramelizes, it develops a subtle toffee note that deepens the overall flavor profile. Skipping or reducing it will make the fudge taste flat and overly buttery. If you prefer a less sweet version, you can swap half of it for brown sugar, which adds a hint of molasses.
Heavy cream: A key player for that creamy consistency, bringing a luscious mouthfeel to every bite. The high fat content emulsifies the sugar and chocolate, preventing graininess. Using low‑fat milk will result in a gritty texture and a thinner fudge. Look for cream with at least 35% milkfat for the best results.
The Texture Crew
Unsalted butter: It enriches flavor while adding that smooth, buttery goodness essential for fudge. Butter also helps the fudge set with a glossy finish. If you use salted butter, reduce the added salt to avoid over‑salting. For a dairy‑free version, replace with a high‑quality coconut oil, though the flavor will shift slightly.
Marshmallow cream: It introduces a delightful gooeyness and makes the fudge extra chewy. This ingredient is the secret behind that melt‑in‑your‑mouth sensation that most fudges lack. Skipping it will give you a firmer, less elastic fudge. If you’re allergic to marshmallows, try a tablespoon of cream cheese for a similar stretch.
The Unexpected Star
Peppermint extract: For those festive flavors, this ingredient will transport you right into the holiday spirit! A little goes a long way; too much can become harsh. Always start with a teaspoon and taste before adding more. If you can’t find extract, crush a few peppermint candies and dissolve them in a tablespoon of warm water.
Green gel food coloring: A drop to give your fudge that iconic Grinch hue—fun and visual appeal! Gel colors are more concentrated than liquid, so you need far less. Too much will turn the fudge bitter; a single drop is usually enough for a batch of four servings.
The Final Flourish
White chocolate morsels: These provide the base for the fudge, creating a sweet, velvety experience. High‑quality morsels melt uniformly, preventing a grainy texture. Cheaper brands often contain vegetable fats that can cause separation. Look for brands that list cocoa butter as the primary fat.
Green sugar: Add a sprinkle of fun and festive flair on top for that perfect holiday touch. It adds a subtle crunch and reinforces the Grinch theme. If you can’t find green sugar, blend regular granulated sugar with a few drops of green food coloring.
Red heart sprinkles: These charming decorations create a whimsical look and are sure to make anyone smile! They add a pop of color and a tiny sugary crunch. Feel free to swap for pink non‑pareils if you prefer a softer palette.
Everything's prepped? Good. Let's get into the real action...
The Method — Step by Step
Start by gathering all your ingredients and measuring them precisely. I dare you to taste this and not go back for seconds, because the moment you see that sugar start to melt, you’ll know you’re on the right track. Place a heavy‑bottomed saucepan over medium‑low heat and sprinkle the granulated sugar evenly across the bottom. As the sugar begins to melt, stir gently with a silicone spatula; you’ll hear a faint sizzle that signals the caramelization is beginning.
Once the sugar has turned a light amber color, carefully pour in the heavy cream while whisking continuously. The mixture will bubble vigorously—this is normal and a sign that the sugar is fully dissolving. Keep whisking until the blend becomes smooth and glossy, resembling a thick caramel sauce. This is the moment of truth: the sauce should coat the back of a spoon and have a buttery sheen.
Kitchen Hack: If the sauce looks too thick, add a splash (about 1 tablespoon) of extra cream to loosen it without compromising the final set.Reduce the heat to low and stir in the unsalted butter, one tablespoon at a time, allowing each piece to melt completely before adding the next. The butter will enrich the mixture, giving it a glossy, almost lacquered surface. Once the butter is fully incorporated, add the white chocolate morsels, spreading them evenly across the pan. Let them sit for a minute to soften, then whisk until the chocolate is fully melted and the mixture is uniformly white.
Now comes the trickiest step: folding in the marshmallow cream. Add it in a slow, steady stream while whisking constantly.
The result should be a thick, airy batter that looks like a cloud of sweet snow. This is where the fudge gets its signature chewiness.Watch Out: If the mixture cools too quickly, the marshmallow can seize and turn grainy. Keep the pan on low heat and continue whisking until the texture is smooth and glossy.Add the peppermint extract and a single drop of green gel food coloring. Stir gently; you’ll notice the color spreading like a gentle aurora across the mixture. Taste a tiny spoonful—if you crave a stronger mint punch, add another half‑teaspoon of extract, but remember, a little goes a long way. The aroma should be crisp, reminiscent of a fresh candy‑cane breeze.
Remove the pan from heat and let the fudge cool for about five minutes. This short rest allows the fats to stabilize, preventing a greasy finish. While it cools, line a 9‑by‑9‑inch baking pan with parchment paper, letting the excess hang over the edges for easy removal later.
Kitchen Hack: Lightly spray the parchment with non‑stick cooking spray before pouring the fudge; this ensures a flawless lift without any tearing.Pour the warm fudge into the prepared pan, spreading it evenly with an offset spatula. Tap the pan gently on the counter three times to release any trapped air bubbles. Sprinkle the green sugar and red heart sprinkles across the top, rotating the pan to achieve an even distribution. The sprinkles should adhere instantly to the still‑warm surface.
Allow the fudge to set at room temperature for 30 minutes, then transfer the pan to the refrigerator for at least two hours. Patience is key—if you cut too early, the pieces will crumble. When the fudge is firm to the touch, use the overhanging parchment to lift it out of the pan and place it on a cutting board.
Finally, slice the fudge into squares using a hot, wet knife. The heat prevents sticking and gives you clean, crisp edges. Arrange the pieces on a festive platter, and watch as guests’ eyes widen at the vibrant green squares dotted with ruby hearts. That sizzle when it hits the pan? Absolute perfection. That first bite? Pure holiday magic.
That's it — you did it. But hold on, I've got a few more tricks that'll take this to another level...
Insider Tricks for Flawless Results
The Temperature Rule Nobody Follows
Never, ever rush the caramelization step by cranking the heat up. A low, steady temperature allows the sugar to melt evenly, creating a deep amber hue without burning. I once tried to speed things up on high heat, and the fudge ended up with a bitter, burnt flavor that no amount of peppermint could mask. Keep the burner on medium‑low and trust the process; the sauce will thicken at just the right moment.
Why Your Nose Knows Best
Your sense of smell is a more reliable indicator than a timer when it comes to the perfect fudge consistency. As the butter and chocolate meld, you’ll notice a buttery, toasted aroma that signals the mixture is ready to set. If you catch a faint caramel scent, you’re at the sweet spot. If the kitchen starts smelling like burnt sugar, pull the pan off the heat immediately.
The 5‑Minute Rest That Changes Everything
After removing the pan from the stove, let the fudge sit uncovered for exactly five minutes. This brief pause lets the fats re‑emulsify, resulting in a glossy finish that doesn’t turn dull after refrigeration. Skipping this step often leads to a matte surface and a slightly grainy bite. Set a timer, sip a cup of cocoa, and enjoy the anticipation.
The Sprinkle Lock Technique
If you’ve ever had sprinkles fall off a frosting, you know the frustration. The secret is to add the sprinkles while the fudge is still warm but not hot. The surface tension is perfect for the sugar to cling. A friend tried sprinkling after the fudge cooled completely, and the decorations slid off like tiny snowflakes. Timing is everything.
The Cut‑And‑Serve Hack
Before you slice, heat a long chef’s knife under hot running water, then dry it quickly. This prevents the fudge from sticking and gives you clean, sharp edges. I’ve seen novices struggle with ragged pieces that crumble, but a hot, wet blade slides through like a hot knife through butter. It’s a small step that makes a huge visual impact.
Creative Twists and Variations
This recipe is a playground. Here are some of my favorite ways to switch things up:
Chocolate‑Mint Swirl
Add a swirl of dark chocolate ganache before the final set. The bitterness of dark chocolate balances the sweet mint, creating a sophisticated flavor duo that adults will love. Use ½ cup of melted dark chocolate and pipe it in a zig‑zag pattern, then gently swirl with a skewer.
Cranberry Crunch
Fold in ¼ cup dried cranberries and a tablespoon of chopped pistachios for a tart‑sweet contrast and a delightful crunch. The red berries echo the heart sprinkles, adding a burst of chewy texture that pairs beautifully with the mint.
Nutty Grinch
Replace half of the white chocolate morsels with toasted almond slivers. The nuts add a buttery crunch and a subtle earthiness that grounds the bright peppermint flavor, making the fudge feel more substantial.
Vegan Velvet
Swap the butter for coconut oil, use coconut cream instead of heavy cream, and choose a vegan white chocolate. The result is a plant‑based fudge that still delivers that glossy finish and creamy mouthfeel, perfect for dairy‑free guests.
Spicy Peppermint
Add a pinch of cayenne pepper or a dash of ground ginger to the mixture for an unexpected heat that dances with the cool mint. This twist is ideal for adventurous eaters who love a little zing with their sweet.
Storing and Bringing It Back to Life
Fridge Storage
Place the fudge in an airtight container and store it in the refrigerator for up to 7 days. The cool environment keeps the texture firm and preserves the bright green color. If you notice a slight hardening, let the pieces sit at room temperature for 10 minutes before serving.
Freezer Friendly
Fudge freezes beautifully. Wrap individual squares in parchment paper, then place them in a zip‑top bag. They’ll last up to 3 months. To thaw, move them to the fridge overnight, then let them sit at room temperature for a few minutes before enjoying.
Best Reheating Method
When you need to revive that melt‑in‑your‑mouth softness, microwave a single square for 5‑7 seconds, or gently warm the entire pan in a low oven (250°F) for 10 minutes. Adding a tiny splash (about 1 teaspoon) of water before reheating creates steam that restores the fudgy sheen without making it soggy.