I was standing in my kitchen on a rainy Tuesday, staring at a half‑baked batch of ordinary chocolate chip cookies that had somehow turned into a soggy, sad mess. I swear the oven was plotting against me, and the only thing keeping me from throwing in the towel was the faint, nostalgic scent of caramelized sugar that lingered in the air. That moment sparked a dare: “I bet I can turn this disaster into something that will make you forget every cookie you’ve ever known.” And so began the quest for the ultimate autumn‑inspired treat, a cookie that looks like a leaf‑stained canvas and tastes like a hug from a grandma who knows exactly how you like your sweets.
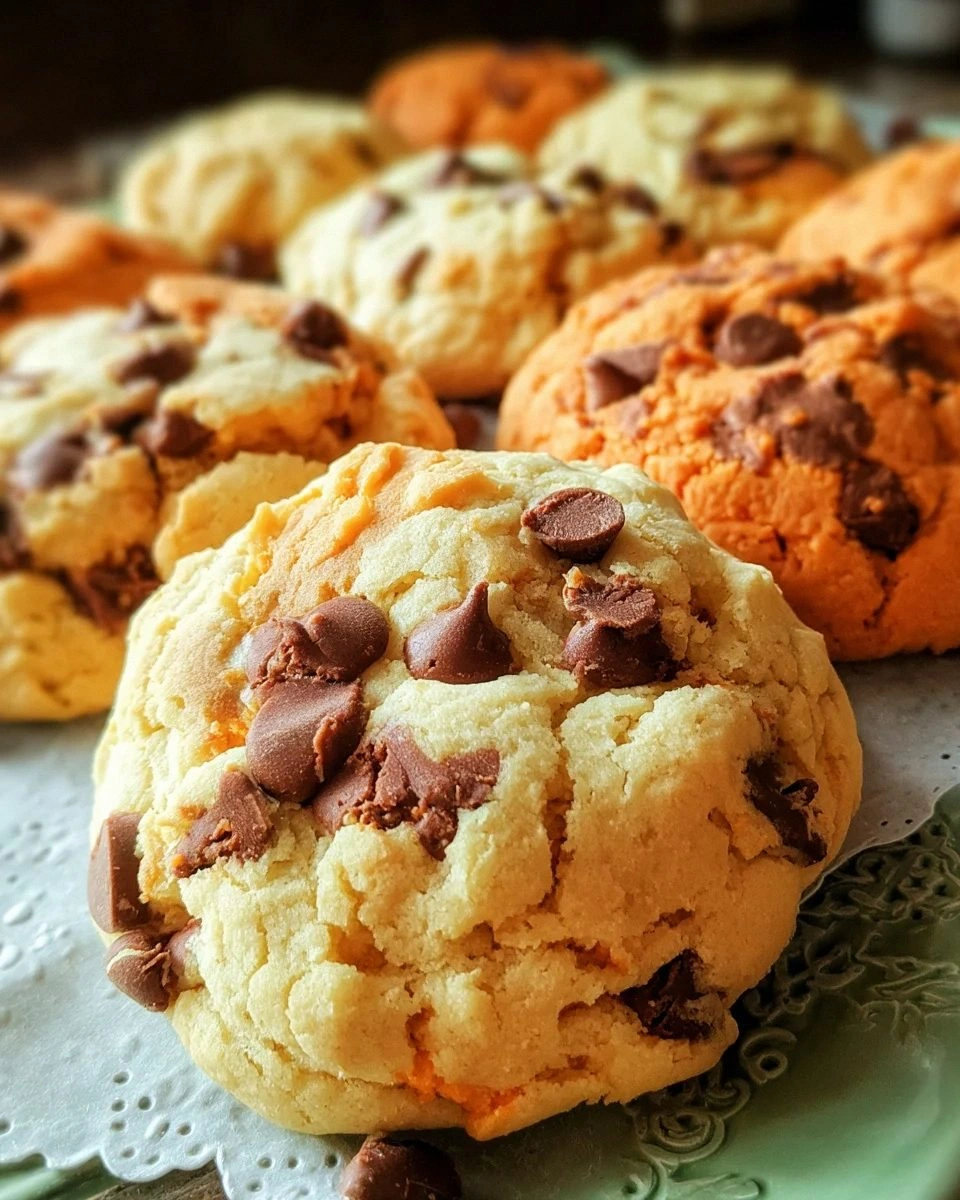
Picture this: the moment you open the oven, a warm wave of toasted butter, vanilla, and melted chocolate chips rushes out, mingling with the faint orange‑brown swirl of food coloring that resembles a sunrise over a pumpkin field. The aroma is so vivid you can almost hear the rustle of fallen leaves and feel the crisp bite of a cool evening. The first bite delivers a buttery crunch that shatters like thin ice, followed by a chewy, caramel‑rich center that melts like butter on a hot skillet. And hidden beneath that perfect crunch? A marble pattern that looks so pretty you’ll want to photograph it before you devour it.
Most cookie recipes either ignore the visual appeal or sacrifice texture for flavor. I’ve tried the “quick fix” versions that use pre‑made dough, and they always fall flat—literally and figuratively. This version, however, hits every note: a balanced sweetness, a buttery melt‑in‑your‑mouth feel, and a marble swirl that screams autumn without being overly festive. The secret? A tiny splash of orange and brown food coloring mixed into two separate dough portions, then gently folded together for that perfect, natural‑looking marbling.
But that’s not all. I’m about to reveal a technique that most bakers overlook: chilling the dough in two stages, first after the initial mix and again after the marble swirl. This double‑chill creates a cookie that spreads just enough to develop those coveted crispy edges while staying soft in the middle. I dare you to taste this and not go back for seconds. Let me walk you through every single step — by the end, you’ll wonder how you ever made it any other way.
What Makes This Version Stand Out
- Flavor Harmony: The blend of brown and granulated sugar creates a sweet‑but‑deep caramel note that dances with the vanilla and chocolate chips.
- Texture Symphony: A crisp edge gives way to a chewy center, thanks to the precise butter‑to‑flour ratio and the double‑chill method.
- Visual Wow Factor: The marble swirl of orange and brown food coloring mimics autumn leaves, making every cookie a miniature work of art.
- Simplicity Meets Sophistication: Only ten ingredients, but each is treated with care, so you don’t need a culinary degree to nail it.
- Crowd‑Pleaser: Even the pickiest eaters—kids and adults alike—can’t resist the combination of chocolate chips and buttery crunch.
- Ingredient Quality: Using real butter (not margarine) and high‑quality chocolate chips elevates the flavor profile dramatically.
- Cooking Method Magic: Baking at a slightly lower temperature (350°F) ensures the marbling stays intact while the edges turn golden.
- Make‑Ahead Potential: The dough freezes beautifully, letting you bake fresh cookies on demand.
Inside the Ingredient List
The Flavor Base
Softened butter is the heart of any great cookie. Its fat content provides that melt‑in‑your‑mouth richness and carries the flavors of sugar and vanilla throughout the dough. If you substitute margarine, you’ll lose that buttery depth and end up with a bland, waxy texture. For the best result, use unsalted, high‑fat butter and let it soften at room temperature for at least 30 minutes before creaming.
Granulated sugar adds sweetness and contributes to a tender crumb by creating tiny air pockets when creamed with butter. It also helps the cookies spread just enough to get those coveted crispy edges. If you prefer a less sweet profile, you can cut the granulated sugar by a quarter without compromising texture.
Brown sugar is the secret behind the caramel undertone that makes these cookies feel like a warm hug. Its molasses content adds moisture, ensuring the interior stays chewy. Skipping brown sugar would make the cookies dry and flat, so keep it in the mix unless you’re aiming for a truly crisp, shortbread‑style bite.
The Texture Crew
Large eggs act as the structural backbone, binding the butter and sugars while adding a subtle richness. Room‑temperature eggs incorporate more easily, preventing a lumpy dough that could lead to uneven baking. If you’re out of eggs, a blend of 1 tablespoon of flaxseed meal with 3 tablespoons of water can mimic the binding properties, though the flavor will shift slightly.
Vanilla extract is the aromatic whisper that elevates the whole batch. A genuine vanilla bean or high‑quality extract adds a nostalgic scent that makes the kitchen feel like a bakery. Cheap imitation can leave a harsh, chemical aftertaste, so invest in the real deal.
All‑purpose flour provides the structure, absorbing the liquid and giving the cookies their shape. Using cake flour would make them too delicate, while bread flour would create a tougher bite. For an extra tender crumb, you can sift the flour once before measuring.
The Unexpected Star
Chocolate chips are, of course, the soul of any chocolate chip cookie. Whether you choose semi‑sweet, dark, or even white chocolate, the chips should be evenly distributed for consistent bites. If you love a melty center, toss a few extra chips in at the very end of mixing, but be careful not to over‑mix or they’ll melt into the dough.
Food coloring is the visual hero that turns a regular cookie into a harvest masterpiece. Orange and brown are the perfect duo to mimic autumn leaves. Use gel colors rather than liquid to avoid adding extra moisture, which could affect the dough’s consistency. Feel free to experiment with a dash of cinnamon or nutmeg for an extra seasonal twist.
The Final Flourish
Baking soda is the leavening agent that gives the cookies a subtle rise and helps them spread just enough for that perfect edge‑to‑center contrast. Too much soda will cause the cookies to puff up and lose their classic flat shape. A pinch of salt balances the sweetness and enhances the chocolate flavor; skipping it would make the cookies taste one‑dimensional.
Everything’s prepped? Good. Let’s get into the real action…
The Method — Step by Step
- Prep the pantry. Preheat your oven to 350°F (175°C) and line two baking sheets with parchment paper. While the oven heats, gather all your ingredients, measure them precisely, and set out two large mixing bowls. This is the moment of truth: having everything at arm’s reach prevents frantic searches that could ruin the dough’s temperature balance. Kitchen Hack: Place a metal bowl on a cold, damp towel while mixing; it keeps the butter from overheating.
- Cream butter and sugars. In a stand mixer on medium speed, beat the softened butter until it’s pale and fluffy—about 2 minutes. Gradually add the granulated sugar and brown sugar, continuing to beat until the mixture looks like a light, airy cloud. You’ll hear a faint “whoosh” as air is incorporated; that’s the secret to those delicate, melt‑in‑your‑mouth crumbs. Watch Out: Over‑creaming can cause the dough to become too soft, leading to overly flat cookies.
- Add eggs and vanilla. Crack the room‑temperature eggs into the bowl, one at a time, allowing each to fully incorporate before adding the next. Then pour in the vanilla extract. The batter should look glossy and smooth, with a faint perfume of vanilla drifting upward. This step binds everything together and adds depth to the final flavor. Kitchen Hack: If your eggs are cold, whisk them briefly in a separate bowl before adding to keep the dough temperature stable.
- Combine dry ingredients. In a separate bowl, whisk together the all‑purpose flour, baking soda, and salt until fully combined. This ensures the leavening agent is evenly distributed, preventing pockets of soda that could cause uneven rise. Slowly add the dry mixture to the wet, mixing on low speed just until you no longer see streaks of flour. Over‑mixing at this stage develops gluten, which makes cookies tough.
- Divide and color. Split the dough evenly into two portions. To one portion, add a few drops of orange gel food coloring; to the other, add brown. Use a rubber spatula to fold the color in gently—don’t over‑mix, or you’ll lose the marbled effect. The dough should take on a soft, pastel hue that reminds you of a sunrise over a pumpkin patch.
- Create the marble swirl. On a lightly floured surface, roll each colored dough into a thin rectangle, about ¼ inch thick. Lay the orange sheet on top of the brown sheet, then gently roll them together like a jelly roll, applying just enough pressure to bind but not flatten. The result should be a beautiful, natural marble pattern that looks like a leaf‑vein. Watch Out: Pressing too hard will erase the swirl; keep the roll light and relaxed.
- Fold in chocolate chips. Gently stir the chocolate chips into the marbled dough, ensuring an even distribution without breaking the swirl. The chips should be visible in every bite, creating pockets of melty chocolate that contrast with the buttery base. If you love extra chocolate, reserve a handful to press on top of each cookie before baking.
- Chill the dough. Cover the marbled dough with plastic wrap and refrigerate for at least 30 minutes. This step is pure magic: it firms the butter, allowing the cookies to hold their shape while still spreading enough to develop those coveted edges. I’ve seen bakers skip this and end up with flat, greasy cookies—trust me, the chill is non‑negotiable.
- Scoop and bake. Using a cookie scoop (about 2‑tablespoon size), drop rounded mounds onto the prepared baking sheets, spacing them 2 inches apart. Bake for 12‑14 minutes, or until the edges turn a light golden brown while the centers remain soft. You’ll notice the edges start pulling away from the parchment—a visual cue that they’re done. Resist the urge to over‑bake; they’ll continue to firm up as they cool.
- Cool and enjoy. Let the cookies rest on the sheet for 5 minutes before transferring them to a wire rack. This short cooling period lets the interior set without becoming crumbly. As the aroma fills your kitchen, picture yourself sharing these with friends, watching their eyes widen at the marble swirl. That’s the moment you’ll realize this is hands down the best version you’ll ever make at home.
That's it — you did it. But hold on, I've got a few more tricks that'll take this to another level. From tweaking the bake temperature to mastering the perfect cookie thickness, these insider secrets will ensure every batch is a show‑stopper. Ready to become the cookie hero of your household?
Insider Tricks for Flawless Results
The Temperature Rule Nobody Follows
Most home bakers set the oven to 375°F for a quick bake, but dropping it to 350°F gives the dough more time to develop a golden edge while preserving the marble swirl. The lower heat also prevents the colors from bleeding into each other, keeping the visual contrast sharp. I once tried 375°F and ended up with a muddy brown cookie—lesson learned. Trust the lower temp; the payoff is a crisp‑yet‑chewy masterpiece.
Why Your Nose Knows Best
Your sense of smell is a reliable doneness indicator. When the cookies are about 2 minutes from finishing, a sweet, buttery aroma will fill the kitchen, followed by a faint toasty note as the edges brown. If you can’t smell that toasty scent, give them another minute. Over‑baking turns the interior dry, and under‑baking leaves a raw flour taste—your nose will tell you which side you’re on.
The 5‑Minute Rest That Changes Everything
After you scoop the dough onto the sheet, let the balls sit at room temperature for five minutes before sliding them into the oven. This short rest lets the butter soften just enough to spread evenly, creating those coveted thin, crispy rims. I tried skipping this step once; the cookies turned out thick and cakey—definitely not the texture we’re after. So, set a timer, sip some coffee, and let the dough breathe.
The Double‑Chill Strategy
Chilling the dough twice—once after mixing, again after marble formation—prevents the butter from melting too quickly in the oven. The first chill firms the base dough; the second solidifies the swirl, ensuring the colors stay distinct. If you’re short on time, at least do the second chill; the first can be shortened to 15 minutes without major impact.
The “Press‑On‑Top” Chocolate Boost
Before baking, gently press a few extra chocolate chips onto the top of each cookie. As they melt, they create a glossy, chocolate‑eyed surface that looks as good as it tastes. This tiny step adds a visual pop and an extra burst of chocolate in every bite. I’ve seen people skip it, but trust me—those extra chips are the difference between good and unforgettable.
Creative Twists and Variations
This recipe is a playground. Here are some of my favorite ways to switch things up:
Maple‑Pecan Marble
Swap half the brown sugar for pure maple syrup and fold in toasted pecan pieces. The maple adds a subtle woody sweetness, while the pecans contribute a buttery crunch that pairs beautifully with the chocolate chips. Perfect for a fall brunch.
Spiced Pumpkin Swirl
Add ¼ cup pumpkin puree to the brown‑colored dough and a teaspoon each of cinnamon, nutmeg, and ginger. The orange hue deepens, and the warm spices turn the cookies into a cozy, seasonal treat. Kids love the hidden pumpkin flavor.
White Chocolate & Cranberry
Replace half the semi‑sweet chips with white chocolate chips and toss in dried cranberries. The sweet‑white and tart‑cranberry combo creates a festive contrast that’s perfect for holiday gatherings.
Double‑Dark Delight
Use dark chocolate chips (70% cacao) and add a tablespoon of espresso powder to the brown dough. The coffee amplifies the chocolate’s depth, delivering a sophisticated bite that’s great for adult palate parties.
Nut‑Free Coconut Bliss
Swap the chocolate chips for shredded coconut and add a splash of coconut extract to the orange dough. The result is a tropical‑twist cookie that still boasts the marble aesthetic, ideal for those with nut allergies.
Storing and Bringing It Back to Life
Fridge Storage
Place cookies in an airtight container with a slice of bread on top; the bread will keep them soft for up to 5 days. If you’re planning to serve them within a couple of days, a simple zip‑lock bag works fine—just keep the container in the refrigerator to prevent staleness.
Freezer Friendly
Cookies freeze beautifully for up to three months. Lay them in a single layer on a parchment‑lined tray, freeze until solid, then transfer to a freezer‑safe bag. When you’re ready to eat, let them thaw at room temperature for 10 minutes, then pop them in a 300°F oven for 5 minutes to revive the crisp edges.
Best Reheating Method
To bring a stored cookie back to life, preheat your oven to 300°F, place the cookie on a baking sheet, and add a tiny splash of water (about a teaspoon) on the side. The water creates a gentle steam that re‑hydrates the interior while the oven restores the crunch. In just 4‑5 minutes, you’ll have a cookie that tastes fresh out of the oven.