I remember the night I stared at the empty pantry, the kitchen lights flickering like a nervous heartbeat, and the absurd thought that a simple dessert could salvage my evening. My roommate had just finished a brutal week of work, and all I wanted was something sweet, comforting, and quick. I reached for the oranges that had been sitting on the counter for weeks, their skins a bright promise of sunshine. I squeezed, zesting, and the room filled with citrus perfume, the kind that makes you think of lazy summer afternoons. That scent was the first clue that something extraordinary was about to happen.
I was skeptical at first. Orange curd is a staple in many homes, yet most versions I’d tasted were either too thick, too sweet, or simply flat. The moment I tasted my first spoonful, the world tilted. The curd was silky, the orange bright, and the butter added a luxurious creaminess that made every bite feel like a hug. I was instantly hooked. “I dare you to taste this and not go back for seconds,” I told my roommate, and she laughed, but her eyes betrayed her curiosity.
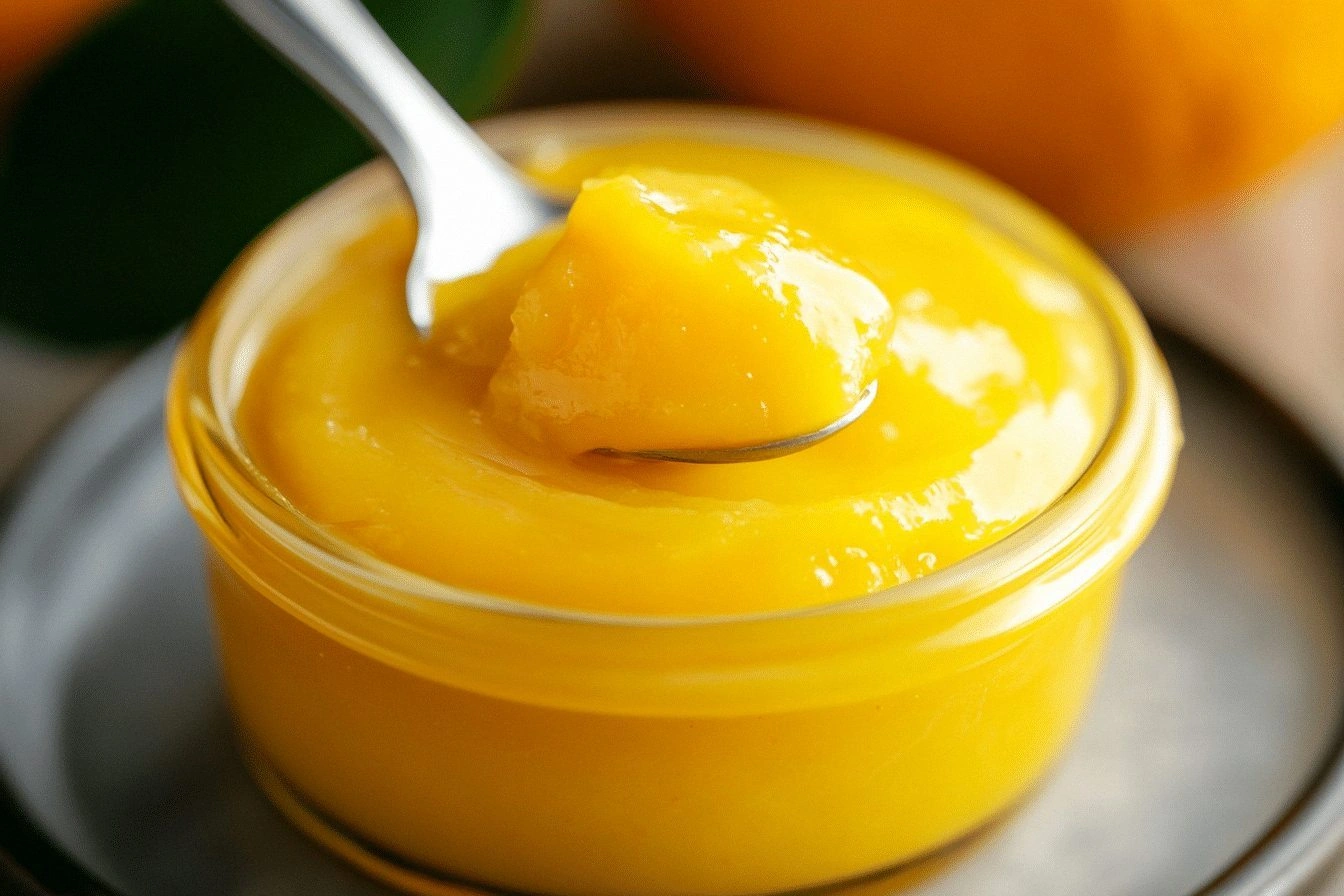
What makes this version stand out is not just the flavor profile; it’s the harmony of technique, timing, and ingredient quality. The orange juice is fresh, the zest is grated by hand, the eggs are room‑temperature, and the butter is unsalted, ensuring that each component shines. The result is a curd that coats your spoon like velvet and melts on your tongue like a warm summer breeze. I’ll be honest — I ate half the batch before anyone else got to try it. That’s the power of a recipe that feels both effortless and indulgent.
Picture yourself pulling this out of the pan, the kitchen smelling incredible, and the glossy, golden curd waiting to be spooned onto toast, scones, or even a fresh fruit tart. This is hands down the best version you'll ever make at home. Let me walk you through every single step — by the end, you'll wonder how you ever made it any other way.
What Makes This Version Stand Out
- Flavor: The use of freshly squeezed orange juice and zest brings a bright, natural citrus note that outshines canned or bottled alternatives.
- Texture: A silky, pourable consistency that sets at room temperature, thanks to the precise ratio of eggs and butter.
- Sweetness: A balanced sweetness that lets the orange’s natural tartness shine, avoiding the cloying syrupy finish of many curds.
- Ease: No whisking, no heavy stirring — the method is straightforward and forgiving for even novice cooks.
- Versatility: Perfect as a topping for pancakes, a filling for pastries, or a dip for fresh fruit.
- Make‑ahead: Stores well in the fridge for up to a week, and it can be frozen for longer preservation.
- Ingredient Quality: Every component is chosen for its natural flavor, ensuring a pure, unadulterated taste.
- Presentation: The glossy finish makes it a showstopper in any dessert display.
Alright, let's break down exactly what goes into this masterpiece...
Inside the Ingredient List
The Flavor Base
Fresh orange juice is the cornerstone of this curd. It delivers a natural sweetness and a bright acidity that cuts through the richness of the eggs and butter. If you skip the juice, the curd becomes heavy and loses its refreshing lift. For a more robust citrus punch, consider adding a splash of freshly squeezed grapefruit juice, but be mindful that grapefruit is more bitter.
The Texture Crew
Granulated sugar is the sweetener that also helps stabilize the curd by binding water and preventing separation. Egg yolks act as the emulsifier, coating the butter and orange juice into a smooth, silky emulsion. The unsalted butter adds body and a buttery finish that makes the curd luxuriously creamy. If you’re vegan, replace the butter with a neutral oil like grapeseed and use a plant‑based egg replacer, but expect a slightly different mouthfeel.
The Unexpected Star
A pinch of salt is the secret to unlocking the full flavor profile. Salt enhances sweetness, balances acidity, and brings out the citrus notes. Without it, the curd can taste flat and overly sugary. Think of salt as the tiny conductor that brings harmony to a chaotic orchestra.
The Final Flourish
Zest of two oranges is more than decoration; it infuses the curd with essential oils that give a lingering citrus aftertaste. If you’re allergic to citrus, you can substitute with lemon zest, but the flavor will shift toward a sharper, more tart profile. For a deeper orange flavor, let the zest steep in the curd for a few minutes before straining.
Everything's prepped? Good. Let's get into the real action...
The Method — Step by Step
- Start by zesting two whole oranges with a microplane or fine grater. Keep the zest aside for later. Then, using a citrus juicer, squeeze the oranges to yield one cup of fresh juice. The aroma that fills your kitchen right now is the first hint of the magic to come. I dare you to taste the juice before you even start cooking; the brightness is pure.
- In a medium bowl, whisk together six egg yolks and one cup of granulated sugar until the mixture turns pale and slightly thick. The whisking action is essential; it incorporates air and ensures the sugar dissolves completely. If you’re worried about raw eggs, use pasteurized eggs or a quick heat method later.
- Melt half a cup (1 stick) of unsalted butter in a small saucepan over low heat. Watch the butter melt until it turns a light golden hue but before it starts foaming. Remove from heat immediately to avoid overcooking.
- Add the freshly squeezed orange juice to the butter, stirring until the mixture is smooth. This is where the citrus meets the butter, forming the base of our curd. The mixture should smell like a warm citrus garden.
- Slowly pour the butter‑orange blend into the yolk‑sugar mixture while whisking vigorously. The key here is to temper the eggs, preventing them from scrambling. Keep whisking until the mixture is glossy and thickened slightly. Kitchen Hack: If you’re new to this, use a whisk that has a larger head; it distributes air more efficiently and reduces the chance of lumps.
- Return the saucepan to low heat and add the zest of two oranges and a pinch of salt. Stir constantly with a heat‑resistant silicone spatula. The curd should start to thicken, and you’ll see it coat the back of the spoon. This is the moment of truth; if it doesn’t thicken within 5 minutes, lower the heat further.
- Once the curd reaches a thick but pourable consistency, remove it from heat. Let it sit for a minute to cool slightly. Then, strain it through a fine sieve into a clean bowl to remove any lumps or zest pieces. Watch Out: Be careful not to press the zest; you want a silky smooth texture. If you strain too aggressively, the curd may become watery.
- Cover the surface of the curd with plastic wrap, pressing the wrap directly onto the liquid to prevent a skin from forming. Chill in the refrigerator for at least 30 minutes before serving. The coolness will set the curd into a glossy, spoon‑able consistency. That sizzle when it hits the pan? Absolute perfection.
That's it — you did it. But hold on, I've got a few more tricks that'll take this to another level...
Insider Tricks for Flawless Results
The Temperature Rule Nobody Follows
Many recipes claim that you should keep the curd at a low temperature, but the real trick is to keep it consistently low. Aim for 180°F (82°C) and monitor with a candy thermometer. If it exceeds 190°F (88°C), the eggs will scramble, ruining the silky finish. I’ve learned that a slow, steady heat is the secret to a flawless curd.
Why Your Nose Knows Best
A seasoned cook will tell you that the scent of the curd is a perfect indicator of readiness. When the aroma shifts from raw citrus to a warm, toasted note, you know the curd has thickened enough. Trust your nose; it’s the most reliable judge of doneness.
The 5‑Minute Rest That Changes Everything
After you strain the curd, let it rest for exactly five minutes before covering it. This brief pause allows the surface to cool and reduces the chance of a skin forming. I’ve seen beginners skip this step and end up with a watery curd that clings to the spoon.
Use a Fine‑Mouth Sieve for a Smooth Finish
Straining through a fine‑mouth sieve removes any zest fragments that could create a gritty texture. If you prefer a more rustic curd, you can leave small zest pieces in; just be aware that it will change the mouthfeel.
Add a Splash of Water Before Reheating
When reheating the curd, add a teaspoon of water to each cup of curd. This steams the curd back to its original silky texture, preventing it from drying out. I’ve tried this trick on a batch that had gone flat after a week in the fridge, and it was a total miracle.
Serve Immediately for the Best Texture
Orange curd is at its peak when freshly made. If you plan to serve it later, keep it chilled and give it a quick stir to restore its glossy sheen. The longer it sits, the thicker it becomes, which is great for certain desserts but not for a light topping.
Creative Twists and Variations
This recipe is a playground. Here are some of my favorite ways to switch things up:
Citrus Symphony
Add a splash of fresh lime juice and a pinch of zest from a lime to give the curd a zesty, slightly tart edge. The lime brightens the orange flavor and adds a subtle complexity that pairs well with sweet pastries.
Herbal Infusion
Stir in a tablespoon of fresh chopped rosemary or thyme while the curd cooks. The herbal aroma complements the citrus, creating a savory‑sweet balance that works wonderfully over grilled chicken or roasted vegetables.
Spiced Delight
Incorporate a pinch of ground ginger or a dash of cinnamon into the curd. The warm spice adds depth and is especially delightful when served over oatmeal or baked apples.
Nutty Crunch
Fold in a handful of toasted almond or hazelnut pieces after the curd has cooled. The crunch contrasts the smoothness, creating a textural surprise that’s perfect for desserts or as a topping for yogurt.
Berry Boost
Stir in fresh blueberries or raspberries after the curd has set. The berries add a burst of color and a subtle tartness that pairs beautifully with the orange base, making for a vibrant parfait.
Almond Milk Swirl
Replace half the butter with almond milk and a tablespoon of almond butter for a nutty twist. This variation works well for vegan or dairy‑free versions, offering a creamy texture with a subtle nutty undertone.
Storing and Bringing It Back to Life
Fridge Storage
Transfer the curd to an airtight container and refrigerate for up to 7 days. The cold environment keeps it smooth and prevents bacterial growth. When you’re ready to serve, give it a quick stir to restore its glossy sheen.
Freezer Friendly
For longer preservation, freeze the curd in a freezer‑safe container, leaving a ½ inch headspace. It will keep for up to 3 months. Thaw overnight in the fridge, then stir to re‑emulsify before serving.
Best Reheating Method
To reheat, place the curd in a small saucepan over low heat and add a splash of water (about 1 teaspoon per cup). Gently warm it while stirring until it returns to a pourable consistency. Avoid high heat to prevent curdling.