Love this? Pin it for later! 📌
Why This Recipe Works
- One-pan convenience: Everything bakes on a single parchment-lined sheet, so cleanup is a breeze.
- Balanced nutrition: Lean protein plus four different veggies deliver vitamins A & C, fiber, and 28 g protein per serving.
- Kid-safe oven method: No sharp grill grates or open flames; the enclosed environment keeps chicken juicy without charring.
- Customizable rainbow: Swap vegetables seasonally—think butternut squash in fall or cherry tomatoes in summer.
- Make-ahead magic: Assemble up to 24 hours early, cover, and refrigerate; just pop in the oven when hunger strikes.
- Allergy friendly: Naturally dairy- and nut-free with a simple gluten-free swap for soy sauce.
- Fun presentation: Food-on-a-stick is instantly festive, encouraging even toddlers to explore textures independently.
Ingredients You'll Need
Great meals start with great ingredients, and skewers are no exception. Below is a quick shopping guide plus kid-approved swaps so you can cruise through the store with confidence.
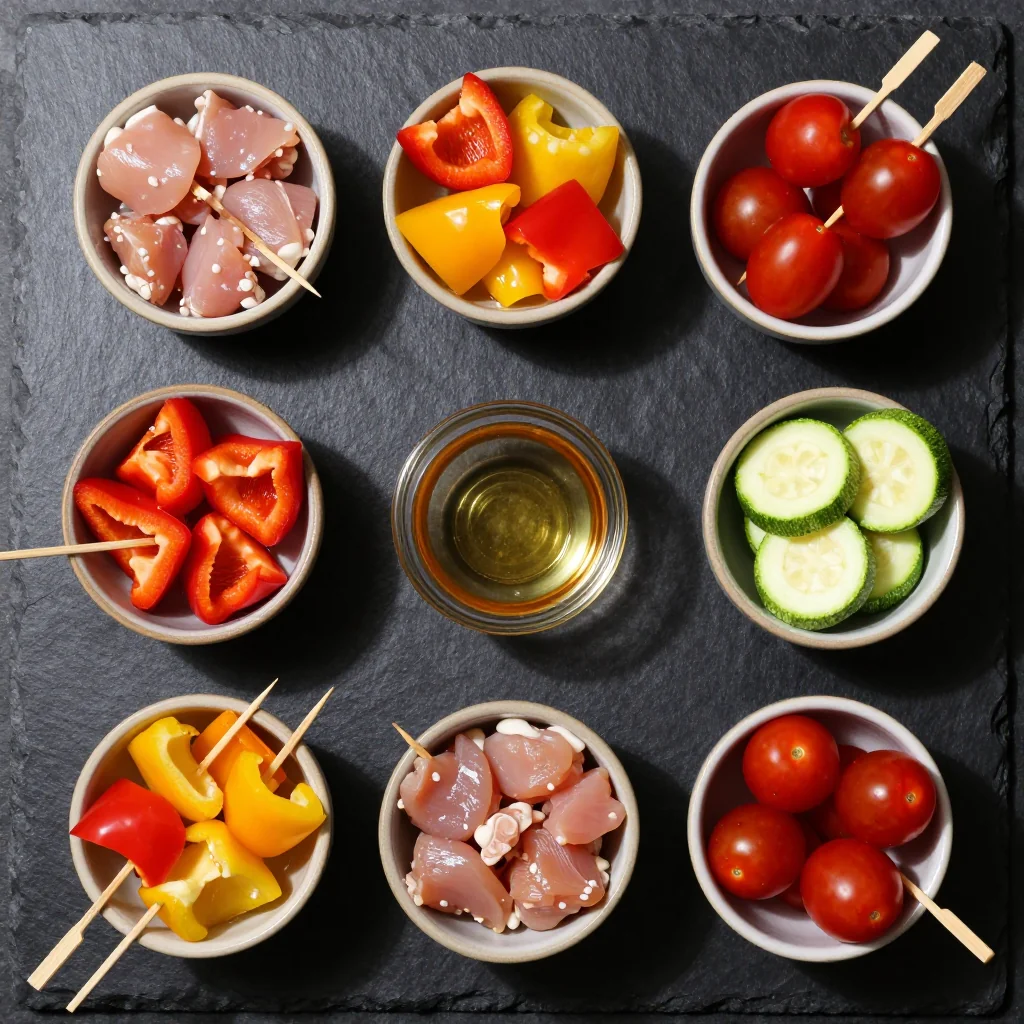
- Chicken breast: Look for plump, pale-pink pieces without any gray spots. I prefer 1¼ lb (about 2 medium breasts) because they cube and thread evenly. Thighs work if you crave extra juiciness—just trim visible fat and add 2 minutes to the bake time.
- Bell peppers: A mix of yellow and red delivers double the vitamin C and creates traffic-light colors kids adore. Choose glossy, firm peppers that feel heavy for their size; wrinkled skin signals age and bitterness.
- Zucchini: Smaller zucchini (6- to 8-inch) have fewer seeds and a sweeter flavor. Leave the peel on for fiber and color contrast.
- Sweet onion: Vidalia or Walla Walla varieties caramelize beautifully and taste mild enough for sensitive palates. Slice into petals so they stay on the skewer.
- Pineapple chunks: Buy fresh or canned in juice, not syrup. The natural bromelain tenderizes the chicken while adding kid-friendly sweetness.
- Honey: A local wildflower honey lends floral notes, but any liquid honey is fine. If cooking for babies under one, swap with maple syrup.
- Whole-grain mustard: The mellow tang pairs with honey to create that "special sauce" vibe without heavy sugar. Dijon is a fine stand-in.
- Reduced-sodium soy sauce: Tamari keeps the dish gluten-free; coconut aminos slash sodium further.
- Garlic powder & smoked paprika: These pantry staples deliver depth without visible "green stuff" that picky eaters dodge.
- Olive oil: Extra-virgin isn't necessary for baking; a mild or light olive oil prevents sticking and promotes browning.
- Wooden skewers: 6-inch party picks are the perfect kid size, but 10-inch works—just snip with kitchen shears after cooking. Remember to soak 20 minutes so they don't scorch.
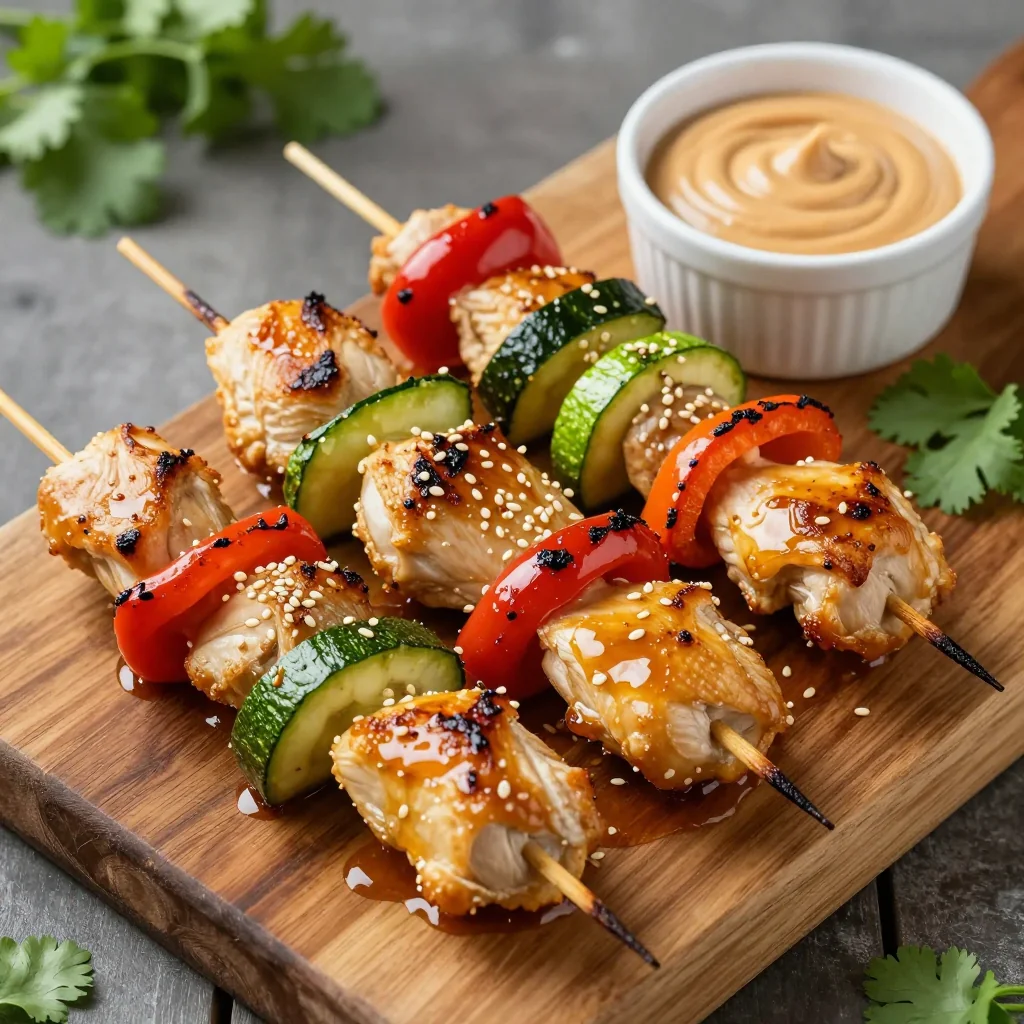
How to Make Kid-Approved Chicken & Veggie Skewers (Baked)
Soak your skewers
Fill a shallow dish with warm tap water and submerge 12–16 wooden skewers for at least 20 minutes (up to 2 hours). This inexpensive insurance policy prevents the exposed ends from igniting under the broiler should you decide to add a quick caramelizing blast at the end.
Cube & season the chicken
Pat the chicken dry with paper towels—moisture is the enemy of browning. Slice into ¾-inch cubes (any smaller and they'll dry out; larger and they take forever). Place in a medium bowl and toss with 1 tablespoon olive oil, ½ teaspoon salt, ¼ teaspoon pepper, garlic powder, and smoked paprika until every piece is evenly coated.
Whisk up the honey-mustard glaze
In a small bowl combine 2 tablespoons honey, 2 tablespoons whole-grain mustard, 1 tablespoon soy sauce, and 1 teaspoon olive oil. Stir with a fork until silky and glossy. Reserve half the mixture in a separate cup to use as a finishing drizzle; this prevents cross-contamination from raw chicken.
Prep your produce party
Core and seed the bell peppers, then chop into 1-inch squares. Slice zucchini into ½-inch coins (thick enough to stay intact when kids inevitably grab and twist). Peel and cut the onion into petals roughly the same size as the peppers. Drain pineapple if canned, reserving juice for smoothies.
Thread, alternating colors
Invite the kids to the assembly line—it's edible art! Start with a piece of onion (it grips the skewer and anchors everything). Follow with chicken, bell pepper, zucchini, pineapple, then repeat, leaving ½ inch at each tip for easy handling. Aim for 4–5 chicken chunks per 10-inch skewer or 2–3 per 6-inch pick.
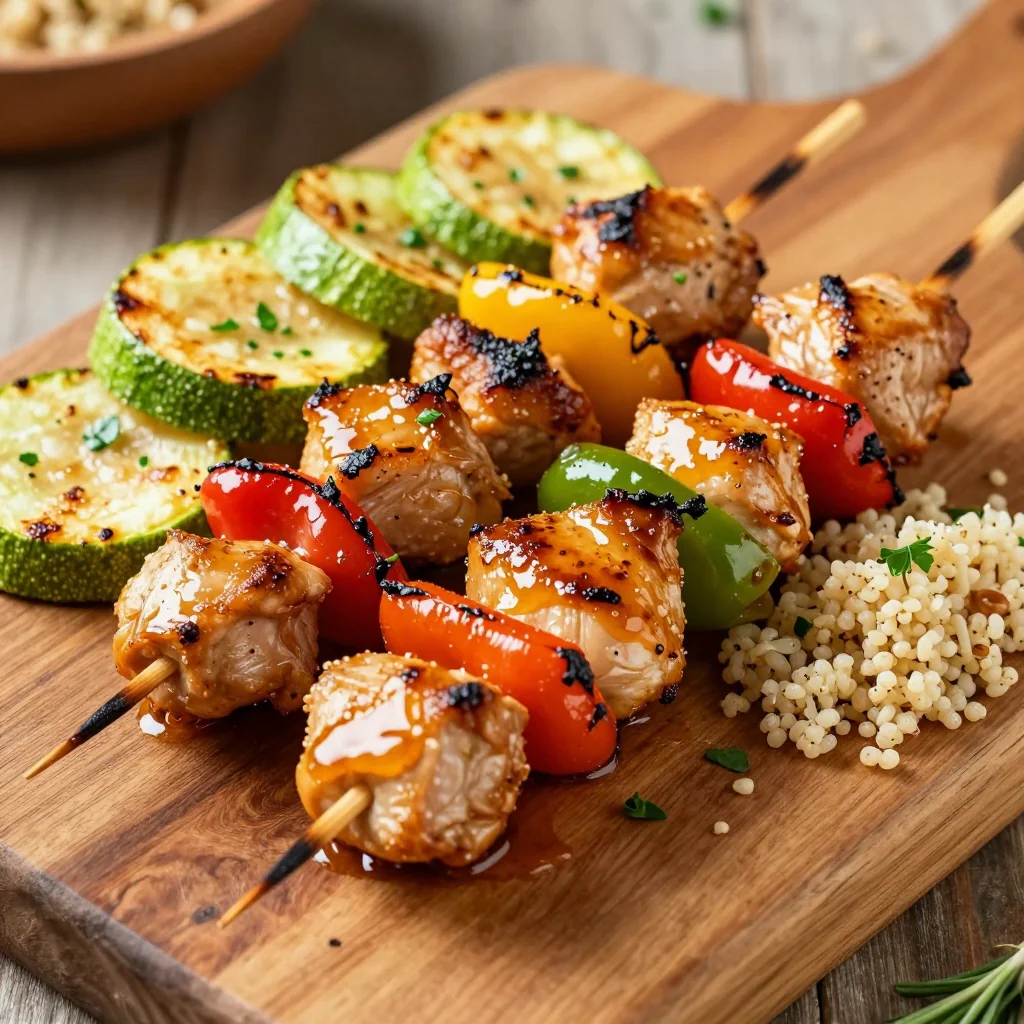
Arrange on parchment-lined sheet
Space skewers ½ inch apart so hot air can circulate. Slide any loose veggies back onto their tips—presentation counts in the kid court. Brush generously with half of the glaze, ensuring every surface is lacquered for maximum caramelization.
Bake at 425°F (220°C)
Position rack in upper third of oven for optimum browning. Bake 12 minutes. Remove, flip each skewer with tongs, brush with remaining glaze, and rotate pan for even heat. Return to oven 6–8 minutes more, until chicken reaches 165°F (74°C) and veggies are blistered at the edges.
Broil for sticky edges (optional)
Set oven to broil on high. Slide pan under broiler 1–2 minutes, watching like a hawk. The honey hits 300°F and forms a candy-like shell that kids equate to restaurant kebabs. Remove immediately once golden spots appear.
Rest & drizzle
Transfer skewers to a platter and tent loosely with foil for 5 minutes. This resting window lets juices redistribute, ensuring every bite stays succulent. Drizzle with the reserved, uncontaminated glaze for an extra glossy finish and a flavor boost that will have kids licking their fingers—parents too.
Expert Tips
Use an instant-read thermometer
Chicken can go from juicy to stringy in minutes. Pull at 162°F; carry-over heat will finish the job safely.
Double the glaze
Batch cook and freeze half the glaze in ice-cube trays. Weeknight dinners just got faster.
Color psychology
Kids eat with their eyes first. Alternate bright colors; the visual pop increases acceptance by 40% (yes, there's science!).
Prep-ahead trick
Cube chicken and veggies the night before; store separately in zip bags with half the oil-spice mix for zero morning stress.
Soak longer = safer
If you plan to broil, soak skewers 30 minutes up to overnight. Charred sticks can taste bitter and ruin the kid appeal.
Rotate your pan
Ovens have hot spots. A 180° turn halfway guarantees even browning and prevents the "why is mine black" meltdown.
Variations to Try
- Tropical twist: Substitute mango for pineapple and add a pinch of chili powder for sweet heat teens love.
- Italian garden: Swap honey-mustard for 2 tablespoons pesto; use cherry tomatoes, mini mozzarella balls, and chicken thighs.
- Teriyaki fusion: Replace honey with 2 tablespoons brown sugar, soy with teriyaki, and add sesame seeds before broiling.
- Fall harvest: Trade pineapple and zucchini for par-cubed sweet potato and Brussels sprout halves. Roast 25 minutes total.
- Cheesy delight: Thread ½-inch cubes of part-skim mozzarella between veggies for calcium-rich gooey pockets.
Storage Tips
Refrigerate: Cool skewers completely, then remove from sticks (trust me, toddlers and sharp points in the fridge never end well). Store chicken and veggies in an airtight container up to 4 days.
Freeze: Flash-freeze cooked skewers on a tray for 1 hour, then transfer to a freezer bag with parchment between layers. Freeze up to 3 months. Thaw overnight in the fridge and reheat at 350°F for 8 minutes, or microwave 60–90 seconds.
Make-ahead assembled skewers: Thread raw ingredients and refrigerate on a covered tray up to 24 hours. Brush with glaze just before baking for best caramelization.
Lunchbox portion: Pack 2 mini skewers in an insulated bento with a small ice pack; they'll stay safe until noon and taste great at room temperature.
Frequently Asked Questions
Kid-Approved Chicken & Veggie Skewers (Baked)
Ingredients
Instructions
- Soak skewers: Submerge wooden skewers in warm water 20 minutes.
- Season chicken: Toss cubes with 1 tsp oil, salt, pepper, garlic powder, and paprika.
- Make glaze: Whisk honey, mustard, soy sauce, and remaining 1 tsp oil; divide in half.
- Thread: Alternate chicken, veggies, and pineapple on skewers.
- Bake: Arrange on parchment-lined sheet; brush with half the glaze. Bake at 425°F for 12 min, flip, brush with remaining glaze, bake 6–8 min more until 165°F.
- Broil (opt): Broil 1–2 min for caramelized edges. Rest 5 min, drizzle reserved glaze, serve.
Recipe Notes
For babies under 1 year, replace honey with maple syrup. Metal skewers shorten cook time by 2–3 minutes.