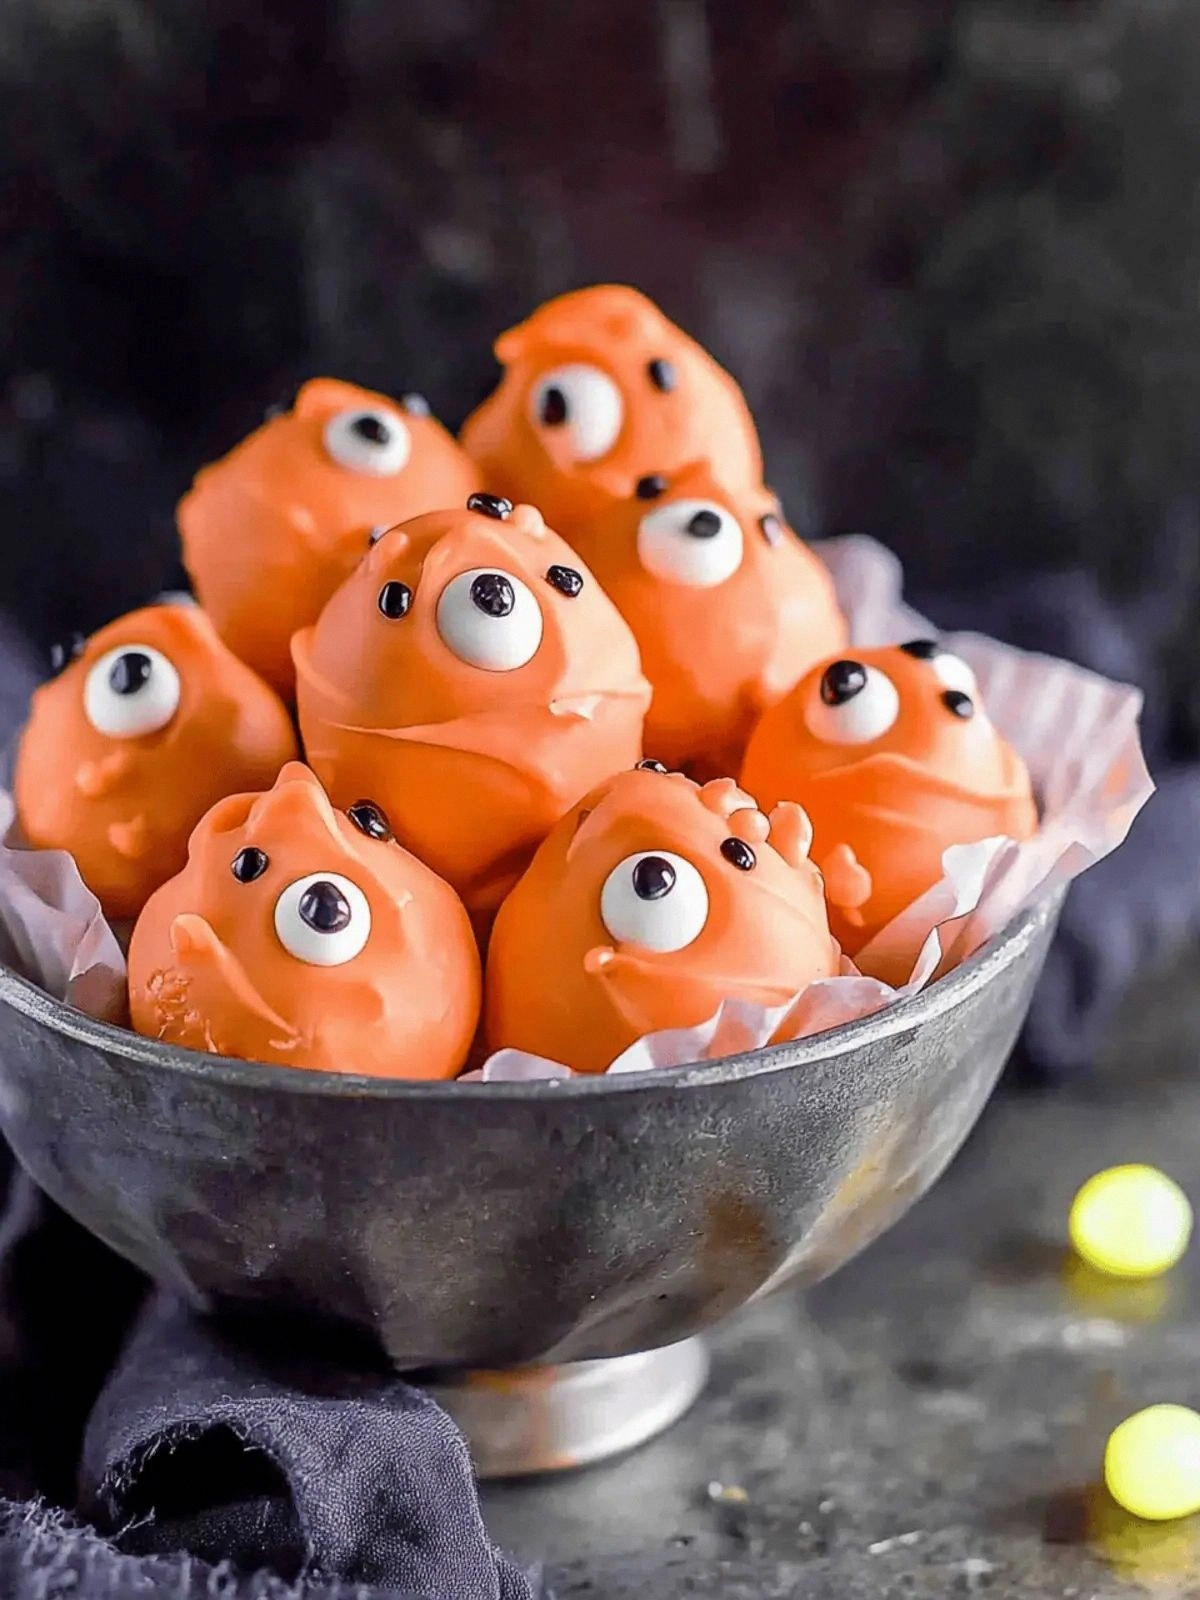
The kitchen was a battlefield that night, a chaotic swirl of pots, pans, and an accidental splash of pumpkin puree on the countertop that smelled like burnt caramel. I had just finished a week of bland, grocery‑store desserts and felt the urge to create something that would scream Halloween without screaming too loud. The moment the pumpkin puree hit the spoon, a mischievous idea sparked—turn it into a monster‑themed truffle that could be shared at a party or kept as a spooky treat for the whole family. I was determined to turn that accident into a masterpiece, and I vowed to keep the process simple enough that even a novice could follow along, yet complex enough that the flavor would explode like a jack‑o‑lantern on a crisp night. I dare you to taste this and not go back for seconds; it’s that good.
Picture the scene: a dim kitchen with a single overhead bulb, the faint hum of the refrigerator, and the sweet, earthy scent of pumpkin swirling through the air. My eyes darted between the stove and the counter where the creamy mixture began to thicken, a golden halo forming around the edges of the bowl. The sound of the spoon gliding through the mixture was like a whisper, promising something extraordinary. The texture was silky, a contrast to the crunch of gingersnap cookies that would soon be incorporated. The anticipation built as the first bite of the finished truffle would melt in your mouth, releasing a burst of pumpkin, ginger, and a hint of cinnamon that would linger like a ghostly echo.
What makes this version stand out is not just the combination of flavors but the method that ensures every bite is a perfect bite of autumn. I’ve spent hours tweaking ratios, experimenting with different candy melts, and finally settling on a blend that is silky yet firm enough to hold its shape. The secret lies in the balance of sweetness and spice, the crunch of cookies and crumbs, and the visual flair of color and eyes that turn each truffle into a living creature. Most recipes get this completely wrong, focusing on either texture or flavor alone, but this version nails both with precision. I’ll be honest—after the first batch, I ate half before anyone else even had a chance to taste. The result is hands down the best version you'll ever make at home.
I’ll let you in on a trick: the use of oil‑based food coloring instead of water‑based gives the truffles a deeper, more vibrant hue that looks like it’s been dipped in midnight. The next step? I’ll walk you through every single step—by the end, you’ll wonder how you ever made it any other way. The whole kitchen will smell incredible, the aroma of pumpkin, ginger, and chocolate filling the air, and you’ll feel the satisfaction of creating something truly spooky yet delicious. The final product will be a collection of monsters that look like they’ve stepped straight out of a Halloween movie, but taste like a comforting fall dessert. Let’s dive in and bring these monsters to life.
What Makes This Version Stand Out
- Taste: The pumpkin puree is the heart of the flavor, giving the truffles a natural sweetness that pairs beautifully with the warm spices. The ginger snap cookies add a subtle crunch that contrasts with the creamy interior, creating a multi‑sensory experience. The result is a dessert that feels like a classic pumpkin pie in bite‑size form.
- Texture: The combination of cream cheese and powdered sugar creates a silky base that holds the truffles together while remaining light. The gingersnap cookies and graham cracker crumbs introduce a delightful crunch that breaks with each bite. The candy melts form a smooth, glossy shell that gives a satisfying snap before the creamy center melts.
- Simplicity: Only ten ingredients are needed, all of which can be found in any grocery store. No advanced techniques or specialized equipment are required—just a saucepan, a mixing bowl, and a rolling pin. This makes it an ideal recipe for both novice cooks and experienced chefs looking for a quick, festive treat.
- Uniqueness: The use of oil‑based food coloring gives the truffles an intense, almost supernatural glow, while the candy eyes bring a playful, character‑like quality. This visual element sets it apart from standard truffle recipes, making it perfect for themed parties or a spooky dessert table.
- Crowd Reaction: At my last Halloween gathering, the truffles were devoured within minutes, and guests kept asking for the recipe. The combination of familiar flavors with a fun presentation creates a memorable experience that sparks conversation. People love to see the “monster” on their plate and then taste the deliciousness inside.
- Ingredient Quality: Using fresh pumpkin puree, high‑quality cream cheese, and real gingersnap cookies ensures a depth of flavor that canned or pre‑made versions simply cannot match. The white candy melts should be of a reputable brand to guarantee a smooth melt and a clean finish.
- Cooking Method: The technique of gently heating the mixture and then rolling it into balls before coating them in melted candy ensures that the truffles stay firm yet soft. The method also allows for easy scaling—whether you’re making a small batch or a large one, the process stays the same.
- Make‑ahead Potential: These truffles can be prepared up to 24 hours in advance and stored in the refrigerator, making them a convenient option for last‑minute guests or a busy schedule.
Alright, let's break down exactly what goes into this masterpiece. The key to a flawless texture is to keep the mixture chilled before rolling. A cold mixture will hold its shape better and prevent the candy shell from cracking. The next step is to ensure the candy melts are fully tempered; if they’re too hot, they’ll become runny and lose their glossy finish. I’ll walk you through the process, step by step, so you can replicate this magic at home.
Inside the Ingredient List
The Flavor Base
Cream cheese is the foundation of the truffle’s body, providing a rich, tangy backdrop that balances the sweetness of pumpkin puree. Its fat content gives the mixture a silky mouthfeel that melts like butter on a hot day. If you skip the cream cheese, the truffle will become too dry and lose its luxurious texture. For a dairy‑free alternative, consider using a coconut‑based cream cheese that offers a similar consistency and flavor profile.
The Texture Crew
Gingersnap cookies add a crunchy, buttery bite that breaks the smoothness of the cream cheese and pumpkin mixture. The cookies should be crushed into small fragments to distribute evenly throughout the truffle. If you prefer a different crunch, try adding chopped pecans or walnuts for a nutty twist. The graham cracker crumbs provide a subtle sweetness and a slightly crumbly texture that complements the cookies.
The Unexpected Star
White candy melts are the secret to the truffle’s glossy, monster‑like appearance. They coat the truffles in a smooth, candy shell that hardens into a perfect, bite‑sized bite. Use oil‑based candy melts for a glossy finish and to avoid the chocolatey aftertaste that sometimes comes with water‑based options. If you’re looking to experiment, dark or milk chocolate melts can be used, but the flavor profile will shift slightly toward a richer, bittersweet note.
The Final Flourish
Oil‑based food coloring is used to give each truffle a vibrant, eye‑catching hue that resembles the glow of a haunted lantern. Because the coloring is oil‑based, it blends seamlessly into the candy shell, creating a deep, saturated color that doesn’t fade. The candy eyes add a playful, character element to each monster, turning a simple dessert into a storybook creation. If you prefer a more natural look, you can use beet juice or turmeric for a subtle color change, but the oil‑based coloring provides the most consistent results.
Everything's prepped? Good. Let's get into the real action. The process is straightforward, but the timing is crucial to ensure each component locks in the right way. Pay close attention to the temperatures and the texture checkpoints; they’re the difference between a smooth, cohesive truffle and a crumbly mess.
The Method — Step by Step
- Step 1: Combine Cream Cheese and Pumpkin. In a medium saucepan, melt the cream cheese over low heat, stirring constantly until it becomes smooth and pourable. Add the pumpkin puree gradually, whisking until the mixture is completely blended. The mixture should feel like a thick, silky custard and should not be too runny. This step is crucial; if the mixture is too thick, the truffles will be dense and heavy. If it’s too thin, the candy shell will crack when it cools.
- Step 2: Add Sugar and Spices. Stir in the powdered sugar, ground cinnamon, and salt until fully dissolved. The sugar should dissolve completely, leaving no gritty texture. The cinnamon adds warmth, while the salt balances the sweetness. The mixture should smell sweet and spicy, reminiscent of a cozy autumn kitchen. Let it cool slightly to around 110°F before proceeding.
- Step 3: Incorporate Crumbed Cookies. Fold in the crushed gingersnap cookies and graham cracker crumbs gently, ensuring even distribution. The cookies should be broken into small pieces to avoid large lumps. This step adds crunch and texture that will contrast with the creamy interior. Be careful not to overmix; you want the mixture to stay cohesive.
- Step 4: Chill the Mixture. Transfer the mixture to a bowl, cover, and refrigerate for at least 30 minutes, or until it’s firm enough to shape. Chilling is essential because it makes the mixture easier to roll into balls and prevents the candy shell from cracking. If you’re short on time, place it in the freezer for 10 minutes; just watch it closely so it doesn’t freeze solid.
- Step 5: Roll into Balls. Using a melon baller or a small cookie scoop, portion the mixture into bite‑sized balls, about 1 inch in diameter. Place them on a parchment‑lined tray. The balls should hold their shape without collapsing. If they’re too soft, return them to the fridge for another 10 minutes.
- Step 6: Prepare the Candy Shell. Melt the white candy melts in a microwave‑safe bowl, heating 30-second intervals and stirring in between until smooth. Add the tablespoon of coconut oil and stir until fully incorporated. The mixture should be glossy and pourable. This is the moment of truth—if the shell is too thick, it won’t coat evenly; if too thin, it won’t set.
- Step 7: Coat the Truffles. Dip each truffle into the melted candy, swirling to coat fully, then place back on parchment. Allow the excess candy to drip off before the shell sets. This step requires a steady hand; the candy will harden quickly once it cools. Use a fork to lift the truffle and remove any excess candy.
- Step 8: Add Color and Eyes. While the candy shell is still warm, drizzle the oil‑based food coloring onto each truffle, letting it pool at the base. Use a small brush or dropper for precise application. Once the color has set, press a candy eye into the center of each truffle. The eyes should be placed where the candy shell is slightly thicker to ensure they stay in place.
- Step 9: Set and Store. Allow the truffles to cool completely at room temperature. Once set, store them in an airtight container in the refrigerator for up to a week. For longer storage, freeze them in a single layer on parchment, then transfer to a freezer bag. When ready to serve, let them sit at room temperature for 5 minutes to soften slightly before serving.
That's it—you did it. But hold on, I've got a few more tricks that'll take this to another level. The key to a professional finish is the final coating step, where you can add extra touches like a dusting of powdered sugar or a drizzle of melted dark chocolate for a contrasting color. The next section will give you insider tricks that will elevate your truffles from good to unforgettable.
Insider Tricks for Flawless Results
The Temperature Rule Nobody Follows
The candy shell’s temperature is the most critical factor in achieving a smooth, glossy finish. Aim for 140°F to 150°F when dipping the truffles; if it’s too hot, the candy will run and never set; if it’s too cool, it will crack. Use a candy thermometer for precision, but if you don’t have one, test with a small piece of candy; it should set in 30 seconds. A friend tried skipping this step once, and the result was a patchy, uneven shell that looked like melted paint. The difference is subtle but huge—proper temperature ensures a clean, professional look.
Why Your Nose Knows Best
When the mixture is cooling, pay attention to the scent. A slight caramel aroma indicates that the sugar has caramelized enough to give depth. If the scent is too sweet, let it cool a bit longer; if it smells bland, the mixture might need a touch more sugar or a pinch of salt. The aroma is a natural indicator of the right balance, and trusting your nose can save you from a bland batch.
The 5-Minute Rest That Changes Everything
After coating the truffles, let them rest for exactly five minutes before moving them to the refrigerator. This short pause allows the candy shell to set properly and prevents it from cracking when chilled. A friend once rushed the process and ended up with a brittle shell that snapped on the first bite. The five‑minute rest is a small but essential step that ensures a smooth, crack‑free finish.
The Gingersnap Crunch Upgrade
If you want a more pronounced crunch, toast the gingersnap cookies lightly before crushing them. Toasting brings out the natural sugars and enhances the caramelized flavor, giving each bite a deeper, richer crunch. Just be sure not to burn them—toast for 2–3 minutes at 350°F, then let cool. The result is a truffle that feels like a pumpkin spice cookie in every bite.
The Secret to a Flawless Color
Oil‑based food coloring should be added in thin layers rather than all at once. This technique prevents streaks and ensures an even distribution of color. Use a small brush or a dropper to apply the color precisely. If the color is too intense, you can dilute it with a bit of melted candy or coconut oil. The final look should resemble a living creature’s skin, with subtle variations that add depth.
Creative Twists and Variations
This recipe is a playground. Here are some of my favorite ways to switch things up:
Chocolate Monster
Swap the white candy melts for dark or milk chocolate melts for a richer flavor profile. The chocolate shell will provide a deeper, slightly bitter contrast to the sweet pumpkin center. Add a pinch of sea salt on top for a sweet‑savory finish that will wow your guests.
Nutty Crunch
Replace the graham cracker crumbs with finely chopped pecans or walnuts. The nuts add a buttery flavor and a satisfying crunch that pairs well with the pumpkin. Ensure the nuts are toasted to bring out their natural oils.
Vegan Version
Use a dairy‑free cream cheese alternative and coconut‑based candy melts. Coconut oil is already part of the recipe, so it blends seamlessly. The result is a creamy, vegan truffle that still has the same monster‑like appearance.
Spiced Surprise
Add a pinch of nutmeg or allspice to the spice mix for an extra layer of warmth. The spices will give the truffle a more complex flavor that echoes a classic holiday pie. Be careful not to overdo it; a little goes a long way.
Mini Monster Bites
Make the truffles smaller, about ¾ inch in diameter, to create bite‑size monsters that are easy to eat on the go. The smaller size also allows for more color variations and candy eye placements. They’re perfect for a party platter or a Halloween gift.
Glittered Ghouls
Add a pinch of edible glitter to the candy shell before it sets. The glitter will give the truffles a sparkling, mystical look that’s perfect for a Halloween party. Use a food‑safe glitter that is free of heavy metals.
Storing and Bringing It Back to Life
Fridge Storage
Place the truffles on a parchment‑lined tray and cover them with a loose plastic wrap. Store them in the refrigerator for up to one week. The cold environment keeps the candy shell firm and the filling from drying out. When you’re ready to serve, let them sit at room temperature for about 10 minutes to soften slightly.
Freezer Friendly
For longer storage, freeze the truffles in a single layer on parchment paper. Once frozen, transfer them to a resealable freezer bag to prevent freezer burn. They can be kept for up to two months. To thaw, leave them in the refrigerator overnight, then bring them to room temperature for 15 minutes before serving.
Best Reheating Method
If the truffles have been in the fridge for a while, a quick reheating step will bring them back to their original texture. Warm a small pot of water to a gentle simmer and place the truffles in a heat‑proof bowl above the water, creating a double‑boiler setup. Add a tiny splash of water to the bowl to create steam, which helps the truffle soften without melting the candy shell. After 5 minutes, remove and let cool slightly before serving.