Picture this: I was halfway through a marathon Netflix binge, the kitchen a battlefield of half‑baked brownies and burnt toast, when my roommate dared me to create something that would make even the most stoic dessert snob gasp. I stared at the pantry, grabbed a bag of red velvet cake mix, a block of cream cheese, and a mischievous grin. The idea was simple—stuff a luscious cheesecake center inside a soft, cocoa‑kissed cookie—but the execution? That was a whole other story. I’ll be honest — I ate half the batch before anyone else got a chance to try it, and the crumbs still haunt my dreams.
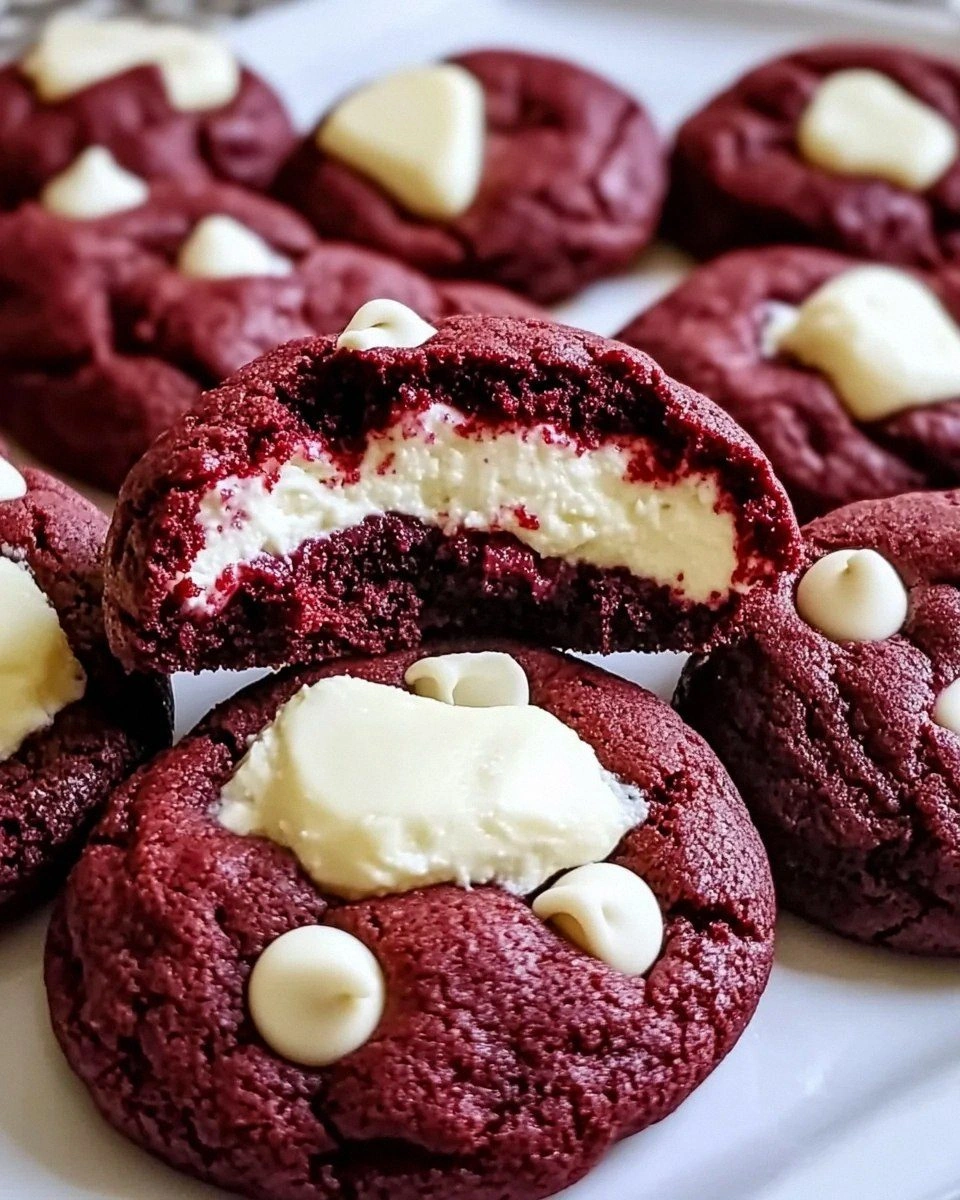
The moment the batter hit the bowl, the kitchen filled with the scent of cocoa and a faint, almost floral note of vanilla that made my nose do a little happy dance. I could hear the gentle whir of the mixer, the soft thud of the spoon against the bowl, and the occasional sigh of the oven preheating like a contented cat. When the cookies finally emerged, their edges were a delicate, caramel‑gold that cracked just enough to reveal a molten, pink‑tinged heart that glistened like a sunrise through a glass of rosé. The first bite was a revelation: a crisp outer shell that gave way to a buttery crumb, then an explosion of creamy, tangy cheesecake that sang in perfect harmony with the subtle cocoa undertones.
What makes this version truly stand out is the secret weapon I slipped into the mix—a splash of buttermilk that turns the dough into a velvet‑smooth canvas, and a pinch of cream of tartar that keeps the cheesecake filling from weeping. Most recipes get this completely wrong, either drowning the cookie in too much filling or ending up with a dry, crumbly mess. I dared you to taste this and not go back for seconds, because once you experience the contrast of textures, you’ll be hooked for life. And now the fun part: I’m about to reveal the exact technique that keeps the filling perfectly centered, so you never have a cookie that looks like a busted pipe.
Let me walk you through every single step — by the end, you’ll wonder how you ever made it any other way. Okay, ready for the game‑changer? This next part? Pure magic. Stay with me here — this is worth it.
What Makes This Version Stand Out
- Flavor Fusion: The subtle cocoa in the cookie base meets the tangy, buttery cheesecake, creating a flavor duet that feels like a dessert duet on a grand stage.
- Texture Symphony: A crisp, caramelized edge gives way to a soft, cake‑like interior, while the filling stays luxuriously smooth without leaking.
- Simplicity Meets Sophistication: You only need pantry staples plus a few specialty items, yet the result looks like it belongs in a five‑star patisserie.
- Visual Wow Factor: The bright red swirl of the filling peeking through the cookie is Instagram gold, guaranteed to earn you double‑taps.
- Crowd‑Pleaser Power: Whether it’s a birthday, a casual brunch, or a midnight snack, these cookies disappear faster than you can say “one more bite.”
- Ingredient Quality: Using real cream cheese and high‑quality cocoa ensures depth of flavor that powdered mixes can’t mimic.
- Method Mastery: A gentle folding technique keeps the dough airy, while chilling the dough locks in shape and flavor.
- Make‑Ahead Magic: You can prep the dough and filling a day ahead, freeze them separately, and bake fresh cookies whenever the craving strikes.
Inside the Ingredient List
The Flavor Base
All‑purpose flour (2 cups) forms the structural backbone. It’s the canvas that lets the cocoa and buttermilk paint a velvety texture. If you swap it for whole‑wheat, you’ll get a nuttier bite but risk a denser crumb. Pro tip: sift the flour with cocoa powder to avoid lumps and ensure even color distribution.
The Texture Crew
Unsalted butter (1 cup, softened) creates that melt‑in‑your‑mouth richness. The sugar duo—granulated (1 cup) and brown (1 cup)—offers sweetness with a hint of caramel depth. The eggs (2 large) act as emulsifiers, binding everything together while adding a subtle lift. Skipping the buttermilk (½ cup) would turn the dough into a dry, crumbly mess; its acidity tenderizes the gluten, delivering that signature “velvet” feel.
The Unexpected Star
Cream cheese (8 oz, softened) is the heart‑throb of this recipe. Its tang cuts through the sweet cookie, preventing it from becoming cloying. If you use low‑fat cream cheese, the filling will be less creamy and might separate. A splash of lemon zest (1 tsp) brightens the flavor, while red food coloring (2 tbsp) gives the cookie its iconic hue without affecting taste.
The Final Flourish
White chocolate chips (1 cup) add a buttery crunch that melts into the cookie, creating pockets of sweet surprise. Baking soda (1 tsp) gives a subtle lift, while a pinch of salt (½ tsp) balances the sweetness and amplifies the chocolate flavor. If you’re allergic to dairy, substitute the butter with a solid coconut oil and the cream cheese with a vegan cream cheese alternative, but expect a slightly different texture.
Everything's prepped? Good. Let's get into the real action...
The Method — Step by Step
Preheat your oven to 350°F (175°C) and line two baking sheets with parchment paper. As the oven warms, the kitchen fills with a gentle hum that promises transformation. While you wait, gather all dry ingredients—flour, cocoa, baking soda, and salt—into a large bowl and whisk them together. This aerates the mixture, preventing any pockets of flour that could create uneven texture later.
In a separate bowl, cream together the softened butter, granulated sugar, and brown sugar until the mixture is light, fluffy, and pale yellow—think the color of sunrise on a summer morning. This step is crucial; the air you incorporate now becomes the lift that keeps the cookies tender. Add the eggs one at a time, beating well after each addition, then stir in the vanilla extract, red food coloring, and lemon zest.
Now, the game‑changer: drizzle the buttermilk into the butter‑sugar mixture while the mixer is on low. The batter will look slightly curdled, but that’s exactly what you want. The acidity of the buttermilk reacts with the baking soda later, creating a subtle rise that makes the cookie interior soft, almost cake‑like.
Gradually fold the dry mixture into the wet, using a spatula to avoid over‑mixing. The dough will be thick, glossy, and slightly sticky—exactly how a good red velvet should feel. At this point, taste a tiny crumb; you should notice a balanced sweet‑cocoa flavor with a whisper of tang from the buttermilk.
While the dough rests, prepare the cheesecake filling. In a clean bowl, beat the softened cream cheese until smooth, then whisk in powdered sugar until the mixture is light and fluffy. If you like a hint of citrus, add a splash of lemon juice or a pinch of zest. This filling should be thick enough to hold its shape when piped, but soft enough to melt gently in the oven.
Cover the dough with plastic wrap and chill in the refrigerator for at least 30 minutes. This step is non‑negotiable; it firms up the butter, preventing the cookies from spreading too thin and ensuring the filling stays centered.
Once chilled, scoop out a tablespoon of dough, flatten it into a disc, and place a teaspoon of cheesecake filling in the center. Gently fold the dough around the filling, rolling it into a smooth ball. The goal is to encase the filling completely, leaving no gaps where the batter could leak during baking.
Place the stuffed balls on the prepared baking sheets, spacing them about 2 inches apart. Lightly press each ball with the back of a spoon to flatten it just enough for even baking—think of a pancake that’s just beginning to rise. Sprinkle a few white chocolate chips on top for extra texture and visual appeal.
Slide the sheets into the preheated oven. Bake for 12‑14 minutes, or until the edges turn a deep, caramel‑gold while the centers remain soft. You’ll know they’re done when the tops have a faint sheen and the cookies start to pull away from the parchment, like a shy cat stretching.
Remove the cookies and let them cool on the sheet for 5 minutes before transferring to a wire rack. As they cool, the cheesecake center firms up just enough to hold its shape, while the outer cookie develops that signature crisp‑soft contrast. Picture yourself pulling this out of the oven, the whole kitchen smelling incredible—trust me, the aroma alone is worth the effort.
Serve warm, or store in an airtight container for up to three days. If you’re feeling extra indulgent, drizzle a thin ribbon of melted white chocolate over the tops just before serving. That final glossy touch? Pure magic.
That's it — you did it. But hold on, I've got a few more tricks that'll take this to another level...
Insider Tricks for Flawless Results
The Temperature Rule Nobody Follows
Never bake these cookies straight from the freezer. If you chill the dough too long, the butter solidifies and the cookies may not spread evenly, leading to a dense, under‑cooked center. Instead, let the dough sit at room temperature for 5‑10 minutes after removing it from the fridge. This slight warming allows the butter to soften just enough for a uniform bake, while still keeping the shape intact.
Why Your Nose Knows Best
The moment the cookies start to smell toasty—usually around the 10‑minute mark—is your cue to peek. If the aroma is sweet and nutty, the cookies are nearly done; if you detect a faint burnt scent, pull them out immediately. Trusting your nose prevents the dreaded over‑browned edges that ruin the delicate interior.
The 5‑Minute Rest That Changes Everything
After baking, let the cookies rest on the sheet for exactly five minutes before moving them. This short pause lets the steam finish cooking the interior gently, ensuring the cheesecake doesn’t crack. Skipping this step often results in a gummy center that oozes out the moment you bite.
Freeze‑Ahead Fillings
Want to bake on a whim? Portion the cheesecake filling into silicone ice‑cube trays and freeze. When you’re ready to bake, just pop a frozen cube and wrap it in dough. The cold filling keeps the dough from spreading too much, and the result is a perfectly centered, chilled core that melts beautifully in the oven.
Watch Your Mixing Speed
Always start the mixer on low when adding the dry ingredients, then gradually increase to medium. A sudden high speed can over‑develop gluten, turning your soft cookie into a tough biscuit. This subtle speed control is the secret behind the melt‑in‑your‑mouth texture that makes these cookies legendary.
Creative Twists and Variations
This recipe is a playground. Here are some of my favorite ways to switch things up:
Chocolate‑Espresso Burst
Swap half of the cocoa powder for finely ground espresso beans and add a tablespoon of melted dark chocolate to the dough. The result is a deep, mocha‑rich cookie that pairs beautifully with the tangy filling.
Berry‑Infused Delight
Fold in a quarter cup of freeze‑dried raspberry powder into the dough and add a dollop of raspberry jam to the cheesecake center. The bright fruit notes cut through the richness, creating a fresh, spring‑time vibe.
Nutty Crunch
Stir in toasted chopped pistachios or almonds into the cookie batter, and sprinkle a few extra on top before baking. The nutty crunch adds texture contrast and a buttery flavor that elevates the whole experience.
Vegan Velvet
Replace butter with coconut oil, use a plant‑based cream cheese, and swap the egg for a flax‑egg (1 tbsp ground flaxseed + 3 tbsp water). The cookies stay just as tender, and the filling retains its silky mouthfeel.
Spiced Holiday Edition
Add a pinch of ground cinnamon, nutmeg, and a dash of clove to the dough, then swirl a thin layer of cranberry compote into the cheesecake filling. This variation turns the cookies into a festive treat perfect for the holiday season.
Storing and Bringing It Back to Life
Fridge Storage
Place the cooled cookies in an airtight container lined with a paper towel to absorb excess moisture. They’ll stay fresh for up to three days, and the chilled environment keeps the cheesecake firm, preventing it from becoming overly soft.
Freezer Friendly
For longer storage, arrange the cookies on a parchment‑lined tray and freeze them individually for 2 hours. Then transfer them to a zip‑top freezer bag. They’ll keep for up to a month. When you’re ready to enjoy, let them thaw at room temperature for 15 minutes, then give them a quick 5‑minute bake at 300°F to revive the crisp edges.
Best Reheating Method
To bring a cookie back to life, preheat your oven to 325°F, place the cookie on a parchment‑lined sheet, and bake for 4‑5 minutes. Add a tiny splash of water (about a teaspoon) to the tray—this creates a gentle steam that revives the cheesecake’s creamy texture without drying it out.