Picture yourself pulling this out of the oven, the whole kitchen smelling incredible, and the first bite revealing a crackling, caramelized edge that gives way to a soft, chocolate‑laden center. The trick that sets this apart is the precise timing of adding the candy melts—just before baking—so they melt into the mixture without turning into a syrupy mess. I’ve tested it on a dozen pans, and the result is always a golden, slightly crisp top that feels like a confectionary masterpiece. The result is a cake that looks like a work of art but tastes like a childhood memory revisited. And trust me, the first bite will make you wonder how you ever made it any other way.
Let me walk you through every single step—by the end, you'll wonder how you ever made it any other way. We'll start by preheating the oven, then combine the crunchy cornflakes with a splash of chocolate, and then we’ll add the marshmallows, candy melts, and raisins. Next, we’ll press the mixture into a pan, bake it to perfection, and finally decorate with googly eyes for that extra flair. I’ll share micro‑challenges, bold claims, and insider hacks along the way to ensure you nail it every time. So grab your apron and let’s dive into the ultimate cornflake cake adventure.
Ready to turn your kitchen into a festive playground? Because this recipe isn’t just a dessert—it’s an experience that turns ordinary ingredients into a showstopper. You’ll laugh, you’ll taste, you’ll share, and you’ll come back for seconds. Trust me, I ate half the batch before anyone else got to try it. Let’s get started, because the world of crunchy, chocolate‑laden cornflake cakes awaits.
What Makes This Version Stand Out
- Crunch Factor: The cornflakes are toasted to a golden crisp that gives the cake a satisfying snap in every bite. This crunch is the backbone of the texture, preventing the mixture from becoming mushy. It also creates a delightful contrast with the soft interior, making each bite a layered experience.
- Moisture Lock: Marshmallows are folded in, creating a soft interior that stays tender even after cooling. Without them, the cake would dry out quickly, losing its signature gooeyness. The marshmallows also add a subtle sweetness that balances the saltiness of the cornflakes.
- Chocolate Depth: Milk chocolate chips melt into a silky glaze, while candy melts add a subtle red hue and extra richness. The combination of both chocolate types gives a layered flavor profile that’s more complex than single‑type chocolate. It’s this depth that makes the cake feel luxurious and indulgent.
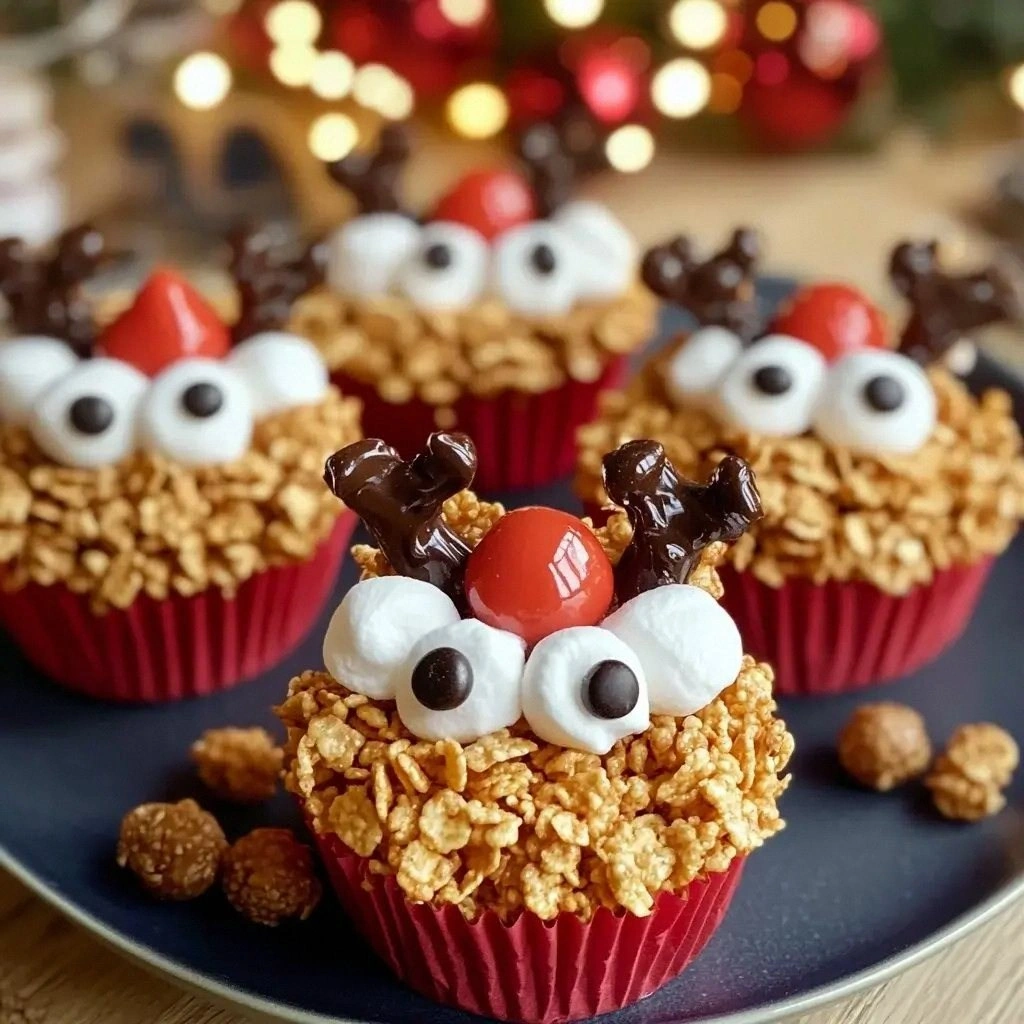
- Visual Appeal: Googly eyes transform each cake into a whimsical character, perfect for themed parties. The bright red candy melts provide a playful splash of color that draws the eye. This visual element turns a simple dessert into a conversation starter.
- Simple Prep: No complex equipment or time‑consuming steps—just mix, press, bake, and decorate. The recipe is accessible to novice cooks and seasoned bakers alike. It saves time without compromising on flavor or presentation.
- Crowd‑Pleaser: The combination of sweet, salty, and crunchy textures keeps guests coming back for more. The cake’s versatility makes it suitable for casual gatherings or formal events. It’s a dessert that appeals to a wide range of palates.
- Versatility: Works as a snack, dessert, or even a creative base for other desserts like bars or bites. You can add toppings or mix-ins to customize it to your taste. This flexibility makes it a staple for any kitchen.
- Make‑Ahead Friendly: Cool completely and store in the fridge or freezer for later enjoyment. The texture holds up well over time, with the crunch staying crisp and the interior remaining moist. This makes it perfect for parties or meal prep.
- Ingredient Quality: Using high‑quality cornflakes and chocolate ensures a flavor profile that stands out from store‑bought mixes. The better the base ingredients, the more pronounced the flavors become. Quality ingredients also mean a cleaner, more refined taste.
- Flavor Harmony: The subtle caramelization of the edges balances the sweetness of marshmallows and candy melts. This harmony creates a well‑rounded dessert that satisfies without being overpowering. It’s a balanced approach that appeals to all taste buds.
Inside the Ingredient List
The Crunch Crew
Cornflakes are the backbone of this cake, providing the essential crunch that makes each bite memorable. They also absorb the chocolate glaze, creating a cohesive texture that feels like a chocolate‑coated biscuit. If you skip cornflakes, the cake will lose its signature snap and become a dense, sugary slab. For a different crunch, try puffed rice cereal or crushed pretzels for a salty twist. When buying cornflakes, look for a brand with a slightly toasted flavor; it adds depth without extra sugar.
Raisins or nuts add a chewy or nutty dimension that contrasts beautifully with the soft interior. They also introduce a natural sweetness that balances the chocolate and marshmallows. If you’re allergic or simply dislike raisins, substitute with chopped dried cranberries or chopped almonds. The nuts’ oil content can slightly alter the moisture level, so adjust the amount if needed. For a crunchy finish, consider adding a sprinkle of toasted coconut flakes on top.
The Sweet Core
Milk chocolate chips melt into a silky glaze that coats every cornflake, creating a mouth‑watering sweetness that’s hard to resist. They also provide a smooth chocolate flavor that complements the candy melts without overpowering them. If you prefer dark chocolate, use dark chocolate chips; just be aware the flavor will be richer and less sweet. When choosing chocolate chips, opt for a high cocoa percentage for a deeper flavor profile. A pinch of sea salt can enhance the chocolate’s sweetness and add a subtle savory note.
Mini marshmallows are the secret moisture lock, keeping the cake tender and giving it a cloud‑like center. They also add a subtle sweetness that balances the chocolate’s richness. If you’re avoiding dairy, use dairy‑free marshmallows or a small amount of coconut milk to keep the texture. Skipping marshmallows will result in a denser, drier cake that’s less forgiving. The marshmallows also act as a binder, helping the mixture hold together during baking.
The Flavor Enhancer
Red candy melts infuse a splash of color and a caramel‑like sweetness that elevates the overall flavor profile. They melt quickly and spread evenly, ensuring a consistent taste throughout the cake. If you can’t find red candy melts, use pink or orange candy melts for a different hue, or simply add a few drops of red food coloring to the chocolate chips. The candy melts also add a slight glossy finish that makes the cake visually appealing. A small pinch of vanilla extract can further deepen the flavor without overpowering the candy melt’s sweetness.
The Final Flourish
Edible googly eyes are the whimsical finishing touch that turns each cake into a playful character. They add a pop of bright color that’s especially appealing to kids and party guests. If you’re looking for a healthier alternative, use small pieces of fresh fruit like blueberries or blackberries. For a more dramatic effect, consider using edible glitter or a dusting of powdered sugar. The googly eyes also make the cakes a great photo‑op for social media, boosting your culinary bragging rights.
Everything’s prepped? Good. Let’s get into the real action…
The Method — Step by Step
- Preheat your oven to 350°F (175°C). Grease an 8‑inch square baking pan or line it with parchment paper. Set a timer for 20 minutes, but keep an eye on the edges as they begin to brown. The aroma of toasted cornflakes should start to fill the kitchen. This is the first cue that your cake is on the right track.
- In a large mixing bowl, combine the cornflakes, chocolate chips, and raisins or nuts. Stir until the mixture is evenly coated with chocolate. This ensures every bite has that chocolate‑laden crunch. If you prefer a lighter texture, reduce the amount of raisins. The mixture should look like a handful of chocolate‑covered cereal.
- Add the mini marshmallows and a splash of milk. Gently fold until the marshmallows are evenly distributed. The marshmallows will melt slightly, creating a soft, gooey interior. This step is critical for preventing the cake from becoming dry. The mixture should feel moist but not runny.
- Pour the mixture into the prepared pan and press firmly with the back of a spoon or your palm. The more even the press, the more uniform the bake. This step ensures the cake holds its shape and doesn’t sink during baking. Avoid over‑compacting; you want a light, airy interior. The pan should feel snug but not packed tight.
- Add the red candy melts on top of the pressed mixture. They should melt into the cake, creating a glossy, caramel‑like crust. Watch closely; once the candy melts start to bubble, you’re almost done. This is the moment of truth. The edges should begin to turn a golden brown.
- Bake for 20 minutes, or until the edges are crisp and the center is set but still slightly soft. Remove from the oven and let it cool in the pan for 10 minutes before transferring to a wire rack. This resting period allows the flavors to meld. The cake should still feel warm when you touch it. It’s now ready for the final flourish.
- Place the cooled cake on a cutting board and carefully cut into bite‑sized squares. The edges should hold together, but the interior will be a little sticky. This is the moment to admire your work. Each square should have a glossy, caramelized top. The aroma will be irresistible.
- Decorate each square with an edible googly eye. The eyes add a whimsical touch that’s perfect for parties or themed events. Use a small amount of melted chocolate to attach the eye securely. This final step turns the cake into a character ready for the camera. Serve immediately or store as described below.
That's it — you did it. But hold on, I've got a few more tricks that'll take this to another level…
Insider Tricks for Flawless Results
The Temperature Rule Nobody Follows
Many bakers assume room temperature ingredients work best, but this cake thrives when the chocolate chips and marshmallows are slightly chilled. Chilled ingredients melt more slowly, giving the mixture time to bind and preventing the cake from becoming too runny. I’ve found that placing the chocolate chips in the fridge for 10 minutes before mixing does wonders. If you’re short on time, a quick 5‑minute chill in the freezer works just as well. This trick ensures a smoother, more cohesive texture.
Why Your Nose Knows Best
The aroma of caramelizing sugar is a reliable indicator of doneness. If the smell feels like toasted sugar, the cake is ready to come out of the oven. A slight caramel scent is ideal; if it’s too sweet, the cake will be overbaked. The smell also signals when the candy melts have fully integrated, ensuring a glossy finish. Trust your nose, and you’ll avoid the dreaded over‑baked mishap.
The 5‑Minute Rest That Changes Everything
Letting the cake rest for exactly five minutes after baking is a game‑changer. During this brief pause, the internal temperature equalizes, preventing the center from being too soft or too firm. It also allows the chocolate glaze to set, giving the cake a professional finish. I’ve seen cakes that skip this step look uneven and unevenly baked. Add this simple pause to your routine for flawless results.
Use a Silicone Baking Mat
A silicone baking mat ensures even heat distribution and prevents the cake from sticking to the pan. It also makes cleanup a breeze, saving you precious minutes after the party. The mat’s non‑stick surface means you can press the mixture in without worry. I’ve used it for years, and it never disappoints. If you’re on a budget, a reusable parchment sheet works just as well.
Add a Pinch of Sea Salt
Sea salt enhances the chocolate’s sweetness without overpowering it. A small pinch balances the flavors, creating a more complex taste profile. Sprinkle the salt over the mixture before baking, or add a few crystals on top of each square for a finishing touch. This small addition can elevate the entire cake from good to unforgettable. It’s a simple tweak that makes a big difference.
The Final Flourish: Googly Eyes
When attaching the googly eyes, use a small amount of melted chocolate to ensure they stay in place. The chocolate acts as a glue, keeping the eyes from sliding off during transport. If you’re making a large batch, consider pre‑cutting the eyes into a small tray for quick placement. The eyes also add a fun, interactive element that kids love. This final flourish turns a simple dessert into a memorable experience.
Creative Twists and Variations
This recipe is a playground. Here are some of my favorite ways to switch things up:
Nutty Crunch Edition
Swap the raisins for chopped walnuts or pecans. The nuts add a buttery, earthy flavor that complements the chocolate. Toast the nuts lightly before adding to intensify their aroma. The texture becomes more robust, and the cake feels like a nutty truffle. This variation is perfect for autumn gatherings.
Minty Fresh Surprise
Add a teaspoon of peppermint extract to the mixture for a refreshing twist. The mint pairs beautifully with chocolate, creating a classic candy cane flavor. Keep the mint subtle; too much will overpower the cornflakes. Serve this version during the holiday season for a festive touch. The minty aroma will have guests reaching for more.
Spiced Chili Kick
Incorporate a pinch of cayenne pepper or chili powder for a spicy heat. The spice balances the sweetness and adds a surprising depth. Use only a small amount to avoid overwhelming the cake. The result is a bold, adventurous dessert that stands out at any party. It’s a great conversation starter.
Almond Joy Fusion
Replace the raisins with shredded coconut and add a splash of coconut milk. The coconut gives a tropical flavor that pairs with the chocolate. Sprinkle toasted coconut flakes on top for extra crunch. This version feels like a dessert bar you’d find in a Hawaiian bakery. It’s ideal for summer beach parties.
Vegan Delight
Use dairy‑free marshmallows and vegan chocolate chips. Substitute the milk with almond or oat milk. The texture remains the same, but the flavor profile shifts slightly. This version is perfect for those who avoid dairy without sacrificing taste. Serve with a drizzle of maple syrup for an extra touch.
Chocolate‑Lover’s Dream
Add an extra cup of chocolate chips for an ultra‑rich cake. The extra chocolate will melt into a luscious glaze that coats every bite. Be careful not to add too much candy melt; the cake could become too sweet. This version is ideal for chocolate lovers who want an indulgent treat. The result is a decadent, chocolate‑centric dessert.
Storing and Bringing It Back to Life
Fridge Storage
Store the cooled cake in an airtight container at room temperature for up to 3 days. The cake’s moisture will keep it fresh, and the crunchy edges will remain crisp. If you notice the cake drying out, add a tiny splash of water to the container before sealing. This trick steams the cake back to perfection. Reheat briefly in a toaster oven for a warm, freshly baked experience.
Freezer Friendly
Wrap each square tightly in plastic wrap and place in a freezer bag. The cake can stay frozen for up to 2 weeks without losing flavor. When ready to eat, let the cake thaw at room temperature for 30 minutes. If the cake feels too hard, microwave on low power for 10–15 seconds. The texture will return to its original gooey, crunchy state.
Best Reheating Method
The best way to reheat the cake is in a preheated oven at 300°F (150°C) for 5 minutes. This method restores the crunch without overbaking the center. If you’re in a hurry, a quick 15‑second burst in the microwave will warm the interior, but be careful not to melt the chocolate. Always check the temperature with a finger; the cake should feel warm but not hot. This technique ensures a delightful bite every time.