Skinny Baked Mozzarella Sticks
Picture this: a midnight kitchen raid, a bag of frozen mozzarella sticks, and a stubborn craving that refuses to quit. I was scrolling through a recipe blog, eyes glazed with hunger, when I stumbled across a version that claimed to be “skinny” yet still “crispy.” The boldness of the headline alone was enough to set my taste buds tingling, but the story behind the recipe was the real hook. It started with a kitchen disaster—an over‑baked batch that left the cheese stringing like a sad, melted ribbon across my counter. I vowed to find a way to keep the gooey center while slashing the fat and calories.
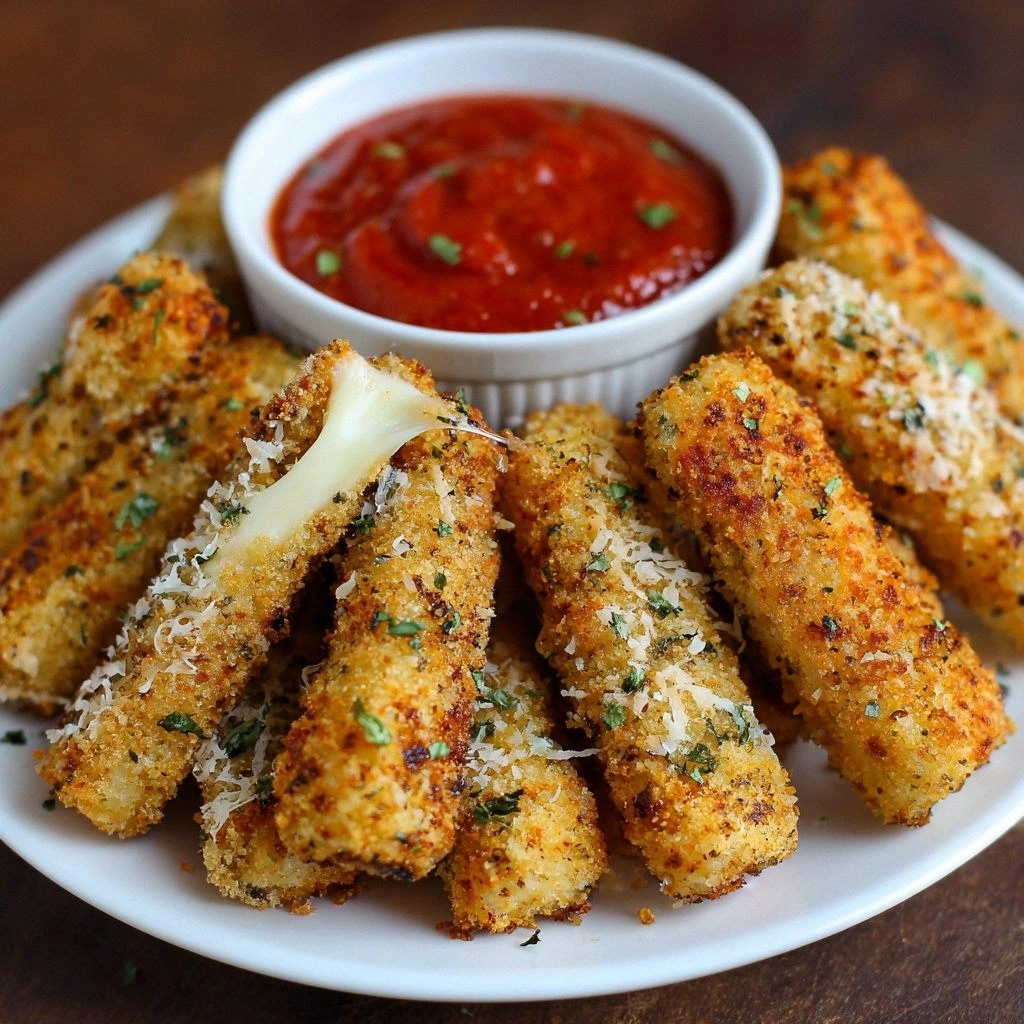
From the first sizzling moment, the aroma of toasted breadcrumbs and melted mozzarella fills the air, a comforting scent that feels like a warm hug. The sound is unmistakable: a gentle crackle as the coating turns golden, a soft hiss as the cheese begins to ooze. The texture is a layered delight—crisp on the outside, chewy on the inside, and that satisfying snap when you bite through the shell. The flavor is a marriage of salty, cheesy richness and a hint of Italian seasoning that lingers like a secret whisper. The heat is just enough to melt the cheese without turning the sticks into a gooey mess. The visual is a golden halo around each stick, promising a bite that will make your mouth water.
What sets this recipe apart from the endless variations you find online is its commitment to health without compromising on taste. Unlike the greasy, deep‑fried versions that drown in oil, these sticks are oven‑baked, cutting fat dramatically while preserving the signature crunch. The use of panko breadcrumbs instead of traditional flour gives a lighter, airier crust that still holds the cheese in place. The secret ingredient? A splash of whole‑grain flour that adds a subtle nutty undertone and a boost of fiber, turning every bite into a wholesome experience. I dare you to taste this and not go back for seconds—though I’ll be honest, I ate half the batch before anyone else got to try it.
Most recipes get this completely wrong by over‑coating the cheese or using too much oil. Here, the technique is razor‑sharp: coat, freeze, bake, repeat. The result? A perfectly crisp exterior that shatters like thin ice, with a molten center that’s still firm enough to hold its shape. Picture yourself pulling a stick out of the oven, the kitchen smelling incredible, the sound of the first bite echoing in your ears. That moment of triumph is worth every second you spend preparing. Okay, ready for the game‑changer? Let me walk you through every single step—by the end, you’ll wonder how you ever made it any other way.
What Makes This Version Stand Out
- Taste: The combination of mozzarella, parmesan, and a dash of Italian seasoning creates a flavor profile that’s both familiar and elevated. Each bite delivers a savory punch that satisfies without the need for heavy sauces.
- Texture: The panko breadcrumb coating provides a light, airy crunch that contrasts beautifully with the gooey cheese inside. The result is a satisfying bite that doesn’t feel heavy or greasy.
- Simplicity: With only a handful of ingredients and a straightforward method, this recipe is perfect for busy weeknights or quick weekend snacks.
- Uniqueness: The addition of whole‑grain flour and a small splash of milk to the coating keeps the sticks lean while adding subtle flavor and structure.
- Crowd Reaction: Friends rave about the low‑calorie crunch and the “cheese‑filled” surprise that makes them crave more. It’s the kind of dish that turns any gathering into a mini‑party.
- Ingredient Quality: Using fresh mozzarella sticks and high‑quality breadcrumbs ensures the best possible flavor and texture, making the difference between a mediocre snack and a memorable one.
- Cooking Method: Oven baking eliminates the need for deep frying, reducing both the cooking time and the cleanup hassle.
- Make‑Ahead Potential: Once coated, the sticks can be frozen and baked later, allowing you to enjoy a fresh snack whenever you want.
Alright, let’s break down exactly what goes into this masterpiece...
Inside the Ingredient List
The Flavor Base
Fresh mozzarella sticks are the star of the show. They provide that classic, melty center that makes everyone reach for more. If you can’t find pre‑made sticks, slice a block of mozzarella into 1‑inch sticks; this gives you more control over the cheese’s meltiness. A pinch of salt on the sticks before coating enhances the overall flavor profile, but be careful not to over‑salt. If you’re on a sodium‑restricted diet, you can use a low‑sodium mozzarella or skip the extra salt entirely.
The Texture Crew
Panko breadcrumbs are essential for that light, airy crunch. Their larger flakes create pockets of air that make the coating feel less dense. Pair them with a small amount of whole‑grain flour to add structure and a subtle nutty flavor. If you prefer a gluten‑free version, use a certified gluten‑free panko or a mixture of almond flour and rice flour. A dash of garlic powder adds depth without overpowering the cheese, while a touch of Italian seasoning brings the dish together with herbs.
The Unexpected Star
Whole‑grain flour is the unsung hero of this recipe. It keeps the coating from becoming too heavy while adding a mild, slightly sweet flavor that pairs well with the cheese. It also boosts fiber content, making the sticks more satisfying. If you’re not a fan of the grainy texture, you can substitute it with oat flour for a smoother finish. The small splash of milk (or water) in the coating mixture keeps the breadcrumbs moist, preventing them from drying out during baking.
The Final Flourish
Parmesan cheese is the finishing touch that adds a sharp, umami kick. Grate it finely so it melts quickly and blends seamlessly with the mozzarella. A light dusting of black pepper adds a subtle heat that balances the richness of the cheese. Finally, a quick spritz of olive oil or a light coating of cooking spray helps the breadcrumbs brown evenly, giving the sticks that coveted golden color.
Everything’s prepped? Good. Let’s get into the real action...
The Method — Step by Step
- Preheat the oven to 425°F (220°C). The high temperature is crucial for achieving that golden crust without overcooking the cheese. Place a rack in the middle of the oven to ensure even heat distribution. While the oven heats, line a baking sheet with parchment paper or a silicone mat to keep the sticks from sticking.
- Prepare the coating mixture. In a shallow bowl, whisk together 1 cup of whole‑grain flour, 1 cup of panko breadcrumbs, 1 teaspoon of garlic powder, 1 teaspoon of Italian seasoning, and a pinch of black pepper. Add 2 tablespoons of milk or water to moisten the mixture; it should be damp enough to hold together but not wet. This step is the foundation for the crispness you’re chasing.
- Dip the mozzarella sticks. Lightly beat 2 eggs in a separate bowl. Dip each mozzarella stick first in the egg, allowing excess to drip off, then roll it in the coating mixture until fully coated. The egg acts as a glue, ensuring the breadcrumbs adhere properly. If you’re making a large batch, you can do this in a single large bowl to speed up the process.
- Freeze for 15 minutes. This step may feel unnecessary, but freezing the coated sticks helps the coating set, preventing it from sliding off during baking. Place the sticks on a parchment‑lined tray and pop them into the freezer for 15 minutes. If you’re in a rush, you can skip this step, but the results will be slightly less crisp.
- Spray or brush with oil. Before baking, give each stick a light spray of olive oil or a thin brush of cooking spray. This creates a barrier that helps the breadcrumbs brown evenly and prevents them from sticking to the pan. The oil also adds a subtle sheen that makes the sticks look even more appetizing.
- Bake for 10-12 minutes. Slide the tray into the preheated oven and bake until the coating is golden brown and the cheese is bubbling. Keep a close eye on the sticks; ovens vary, so start checking at the 10‑minute mark. The moment the cheese starts to ooze, you know they’re ready.
- Cool for 2 minutes. Let the sticks rest on a wire rack for a couple of minutes. This brief cooling period allows the cheese to set slightly, reducing the risk of it spilling out when you bite. The crust will also firm up a little, making the sticks easier to handle.
- Serve immediately with marinara sauce. Pair the sticks with a homemade marinara or a store‑bought sauce that’s low in sugar. The acidity of the tomato sauce cuts through the richness of the cheese, creating a balanced flavor profile. For an extra burst of freshness, sprinkle a few basil leaves on top.
That’s it—you did it. But hold on, I’ve got a few more tricks that will take this to another level…
Insider Tricks for Flawless Results
The Temperature Rule Nobody Follows
Many people bake at a standard 400°F, but raising the temperature to 425°F creates a faster, more even crust. The higher heat caramelizes the breadcrumb coating in seconds, giving you that crisp snap that melts in your mouth. I’ve tried 450°F, but the cheese started to burn before the coating browned fully. Keep the oven rack centered to avoid uneven heat.
Why Your Nose Knows Best
Before you even open the oven door, the smell of toasted breadcrumbs will start to rise. That aroma is a reliable indicator that the sticks are nearing perfection. If you’re in a hurry, trust your nose to tell you when they’re ready; it’s a much more accurate gauge than the timer.
The 5‑Minute Rest That Changes Everything
After baking, let the sticks sit for 5 minutes on a wire rack. This small window allows the cheese to set, reducing the risk of it leaking when you bite. It also lets the breadcrumb coating firm up, giving you a cleaner bite. I’ve found that a 5‑minute rest is the sweet spot—short enough to keep the cheese warm, long enough to lock the structure.
Use a Light Oil Spray, Not a Heavy Brush
When you spray the sticks with oil, you’re creating a thin film that encourages even browning. A heavy brush can cause uneven coating, leading to some sticks under‑baked and others over‑baked. A quick spray or a light mist is all you need to achieve that golden shine.
Freeze for a Crispier Texture
Freezing the coated sticks before baking is a game‑changer. The moisture in the coating forms ice crystals that expand during baking, creating a lighter, airier crust. If you’re making a large batch, freeze the sticks in a single layer on a tray before transferring them to the oven.
Serve with a Fresh Tomato Sauce
Pairing the sticks with a bright, herb‑infused marinara amplifies the flavor. The acidity of the tomato cuts through the richness, while the herbs echo the Italian seasoning in the coating. A squeeze of lemon over the sauce adds a fresh zing that brightens every bite.
Creative Twists and Variations
This recipe is a playground. Here are some of my favorite ways to switch things up:
Smoky Chipotle Version
Swap the Italian seasoning for a blend of smoked paprika and chipotle powder. The smoky flavor adds depth, and the slight heat complements the cheese’s richness. Serve with a cool, yogurt‑based sauce to balance the spice.
Herbed Parmesan Delight
Replace the mozzarella with a mix of provolone and fontina for a sharper cheese profile. Sprinkle the coating with finely grated Parmesan and a dash of dried thyme. The result is a sophisticated, savory bite that feels gourmet.
Vegan Cheese Alternative
Use a block of vegan mozzarella or a cheese alternative made from cashews. Keep the same coating, but add nutritional yeast to the breadcrumb mix for a cheesy flavor boost. This version is dairy‑free yet still delivers on taste.
Crunchy Panko Twist
For an extra crunch, double the amount of panko and add a tablespoon of crushed cornflakes. The cornflakes add a subtle sweetness and a different texture that keeps the sticks interesting.
Spicy Sriracha Drizzle
After baking, drizzle a thin stream of sriracha over the sticks before serving. The sauce’s heat contrasts with the mild cheese, creating a dynamic flavor profile that’s hard to resist.
Breakfast‑Style Cheesy Bites
Serve the sticks with a side of scrambled eggs and toast. The savory cheese pairs beautifully with the protein and carbs, turning the snack into a hearty breakfast option.
Storing and Bringing It Back to Life
Fridge Storage
Store leftover sticks in an airtight container in the refrigerator for up to 2 days. Keep them on a paper towel to absorb excess moisture, preventing the coating from becoming soggy. When ready to eat, reheat in a toaster oven at 350°F for 5 minutes to restore crispness.
Freezer Friendly
Freeze the coated sticks in a single layer on a parchment‑lined tray before transferring them to a freezer bag. They’ll stay good for up to 2 months. When you’re ready to serve, bake directly from the freezer at 425°F for 12 minutes. The coating will still crisp up nicely.
Best Reheating Method
To revive frozen sticks, preheat the oven to 425°F. Place the sticks on a baking sheet and bake for 12‑15 minutes, or until the cheese is melty and the coating is golden. For a quick fix, pop them in a microwave for 20 seconds, then transfer to a toaster oven for 2 minutes to crisp the exterior.
Adding a tiny splash of water before reheating steams the sticks back to perfection, keeping the cheese from drying out. The moisture helps the coating re‑bloom, giving you that same delightful crunch you had on the first bake.