Picture this: I’m standing in a cramped kitchen, the air thick with the scent of melted butter and fresh apples, when my phone buzzes with a text from a friend daring me to create the ultimate apple blondie. I stared at the empty fridge, a handful of apples, a jar of maple syrup, and a stack of flour, and I thought, “Why not?” The moment the batter hit the pan, the sweet aroma rose, mingling with the buttery crackle that sounded like a gentle applause from the oven. I was already halfway to a culinary revelation, and I couldn’t wait to share every step of the journey with you.
What makes this version stand out from the endless array of blondie recipes? It’s the combination of texture, flavor, and a touch of maple magic that turns a simple dessert into a crowd‑pleaser. I dare you to taste this and not go back for seconds. I’ll be honest – I ate half the batch before anyone else got to try it, and the rest of the family begged for a second round. If you’ve ever struggled with bland blondies that fall apart or taste like cardboard, you’re not alone – and I’ve got the fix. This is hands down the best version you’ll ever make at home.
Let’s walk through every single step. By the end, you’ll wonder how you ever made it any other way. The secret lies in a few key techniques that elevate the ordinary into extraordinary, and a surprising ingredient that you won’t expect. Picture yourself pulling this out of the oven, the whole kitchen smelling incredible, and the first bite revealing a chewy center that melts in your mouth while the edges stay golden and crisp like thin ice. Stay with me here – this is worth it.
What Makes This Version Stand Out
- Texture: The batter’s ratio of butter to sugar creates a dense, chewy crumb that holds its shape yet yields to the bite. The apples are diced finely enough to distribute sweetness without overpowering the blondie base.
- Flavor: A blend of brown and white sugar gives a caramel depth, while a splash of vanilla extract and a pinch of nutmeg add warmth that complements the apples.
- Maple Glaze: The glaze is brushed on just before the blondies finish baking, sealing in moisture and giving a glossy finish that tastes like a maple syrup kiss.
- Ingredient Quality: Using organic apples, real maple syrup, and unsalted butter ensures each bite is full of real flavor, not artificial sweeteners or refined sugars.
- Make‑Ahead Potential: These blondies can be refrigerated for up to five days and frozen for up to a month, making them a perfect batch‑cook treat for busy weeknights.
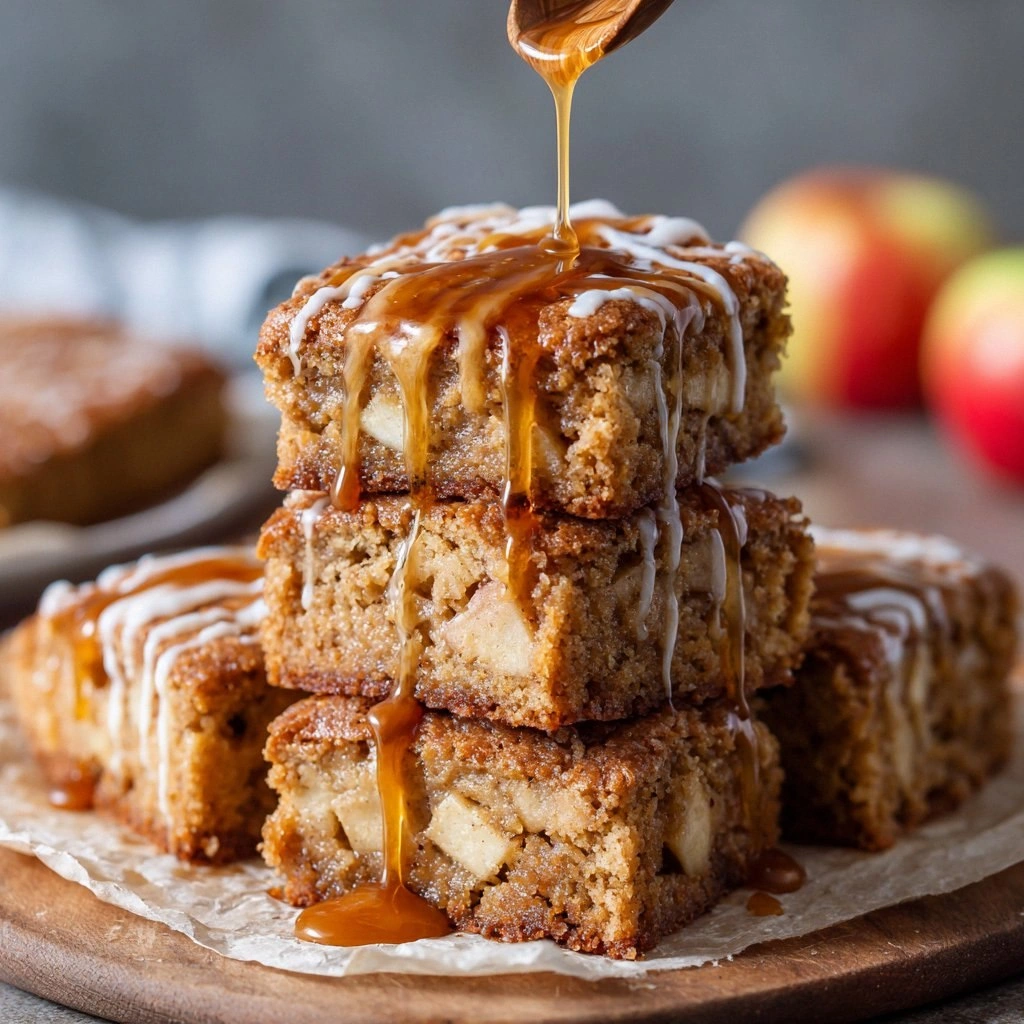
- Visual Appeal: The golden edges and caramelized apple specks create a rustic yet elegant look that makes even a simple dessert feel special.
- Ease of Preparation: All steps can be completed in under an hour, and the recipe requires no specialized equipment, just a standard oven and a mixing bowl.
- Kid‑Friendly: The batter is non‑toxic, and the apples can be left on the surface or removed for those who prefer a cleaner crumb.
Alright, let’s break down exactly what goes into this masterpiece.
Inside the Ingredient List
The Flavor Base
All-purpose flour is the backbone of the blondies, providing structure and a neutral canvas for the sweet elements. The flour’s protein content is low enough to keep the blondies tender but high enough to bind the batter. If you skip the flour, the blondies will collapse and lose their characteristic shape. A good swap is cake flour for an even softer crumb, but the texture will be noticeably lighter.
The Sweetener Squad
Brown sugar delivers a deep molasses note that caramelizes beautifully, while white sugar adds a clean sweetness that balances the richness. Together, they create a complex flavor profile that feels indulgent without being cloying. If you’re watching your sugar intake, try using a sugar substitute that has a lower glycemic index, but keep in mind the caramelization will be less pronounced.
The Baking Essentials
Baking powder and baking soda are the leavening agents that give the blondies a slight lift without turning them airy. Salt is essential for flavor enhancement and to temper the sweetness. A pinch of salt can make the entire dessert feel more rounded. If you prefer a salt-free version, reduce the amount of butter slightly to compensate.
The Fat & Protein
Unsalted butter, melted and cooled to room temperature, infuses the batter with a silky mouthfeel and a rich flavor that’s hard to replicate with margarine or oil. The eggs bind everything together, adding protein and structure. If you’re vegan, try using flax eggs and coconut oil; the texture will be slightly denser, but the flavor stays robust.
The Apple Element
Diced apples are the star that gives this blondie its signature fruity bite. They release natural juices during baking, creating pockets of moisture that keep the blondies from drying out. Choose firm varieties like Honeycrisp or Gala for the best balance of sweetness and tartness. If you’re in a hurry, use pre‑peeled and diced apples from the grocery store.
The Spice & Finish
Cinnamon and nutmeg add warmth and depth, while a splash of vanilla extract lifts the overall aroma. The maple glaze, made from maple syrup, powdered sugar, and a touch of water, provides a glossy finish that caramelizes as it cools. If you’re not a fan of maple, a drizzle of honey or a dusting of cocoa powder can give a different twist.
Everything’s prepped? Good. Let’s get into the real action.
The Method — Step by Step
- Preheat your oven to 350°F (175°C) and line a 9x9-inch baking pan with parchment paper, leaving a little overhang on the sides for easy removal. The parchment prevents sticking and gives a cleaner finish. Let the oven warm while you mix the batter. This step ensures a consistent bake temperature for even browning.
- In a medium bowl, whisk together the flour, baking powder, baking soda, salt, ground cinnamon, and nutmeg. Sifting the dry ingredients removes lumps and ensures an even distribution of leavening agents. This mixture is the foundation that keeps the blondies from sinking. Keep the bowl covered until you’re ready to combine it with the wet ingredients.
- In a separate large bowl, combine the melted butter, brown sugar, and white sugar. Using an electric mixer on medium speed, beat until the mixture is light and fluffy, about 2 minutes. The creamed sugars trap air, which helps the blondies rise slightly and develop a tender crumb. Watch the color change; it should lighten to a pale caramel shade.
- Add the eggs one at a time, beating well after each addition. The first egg should be fully incorporated before adding the second to avoid curdling. Then stir in the vanilla extract, letting the fragrant aroma fill the kitchen. This step adds richness and depth to the batter.
- Gradually fold the dry mixture into the wet batter, mixing just until combined. Overmixing can develop gluten and result in a tough texture. The batter should be thick but still pourable. The goal is a smooth, cohesive mixture that holds the apples evenly.
- Fold in the diced apples, distributing them evenly throughout the batter. The apples will release juices during baking, creating pockets of moisture that keep the blondies from drying out. If you like a stronger apple presence, you can add a handful of chopped walnuts for crunch.
- Pour the batter into the prepared pan, smoothing the top with a spatula. The batter should be about 1 inch thick. This thickness allows the blondies to bake evenly and develop a crisp edge while remaining chewy inside.
- Bake for 30 minutes, or until the edges are golden brown and a toothpick inserted in the center comes out with a few moist crumbs. Avoid opening the oven too early to prevent the blondies from collapsing. Once done, remove from the oven and let cool for 10 minutes before brushing the glaze.
- While the blondies are still warm, whisk together the maple syrup, powdered sugar, and water until smooth. The glaze should be thick enough to coat the top but still pourable. Brush it generously over the warm surface, letting it seep into the crevices for a glossy finish.
- Let the blondies cool completely in the pan on a wire rack. Once cooled, lift them out using the parchment overhang and cut into squares. Serve at room temperature or warm them briefly in the microwave for a gooey treat. Enjoy the harmonious blend of sweet, buttery, and tart notes.
That's it — you did it. But hold on, I've got a few more tricks that'll take this to another level.
Insider Tricks for Flawless Results
The Temperature Rule Nobody Follows
Many bakers bake at a high temperature to get a quick brown top, but the right temperature for these blondies is 350°F. Baking at 350°F allows the sugars to caramelize slowly, creating a deep amber hue without burning the edges. I’ve tried 375°F, and the result was a shiny but dry crumb. Keep the oven rack in the middle to avoid uneven heat distribution.
Why Your Nose Knows Best
During the first 15 minutes of baking, the scent of butter and apples will fill the room. If the aroma is sweet and caramelized, the blondies are on track. If it smells overly sugary or raw, reduce the oven temperature by 10°F and bake a bit longer. Trust your nose; it’s a reliable indicator of doneness.
The 5‑Minute Rest That Changes Everything
After removing the blondies from the oven, let them rest on the pan for five minutes before lifting them out. This resting period allows the internal temperature to stabilize and the glaze to set. Skipping this step often results in a sticky, uneven glaze that’s hard to cut.
Glaze Timing Matters
Brush the glaze while the blondies are still warm; a cold surface will cause the glaze to harden too quickly. The glaze will then crack as it cools. Warm glaze also helps the maple flavor penetrate the crumb, giving each bite a subtle maple undertone.
Batch‑Cook Bonus
These blondies freeze well. Wrap a slice in parchment, then foil, and place it in a freezer bag. When you’re ready to eat, thaw at room temperature and microwave for 10–15 seconds. The result is a warm, gooey treat that’s almost as good as fresh.
Creative Twists and Variations
This recipe is a playground. Here are some of my favorite ways to switch things up:
Chocolate Chip Surprise
Fold in a cup of semi‑sweet chocolate chips into the batter before baking. The chocolate melts into pockets of molten flavor, creating a decadent twist that appeals to kids and adults alike.
Nutty Crunch Edition
Replace the apples with chopped pecans or walnuts for a nutty crunch. The nuts add a buttery flavor and a satisfying bite that pairs beautifully with the maple glaze.
Spiced Ginger Variation
Swap out the cinnamon for ground ginger and add a pinch of cloves. The warm, spicy notes give the blondies a holiday vibe that’s perfect for autumn gatherings.
Vegan Version
Use plant‑based butter, flax eggs, and maple syrup as the sweetener. The texture will be slightly denser, but the flavor remains rich and satisfying.
Salted Caramel Twist
Drizzle a thin layer of salted caramel sauce over the glazed blondies. The salty sweetness enhances the maple flavor and creates a luxurious finish.
Berry Boost
Stir in a cup of fresh blueberries or diced strawberries into the batter. The berries burst with juice as the blondies bake, adding a pop of color and tartness.
Storing and Bringing It Back to Life
Fridge Storage
Store the cooled blondies in an airtight container at room temperature for up to five days. The parchment paper helps prevent sticking, and the airtight seal keeps the crumb moist. For best flavor, consume within three days.
Freezer Friendly
Wrap individual slices tightly in parchment paper and then foil before placing them in a freezer bag. Freeze for up to one month. Thaw at room temperature for 30 minutes before reheating.
Best Reheating Method
Reheat frozen slices in a microwave on medium power for 15–20 seconds, then finish in a toaster oven for 2 minutes at 350°F to restore crispness. Add a tiny splash of water before reheating; it steams the crumb back to perfection.
With these storage tips, you can enjoy a fresh batch whenever you want, and the maple glaze will always feel like a warm hug.