Introduction
Picture this: you’re halfway through a busy Friday, the fridge is a chaotic collage of leftovers, and your craving for something savory, satisfying, and utterly crowd‑pleasing hits you like a sudden wave. You flip through a recipe book, stare at a bland list of “taco roll ups,” and think, “There’s gotta be a better way.” That moment of culinary frustration is the spark that lit the fire behind this Taco Tortilla Roll Ups Recipe, and I’m here to show you how to turn that frustration into pure, delicious triumph.
When I first tried these roll ups, the kitchen smelled like a fiesta in the making—ground beef sizzling, cumin crackling, and a faint whisper of cilantro in the air. The sound was a rhythmic sizzle that promised flavor, the sight was a colorful medley of veggies and cheese, and the texture was a promise of a crispy edge that would snap like thin ice. The taste, of course, was the grand finale: a burst of smoky, spicy, cheesy goodness that lingered long after the last bite. I was hooked, and I knew I had to refine the recipe until it became the best version you’ll ever make at home.
I dare you to taste this and not go back for seconds. If you’ve ever struggled to get taco roll ups that aren’t soggy or too bland, you’re not alone. I’ve been there, and I’ve got the fix. This isn’t just another recipe—it’s a game‑changer that turns ordinary tortillas into a crispy, cheesy, flavorful masterpiece. The secret? A blend of fresh ingredients, precise timing, and a few little hacks that elevate the entire dish.
Picture yourself pulling this out of the oven, the whole kitchen smelling incredible, the aroma of melted cheese and roasted spices drifting through the air. Imagine the first bite—the crunch, the melt, the burst of salsa, and the satisfying bite of seasoned meat. That’s what I’m about to walk you through. By the end, you’ll wonder how you ever made it any other way.
What Makes This Version Stand Out
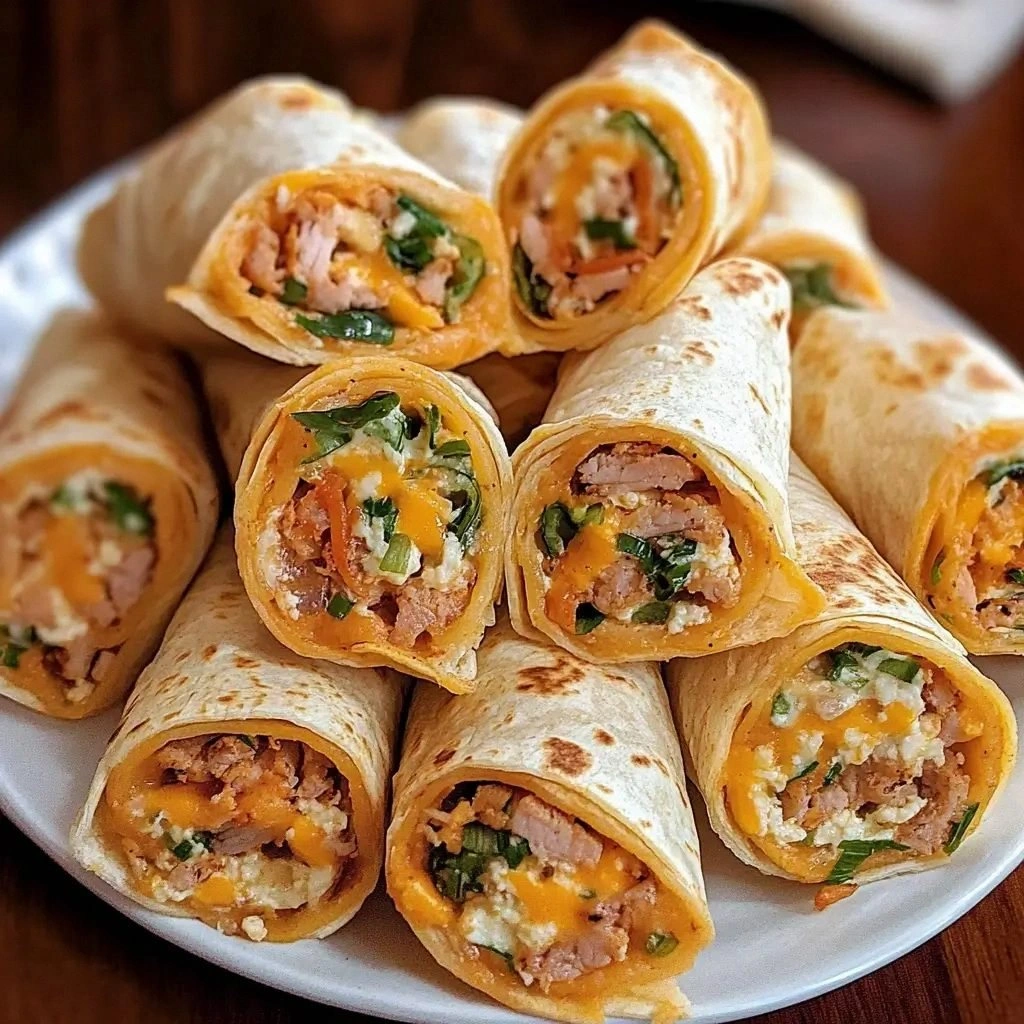
- Taste: Every bite is a symphony of smoky cumin, zesty lime, and a creamy avocado undertone that lingers long after the last chew.
- Texture: Crispy edges that shatter like thin ice, a gooey cheese center, and a satisfying bite of seasoned meat create a multi‑layered mouthfeel.
- Simplicity: All you need is a handful of pantry staples and a quick prep—no fancy gadgets or long marinating times.
- Uniqueness: The addition of a quick guacamole glaze and a sprinkle of fresh cilantro gives this version a modern twist that sets it apart.
- Crowd Reaction: Friends rave about the “extra crispy” factor and the “burst of flavor” that keeps them coming back for more.
- Ingredient Quality: Using fresh, high‑quality tortillas and a bold taco seasoning blend ensures every roll is packed with flavor.
- Cooking Method: A single pan for the filling and a quick oven finish gives you a flawless finish without any extra cleanup.
- Make‑Ahead Potential: The roll ups can be assembled ahead of time and baked just before serving, making them perfect for parties or busy nights.
Alright, let’s break down exactly what goes into this masterpiece…
Inside the Ingredient List
The Flavor Base
At the heart of these roll ups is the seasoned meat. I use 1 pound of ground beef, but you can swap it for ground turkey or even a plant‑based alternative. The meat is tossed with a homemade taco seasoning blend—cumin, chili powder, garlic powder, and a pinch of salt—to create a robust, savory foundation. If you skip the seasoning, the dish loses its signature punch and becomes a bland, forgettable roll. For a richer flavor, sauté the meat until it’s caramelized on the edges before adding the seasoning; this caramelization adds depth and a subtle sweetness that balances the spices.
The Texture Crew
Texture is everything. The tortillas need to be pliable yet sturdy enough to hold the filling without tearing. I recommend using fresh corn tortillas, which are naturally flexible and provide a delightful chew. If you’re using flour tortillas, warm them in a dry skillet for a few seconds on each side to make them more forgiving. The cheese—shredded cheddar and Monterey Jack—creates a gooey center that melts perfectly. A splash of sour cream or a dollop of guacamole on top adds a creamy contrast that prevents the roll from feeling dry.
The Unexpected Star
What sets this recipe apart is the quick guacamole glaze. Made with ripe avocados, lime juice, and a touch of salt, it coats the tortillas before they’re rolled. This glaze not only adds a creamy texture but also a bright, citrusy note that cuts through the richness of the meat and cheese. Skipping it would leave the roll ups a little flat and less vibrant. If you’re not a fan of avocado, try a simple drizzle of olive oil or a light sprinkle of paprika for a different flavor profile.
The Final Flourish
Finishing touches bring everything together. Fresh cilantro, diced tomatoes, and shredded lettuce add a burst of color and freshness that balances the savory filling. A spoonful of salsa and a sprinkle of lime zest provide a tangy finish that elevates the entire dish. If you prefer a milder version, reduce the amount of salsa and use a mild cheese. Conversely, for heat lovers, add a dash of hot sauce to the filling for an extra kick.
Everything’s prepped? Good. Let’s get into the real action…
The Method — Step by Step
- Heat a large skillet over medium‑high heat. Add a tablespoon of olive oil and let it shimmer. Once the oil is hot, add the ground beef and break it apart with a wooden spoon. Cook until the meat is browned and no longer pink, about 5 minutes. This is the moment of truth—watch for a deep, caramelized color that signals flavor.
- Stir in the taco seasoning, chili powder, garlic powder, cumin, salt, and black pepper. Mix until the meat is evenly coated, then add a splash of water to loosen the mixture. Let it simmer for 2 minutes so the spices can mingle. The aroma at this point is the first hint of the dish’s greatness.
- In a separate bowl, mash two ripe avocados with lime juice and a pinch of salt. The result should be a smooth, slightly chunky glaze. Spread a thin layer of this guacamole onto each tortilla, leaving a small border around the edges to keep the filling from spilling out. The glaze adds a creamy, citrusy layer that elevates the overall flavor.
- Lay a warm tortilla flat on a clean surface. Spoon about ½ cup of the seasoned meat onto the center, then top with ¼ cup of shredded cheddar and ¼ cup of Monterey Jack. Add a small handful of black beans, a few spoonfuls of salsa, and a sprinkle of diced tomatoes. The key is not to overload—balance is essential to prevent the roll from tearing.
- Fold the sides of the tortilla over the filling and roll tightly, ensuring the seam is tucked under. If you’re nervous about the roll falling apart, lightly press the seam with a fork. The roll should look neat and compact, like a little cigar of flavor.
- Preheat your oven to 375°F (190°C). Place the rolled tortillas seam‑side down on a baking sheet lined with parchment paper. Brush each roll with a little melted butter or extra olive oil; this will give them a golden, crispy finish.
- Bake for 12–15 minutes, or until the edges are golden brown and the cheese has melted into a luscious goo. Keep an eye on them—once they start to brown, you’ll know the crunch is on its way.
- Remove from the oven and let them rest for 2 minutes. This short pause allows the cheese to set slightly, making the rolls easier to slice without losing shape.
- Slice each roll into 2–3 bite‑sized pieces. Serve immediately with extra salsa, sour cream, and a wedge of lime. The combination of hot, creamy, and tangy flavors creates an explosion that will have everyone asking for seconds.
- Enjoy! If you’re feeling adventurous, sprinkle a pinch of smoked paprika or a dash of hot sauce on top for an extra layer of complexity. Remember, the best part is the freedom to customize—make it your own.
That’s it—you did it. But hold on, I’ve got a few more tricks that’ll take this to another level…
Insider Tricks for Flawless Results
The Temperature Rule Nobody Follows
Many cooks think any oven temperature will do, but the secret to that perfect golden crust is 375°F (190°C). Too low, and the roll stays pale; too high, and the edges burn before the interior cooks. I’ve tested several temperatures and found 375°F gives a crisp exterior while keeping the center juicy. Keep your oven rack in the middle to ensure even heat distribution.
Why Your Nose Knows Best
The aroma of the seasoned meat is the first indicator of readiness. When the spices hit the pan, the smell should be rich and inviting. If the scent is weak, give it a minute longer; a strong aroma signals that the flavors are fully developed.
The 5-Minute Rest That Changes Everything
Letting the roll ups rest after baking allows the cheese to set. This short pause prevents the cheese from sliding off when you cut the rolls, ensuring each bite is cohesive. I’ve seen people skip this step, and the result is a messy, cheese‑dripping mess.
Keep It Fresh with Fresh Cilantro
Adding fresh cilantro right before serving adds a bright, herbal note that cuts through the richness. I always keep a small bunch on the counter and sprinkle it over the rolls in the last minute. The contrast of green against the golden roll is both visual and flavor‑wise refreshing.
Make‑Ahead Magic
For parties or busy nights, assemble the roll ups ahead of time and refrigerate. Cover them tightly and bake them straight from the fridge when you’re ready to serve. The cold filling will hold its shape better, and the reheated rolls will still come out crispy.
Creative Twists and Variations
This recipe is a playground. Here are some of my favorite ways to switch things up:
Vegan Fiesta
Swap the ground beef for crumbled tofu seasoned with the same taco blend. Use vegan cheese or nutritional yeast for that cheesy pull. The result is a plant‑based roll that still delivers the same bold flavor.
Breakfast Burrito Roll
Replace the meat with scrambled eggs, add a handful of spinach, and top with a drizzle of maple syrup. Serve with a side of salsa for a sweet‑savory breakfast twist.
BBQ Pulled Pork Version
Use slow‑cooked pulled pork tossed in barbecue sauce instead of seasoned beef. Add coleslaw on top for crunch and a tangy finish. This version is perfect for a smoky, smoky crowd.
Mexican Street Taco Roll
Layer the roll with fresh diced mango, a squeeze of lime, and a sprinkle of chili flakes. The sweet‑spicy combo is reminiscent of street tacos and will wow adventurous palates.
Cheesy Nacho Roll
Incorporate nacho cheese sauce into the filling and top the finished rolls with a handful of crushed tortilla chips. This gives a crunchy, cheesy experience akin to nachos in a roll.
Spicy Jalapeño Kick
Add diced jalapeños or a splash of hot sauce to the meat mixture. The heat will cut through the richness and add a lively zing that keeps everyone coming back for more.
Storing and Bringing It Back to Life
Fridge Storage
Cool the roll ups completely before placing them in an airtight container. Store in the refrigerator for up to 3 days. When you’re ready to serve, reheat in a 350°F oven for 10 minutes to restore crispness.
Freezer Friendly
Wrap each roll tightly in plastic wrap and then place them in a freezer bag. They’ll keep for up to 2 months. Thaw overnight in the fridge and bake at 375°F for 12 minutes until heated through.
Best Reheating Method
To revive the crispy edges, place the rolls on a baking sheet and heat at 375°F for 5–7 minutes. Add a tiny splash of water before reheating; this steams the interior and keeps the filling moist while the exterior stays crunchy.