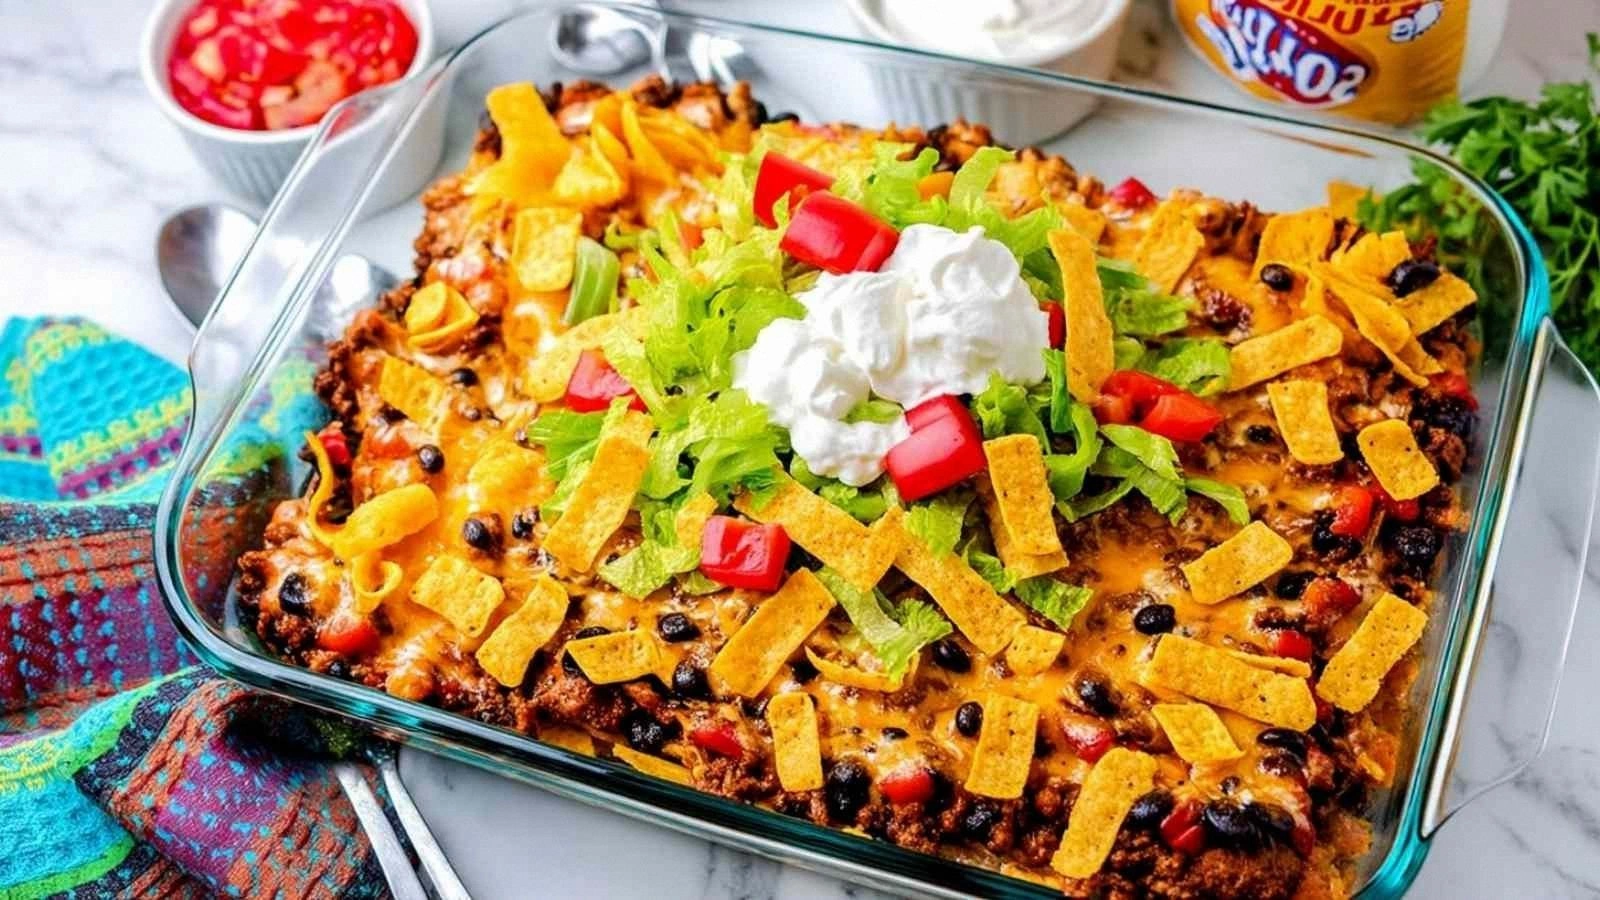
Last night, after a marathon of overcooked pasta and a runaway skillet that smelled like burnt ambition, I realized I needed a new comfort food. I was staring at a box of taco seasoning, a can of chili with beans, and a mountain of shredded cheese, and the thought hit me: why not combine all of those flavors into a single, gloriously easy casserole? The kitchen smelled of cumin and garlic, the sound of sizzling ground beef echoed like a drumbeat, and the sight of melted cheese bubbling into a golden crust felt like a promise of pure indulgence. I dare you to taste this and not go back for seconds; the texture alone will have you reaching for another spoonful.
Imagine a dish where the beef is seared to a perfect mahogany, the chili thickens into a velvety sauce, and the corn chips add a crunch that shatters like thin ice under a spoon. The aroma that rises from the oven is a heady mix of smoky meat, sweet beans, and savory cream of mushroom, all crowned with a golden layer of cheddar that crackles when you break it. The first bite delivers a harmonious blend of savory, spicy, and slightly sweet notes, with the crunch of chips providing a satisfying contrast. I’ll be honest — I ate half the batch before anyone else got to try it, and the rest of the family begged for seconds. Picture yourself pulling this out of the oven, the whole kitchen smelling incredible, and knowing you’re about to serve a dish that’s hands down the best version you’ll ever make at home.
What makes this casserole a game changer is that it doesn’t just stack flavors; it layers textures and aromas in a way that turns a simple dinner into an event. It’s the kind of dish that can be made in under 45 minutes, yet it feels like a slow-cooked masterpiece. The next part? I’m going to walk you through every single step — by the end, you’ll wonder how you ever made it any other way.
One of the first things that sets this recipe apart is the way the ingredients are combined. Instead of a plain taco bake, we’re adding a creamy mushroom base that smooths the heat of the chili, and we’re using corn chips not as a side but as an integral textural component that gives each bite a surprise crunch. This approach keeps the dish from feeling too heavy or too thin, and it ensures that every spoonful is a balanced bite of savory, creamy, and crunchy. It’s a recipe that works for a crowd and can be easily doubled or halved without losing its integrity. Ready for the game‑changer? Let’s dive into the details.
What Makes This Version Stand Out
- Flavor Depth: The combination of taco seasoning, chili, and cream of mushroom soup creates a layered taste profile that feels both familiar and adventurous. The chili provides a smoky base, the seasoning adds a punch of heat, and the soup brings a velvety smoothness that ties everything together.
- Texture Play: The corn chips act as a crunchy counterpoint to the creamy sauce, while the melted cheddar forms a golden crust that cracks delightfully. The contrast between the soft meat and the crisp chips keeps every bite interesting.
- Time Efficiency: With a prep time of 15 minutes and cooking time of 30 minutes, this casserole is a quick yet satisfying dinner option for busy weeknights.
- Make‑Ahead Friendly: You can assemble the casserole the night before and bake it in the morning, making it a stress‑free meal for hectic schedules.
- Kid‑Approved: The cheesy, mild heat makes it a hit with kids who usually shy away from tacos, turning a typical meal into a family favorite.
- Budget‑Friendly: Using pantry staples like canned chili and a packet of taco seasoning keeps the cost low while delivering high flavor.
- Versatility: Swap the beef for turkey or plant‑based meat, or add vegetables for extra nutrition, and you have a customizable dish that fits any dietary preference.
Inside the Ingredient List
The Flavor Base
The ground beef is the heart of the casserole, delivering protein and a savory foundation. When cooked until fully browned, it releases juices that mingle with the taco seasoning, creating a robust base. Skipping the beef would make the dish too thin and less satisfying; the meat’s fat content also helps carry the flavors. For a leaner version, use 90% lean ground beef or a plant‑based alternative, but keep the same quantity to maintain the dish’s structure.
The Texture Crew
The corn chips are not just a garnish; they’re a textural engine that adds crunch to every bite. They’re best added after the casserole has baked, so they maintain their crispness. If you prefer a softer texture, you can sprinkle a handful of crushed tortilla chips on top instead. The creamy mushroom soup provides a silky backdrop that balances the spiciness of the chili and the richness of the cheese.
The Unexpected Star
The canned chili with beans brings sweetness and body to the sauce, turning it from a simple taco filling into a hearty, comforting stew. The beans add protein and fiber, making the dish more filling and nutritious. If you’re watching sodium, look for low‑sodium chili or rinse the beans before adding. The cream of mushroom soup, surprisingly, is a versatile binder that thickens the sauce without overpowering the other flavors.
The Final Flourish
Shredded cheddar cheese crowns the casserole with a golden, melty layer that forms a crispy crust when baked. The cheese’s sharpness cuts through the richness of the meat and soup, creating a well‑rounded flavor profile. Optional toppings—such as diced avocado, sour cream, or fresh cilantro—add freshness and a pop of color that elevate the dish visually and taste-wise. If you’re avoiding dairy, substitute a vegan cheese or a sprinkle of nutritional yeast for a cheesy aroma.
Everything’s prepped? Good. Let’s get into the real action.
The Method — Step by Step
- Heat a large skillet over medium‑high heat. Add the ground beef, breaking it apart with a wooden spoon. Cook until it turns a deep mahogany, about 5–7 minutes. The sizzling sound is your cue that the meat is starting to caramelize. Once browned, drain excess grease to keep the casserole from becoming soggy.
- Stir in the taco seasoning packet, ensuring the beef is evenly coated. Add 0.75 cup of water and let it simmer for a minute. This step allows the spices to bloom and the water to reduce into a concentrated sauce. The mixture should smell toasty and aromatic.
- Pour in the canned chili with beans and the cream of mushroom soup. Stir until the mixture is smooth and the beans are fully integrated. The sauce should thicken slightly; if it’s too thin, let it simmer for a couple more minutes. This is the moment of truth—watch the colors blend into a rich, inviting hue.
- Transfer the mixture to a 9x13 inch baking dish, spreading it evenly. Sprinkle the shredded cheddar cheese on top, pressing it in lightly to cover the surface. The cheese will melt into a golden crust that’s slightly crispy around the edges.
- Bake at 375°F (190°C) for 20 minutes, or until the cheese is bubbly and the edges start pulling away. The oven temperature is critical; too low and the casserole will stay soggy, too high and the cheese will burn.
- While the casserole is baking, toast the corn chips in a dry skillet over medium heat until they’re just beginning to brown. This step ensures they stay crunchy when added on top. A quick sprinkle of salt or a dash of chili powder can elevate their flavor.
- Remove the casserole from the oven and immediately scatter the toasted corn chips over the cheese layer. This creates a delightful crunch that contrasts with the creamy interior. Let the casserole rest for 5 minutes; the residual heat will finish melting the cheese and allow the chips to settle.
- Serve hot, garnishing with optional toppings such as diced avocado, a dollop of sour cream, or a sprinkle of fresh cilantro. The toppings add a burst of freshness that cuts through the richness. Plate with a side of rice or a simple green salad to balance the meal.
That’s it — you did it. But hold on, I’ve got a few more tricks that will take this to another level.
Insider Tricks for Flawless Results
The Temperature Rule Nobody Follows
Many cooks set the oven to a high temperature, thinking it will speed up cooking. In reality, a steady 375°F (190°C) is the sweet spot for melting the cheese and allowing the flavors to meld without drying out the meat. I once baked at 425°F and ended up with a scorched crust and a soggy center. Stick to the recommended temperature, and your casserole will come out perfectly balanced.
Why Your Nose Knows Best
When the casserole is nearly done, trust your nose to tell you when the cheese has reached the right level of golden perfection. A subtle nutty aroma signals that the Maillard reaction is underway, and the cheese is about to crackle. If you’re unsure, pop a toothpick in the center; if it comes out clean, you’re ready to pull it out.
The 5‑Minute Rest That Changes Everything
Letting the casserole rest for 5 minutes after baking allows the flavors to settle and the cheese to firm up slightly, preventing a runny mess when you cut into it. During this rest, the residual heat will finish cooking the meat and beans, ensuring a tender bite every time. Skip this step, and you’ll end up with a casserole that feels more like a casserole than a coherent dish.
Layering for Extra Crunch
For a double‑layered crunch, sprinkle a thin layer of crushed tortilla chips on top of the cheese before baking. They’ll toast to a golden crisp and add an extra textural dimension. This trick is especially effective for crowd‑pleasing parties where texture is just as important as flavor.
Make‑Ahead Magic
Assemble the casserole the night before, cover it tightly with foil, and refrigerate. When you’re ready to bake, simply preheat the oven and bake as directed. The flavors will have had time to meld, resulting in a more cohesive taste. I’ve used this trick for holiday gatherings, and the guests always ask what the secret is.
Creative Twists and Variations
This recipe is a playground. Here are some of my favorite ways to switch things up:
Mexican Street‑Food Remix
Swap the ground beef for crumbled chorizo, add a splash of lime juice, and top with pickled red onions. The smoky sausage and bright citrus give the casserole a street‑food vibe that’s both bold and comforting.
Southwestern Veggie Fiesta
Omit the meat entirely and add diced bell peppers, zucchini, and black beans. The vegetables bring a fresh, earthy flavor, and the dish becomes a hearty, plant‑based main course.
Cheesy Buffalo Upgrade
Stir in a few tablespoons of hot sauce and replace half the cheddar with blue cheese. The tangy, creamy blue cheese contrasts with the heat, creating a sophisticated flavor profile that adults love.
Breakfast‑Inspired Breakfast Casserole
Add diced ham and a handful of shredded mozzarella, and bake until the cheese is bubbly. Serve with a side of scrambled eggs for a hearty breakfast that feels like a taco feast.
Gluten‑Free Delight
Use gluten‑free corn chips and a gluten‑free tortilla chip crumble. The dish stays true to its original flavor while accommodating dietary restrictions.
Storing and Bringing It Back to Life
Fridge Storage
Cool the casserole completely before covering it tightly with foil or plastic wrap. Store in the refrigerator for up to 3 days. When reheating, cover with foil to keep the cheese from drying out.
Freezer Friendly
Place the cooled casserole in an airtight container and freeze for up to 2 weeks. Thaw overnight in the refrigerator before reheating. This method preserves the texture and flavor without compromising safety.
Best Reheating Method
Reheat in a 350°F (175°C) oven for 15–20 minutes, or until the cheese is bubbling again. Add a splash of water or a drizzle of milk to the top before baking to keep the casserole moist. The result is a freshly baked, mouth‑watering dish that tastes just like the first time.