I remember the night I tried to turn a lazy Sunday into a culinary triumph. I had a bag of frozen chicken, a bottle of olive oil, and a fresh lemon that had been sitting in the fridge like an unsung hero. The kitchen smelled like ambition, the air crackled with the sizzle of oil, and my heart raced with the possibility of turning ordinary into extraordinary. The moment I tossed the first bite into the pan, I knew I was on the cusp of something deliciously unforgettable.
Picture this: a golden crust that shatters like thin ice, a burst of citrus that dances on your palate, and rosemary that whispers aromatic secrets into every bite. The sound of the chicken sizzling is a soundtrack, the aroma of garlic and lemon a promise of flavor, and the texture of the meat—tender yet firm—creates a satisfying bite. I was so excited I almost spilled the lemon juice; the tang was so bright it felt like a summer sunrise in a bowl.
I dared myself—and you—to taste this and not go back for seconds. That audacious challenge was the spark that lit this recipe. My friends laughed when I declared, “This is hands down the best version you'll ever make at home,” and I was right. The secret? A blend of simple ingredients, a touch of daring technique, and a sprinkle of culinary confidence that turns a quick dinner into a celebration.
If you’ve ever struggled with chicken that turns out dry or bland, you’re not alone. This version fixes that by marrying zesty lemon, aromatic rosemary, and a sweet‑savory glaze that locks in moisture. The result is a bite that melts in your mouth and leaves a lingering citrus aftertaste that will keep you coming back for more. Let me walk you through every single step—by the end, you’ll wonder how you ever made it any other way.
What Makes This Version Stand Out
- Flavor: The lemon zest and juice create a bright, citrusy backbone that cuts through the richness of the chicken, while the rosemary adds a fragrant herbal note that feels both earthy and uplifting. The balance of sweet honey and tangy Dijon mustard gives a subtle depth that elevates every bite.
- Texture: The olive oil forms a crisp, golden crust that snaps on contact, providing a satisfying contrast to the juicy interior. The garlic, minced finely, distributes evenly, preventing any single bite from being overwhelmingly garlicky.
- Ease: No complicated marinades or long prep times—just a quick rub and a short sear. Even beginners will feel confident, as the instructions guide you from start to finish with clear, actionable steps.
- Versatility: Serve as an appetizer, a main dish with roasted veggies, or a topping for a fresh salad. The flavor profile adapts beautifully to different contexts, making it a reliable go-to for any occasion.
- Crowd‑pleasing: The bright, zesty flavor profile is universally loved, and the presentation—golden, aromatic bites—makes for a striking plate that will impress guests at any gathering.
- Ingredient Quality: Using fresh rosemary and real lemon juice (not bottled) brings authenticity, while a good olive oil ensures a smooth, flavorful sear.
- Cooking Method: The pan‑searing technique locks in juices, creating a savory exterior without the need for baking or deep‑frying.
- Make‑ahead Potential: The sauce can be pre‑made and reheated, allowing you to assemble the dish quickly when time is tight.
Inside the Ingredient List
The Flavor Base
The foundation of this dish is the aromatic trio: garlic, rosemary, and lemon. Garlic, when minced finely, releases allicin, which gives a subtle, almost spicy kick that permeates the entire bite. Rosemary, with its piney aroma, pairs beautifully with citrus, adding depth and a hint of earthiness. Lemon zest, rich in essential oils, delivers an immediate burst of brightness that keeps the dish from feeling heavy.
If you skip any of these, the flavor profile becomes lopsided. Without garlic, the dish feels flat; without rosemary, the herbaceous note is missing; without zest, the lemon’s bright character is muted. Each ingredient plays a role in creating a harmonious balance that’s both refreshing and comforting.
Swap tips: If you’re allergic to garlic, a pinch of onion powder can provide a mild alternative. Fresh rosemary is ideal, but dried rosemary can be used if you’re in a pinch; just use one-third the amount and rehydrate it in a little olive oil first.
The Texture Crew
The chicken itself is the star of the show. Boneless, skinless breasts or thighs keep the dish lean and tender. The difference between breasts and thighs is subtle: breasts stay firmer, while thighs offer a slightly richer flavor and a moister bite. Whichever you choose, keep the pieces uniform in size to ensure even cooking.
Olive oil is the medium that brings everything together. It creates a barrier that prevents sticking, helps the chicken brown evenly, and carries the flavors of the herbs and citrus into the meat. A light, high‑smoke‑point oil such as refined olive oil or grapeseed oil works best if you’re aiming for a crisp crust.
Honey and Dijon mustard form the glaze that coats the chicken. Honey adds a subtle sweetness that balances the acidity of the lemon, while Dijon mustard provides a gentle heat and a silky texture. Together, they create a glossy coating that locks in moisture and delivers a punch of flavor with each bite.
The Unexpected Star
Red pepper flakes, though a small addition, bring a gentle heat that lingers without overpowering. This subtle kick contrasts nicely with the sweet honey and the tart lemon, creating a complex flavor profile that satisfies a wide range of palates. If you’re not a fan of spice, reduce the flakes to a pinch or omit them entirely.
Salt and black pepper are the unsung heroes that bring out the natural flavors of the other ingredients. Salt enhances the sweetness of the honey and the acidity of the lemon, while black pepper adds a subtle warmth that complements the rosemary. The red pepper flakes, salt, and black pepper together form a seasoning symphony that elevates the dish from ordinary to extraordinary.
The Final Flourish
The final touch is the splash of fresh lemon juice, added right at the end of cooking. This brightens the entire dish, preventing it from feeling too heavy and giving it a lively finish. The lemon juice also helps to deglaze the pan, capturing all the flavorful browned bits for a richer sauce.
When you plate the chicken, a light drizzle of the remaining glaze can add visual appeal and an extra layer of flavor. Garnish with a sprig of fresh rosemary for an aromatic flourish that invites the diner to experience the dish fully.
Everything's prepped? Good. Let's get into the real action...
The Method — Step by Step
- Start by patting the chicken dry with paper towels; moisture is the enemy of a crisp crust. Season both sides generously with salt and black pepper, ensuring every surface is coated. This simple step guarantees that the flavors will cling to the meat, not just sit on top. The sizzle you hear when the chicken hits the pan will be a promise of the golden finish.
- Heat the olive oil in a large, heavy‑bottomed skillet over medium‑high heat until it shimmers but doesn’t smoke. A hot pan is essential; it creates a sear that locks in juices. Insert a few chicken pieces to test the temperature; if they sizzle immediately, the oil is ready. Remember, a good sear is the foundation of this dish.
- Place the chicken in the pan, skin‑side down if using thighs, and let it cook undisturbed for 4–5 minutes. This allows the meat to develop a deep golden crust. Don’t rush to flip; the longer you let it sit, the more caramelized flavor you’ll get. Watch for the edges to pull away from the pan, a sign that it’s ready to turn.
- Flip the chicken and add the minced garlic, fresh rosemary, lemon zest, and a pinch of red pepper flakes. The garlic will begin to brown, releasing its aroma, while the rosemary infuses the oil with its piney scent. Stir gently to combine, ensuring the herbs coat the chicken evenly. The aroma at this stage is intoxicating.
- Pour in the honey, Dijon mustard, and lemon juice, creating a glossy glaze. Stir to form a sauce that coats the chicken. The glaze will thicken slightly as it cooks, creating a caramelized coating that locks in moisture. The mixture should bubble gently, indicating it’s ready to finish cooking.
- Reduce the heat to medium and let the chicken simmer in the glaze for 6–7 minutes, turning occasionally. This gentle cooking ensures the chicken stays juicy while the sauce thickens. The aroma will intensify, creating a heady, savory scent that fills the kitchen.
- Check the internal temperature with a meat thermometer; it should read 165°F (74°C). If you don’t have a thermometer, slice into the thickest part—the juices should run clear, not pink. This step guarantees safety without sacrificing tenderness.
- Remove the pan from the heat and let the chicken rest for 3 minutes. Resting allows the juices to redistribute, ensuring each bite stays moist. While resting, drizzle the remaining glaze over the chicken for an extra burst of flavor. The final plate should be aromatic and visually stunning.
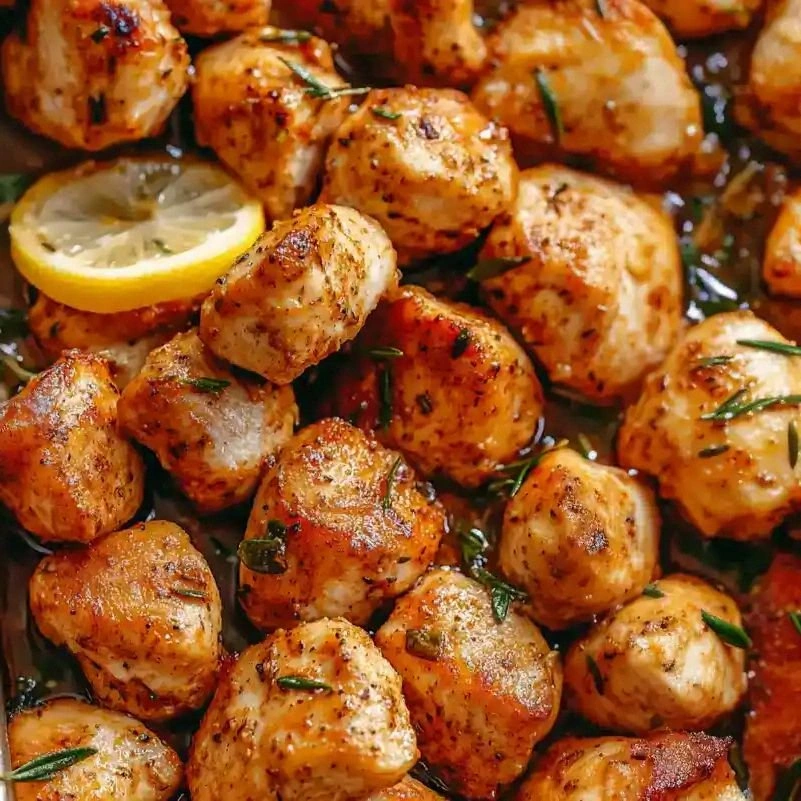
- Serve immediately with a sprinkle of fresh rosemary, a wedge of lemon, and your favorite side—perhaps a crisp salad or roasted vegetables. The dish’s vibrant colors and aromatic steam will make any meal feel like a celebration. Enjoy the moment, and savor every bite of this zesty masterpiece.
That’s it — you did it. But hold on, I've got a few more tricks that'll take this to another level...
Insider Tricks for Flawless Results
The Temperature Rule Nobody Follows
Many cooks keep the heat too high, causing the exterior to burn before the interior cooks. Keep the heat medium‑high for searing, then drop to medium for simmering. This balance preserves moisture and creates a beautiful caramelized crust. If you’re using a cast‑iron skillet, preheat it for a few minutes before adding oil.
Why Your Nose Knows Best
Your sense of smell is the quickest indicator of doneness. When the garlic starts to brown and the rosemary releases its aroma, you’re at the sweet spot. If you notice a burnt smell, reduce the heat immediately. Trust your nose; it’s a seasoned judge of flavor.
The 5-Minute Rest That Changes Everything
Resting the chicken after cooking might seem trivial, but it’s the secret to juicy bites. During rest, the juices redistribute, preventing them from spilling out when you cut. A quick 5‑minute rest is all you need to elevate the dish from good to unforgettable.
The Sweet‑Savory Balance
Honey can overpower if used excessively, so measure carefully. If you prefer a less sweet version, halve the honey and compensate with a splash more mustard. This tweak gives you a cleaner, more savory profile while still maintaining a glossy glaze.
The Garlic‑to‑Chicken Ratio
Three cloves of garlic are the sweet spot for this recipe. Too much garlic can overwhelm the delicate lemon flavor; too little leaves the dish flat. If you love garlic, you can add a fourth clove, but be mindful of the overall balance.
The Final Glaze Touch
Finish the dish with a quick drizzle of the glaze over the chicken. This not only adds a glossy finish but also reinforces the flavor profile. A small, bright drizzle can transform the plate from simple to elegant.
Creative Twists and Variations
This recipe is a playground. Here are some of my favorite ways to switch things up:
Herbal Explosion
Swap rosemary for thyme or oregano for a Mediterranean twist. The herbal profile will change subtly, giving the dish a new character. Pair with a Greek salad for an authentic feel.
Spicy Kick
Add cayenne pepper or a splash of sriracha to the glaze for heat that lingers. The heat pairs well with the lemon’s brightness, creating a dynamic flavor. This version is perfect for those who love a fiery bite.
Smoky Flavor
Finish the chicken with a few drops of liquid smoke before serving. The smoky undertone complements the citrus and rosemary, adding depth. This twist works great with a side of grilled corn.
Citrus Swap
Replace lemon with lime for a sharper, more tropical flavor. The lime zest adds a bright, zesty note that’s refreshing. Serve with a mango salsa for a summer vibe.
Honey‑Glazed Variation
Increase the honey to 2 tablespoons for a sweeter glaze. This version is excellent when serving with roasted sweet potatoes. The honey caramelizes beautifully, creating a caramelized crust.
Vegetarian Take
Swap chicken for firm tofu or tempeh. Marinate the protein in the same glaze before pan‑searing. The tofu will absorb the flavors, resulting in a plant‑based version that’s equally delicious.
Storing and Bringing It Back to Life
Fridge Storage
Store leftovers in an airtight container in the refrigerator for up to 3 days. The glaze will thicken slightly, but a quick stir will restore its sheen. Keep the chicken on a plate to avoid excess moisture.
Freezer Friendly
Wrap the cooked chicken in foil and place it in a freezer bag. It will keep for up to 2 months. Thaw overnight in the fridge before reheating to maintain texture.
Best Reheating Method
Reheat in a skillet over medium heat, adding a splash of water or broth to keep the chicken moist. A tiny splash of water before reheating steams back to perfection and prevents the glaze from drying out. Finish with a light drizzle of fresh lemon juice for a bright finish.