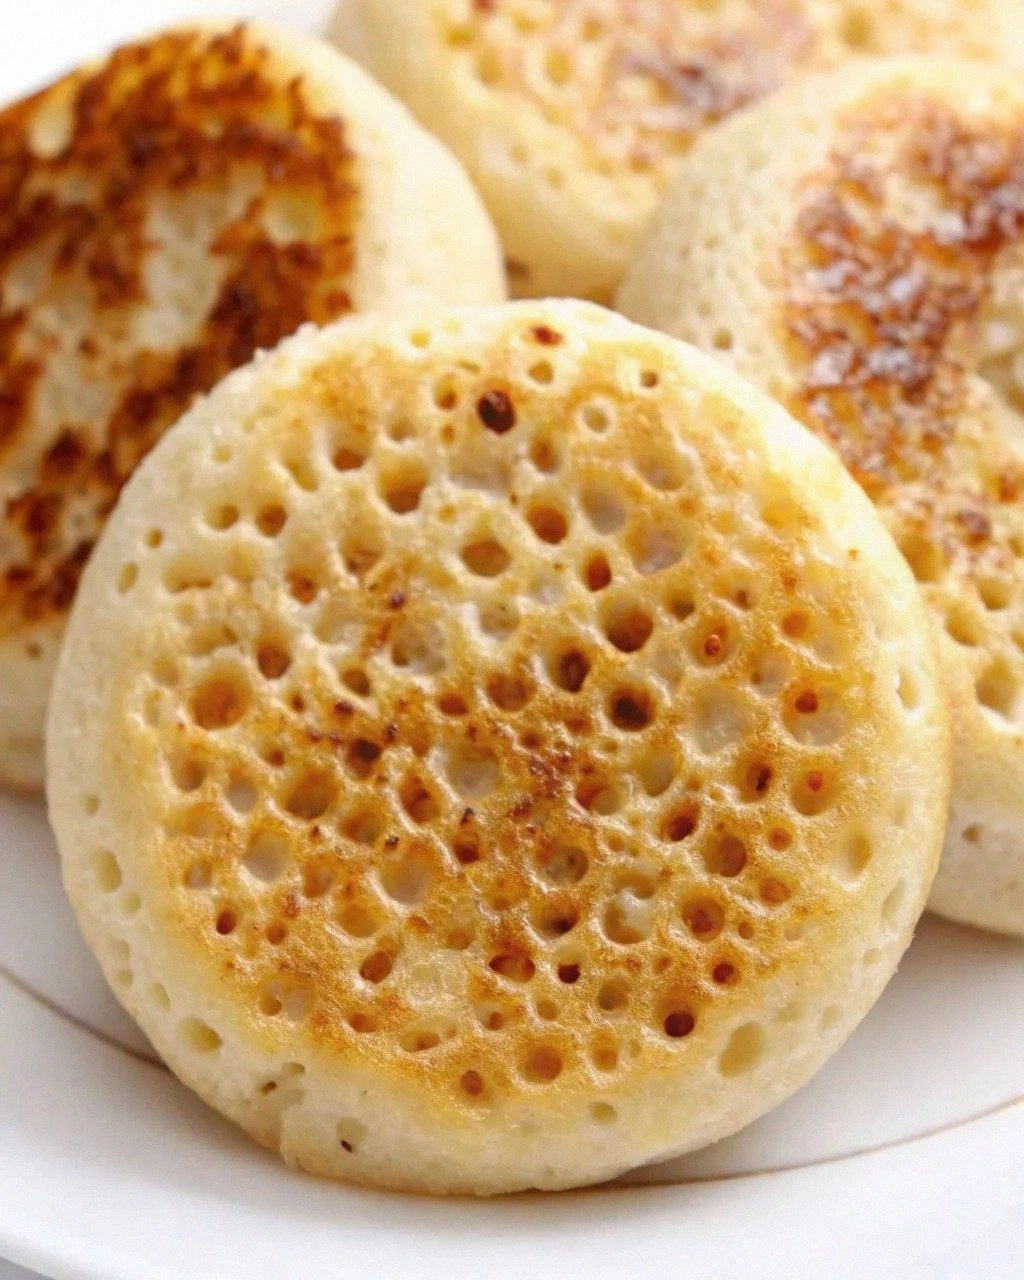
I still remember the first time I tried making crumpets at home. It was a rainy Sunday morning, the kind that begs for something warm and comforting, and I thought, "How hard could it be?" Three hours later, I was staring at a pile of dense, hockey-puck disasters that wouldn't even absorb butter properly. The dog wouldn't even eat them. Fast forward through countless trials, a few choice words, and what felt like a lifetime of research, and I've finally cracked the code to crumpet perfection. These aren't just good crumpets — they're the kind that make you question why you ever bought the rubbery store-bought ones. Picture this: golden discs with holes so perfect they could be on a postcard, edges that shatter like thin ice when you bite into them, and a texture so fluffy it feels like eating a buttery cloud. The aroma that fills your kitchen? Pure magic. I'm talking about crumpets that are crispy on the outside, pillowy soft inside, with those signature nooks and crannies that hold pools of melted butter like tiny edible lakes. If you've ever struggled with flat, lifeless crumpets or ones that taste like cardboard, you're not alone — and I've got the fix that'll change your breakfast game forever. Let me walk you through every single step — by the end, you'll wonder how you ever made it any other way.
What Makes This Version Stand Out
This is hands down the best version you'll ever make at home, and here's why it beats every other crumpet recipe out there. After testing dozens of recipes and making literally hundreds of crumpets (my neighbors thought I'd lost my mind), I've discovered the secrets that make all the difference.
Cloud-Like Texture: Most recipes produce dense, heavy crumpets that sit in your stomach like rocks. This version creates an impossibly light texture that practically floats off the plate, thanks to a specific fermentation technique that develops the perfect bubble structure.
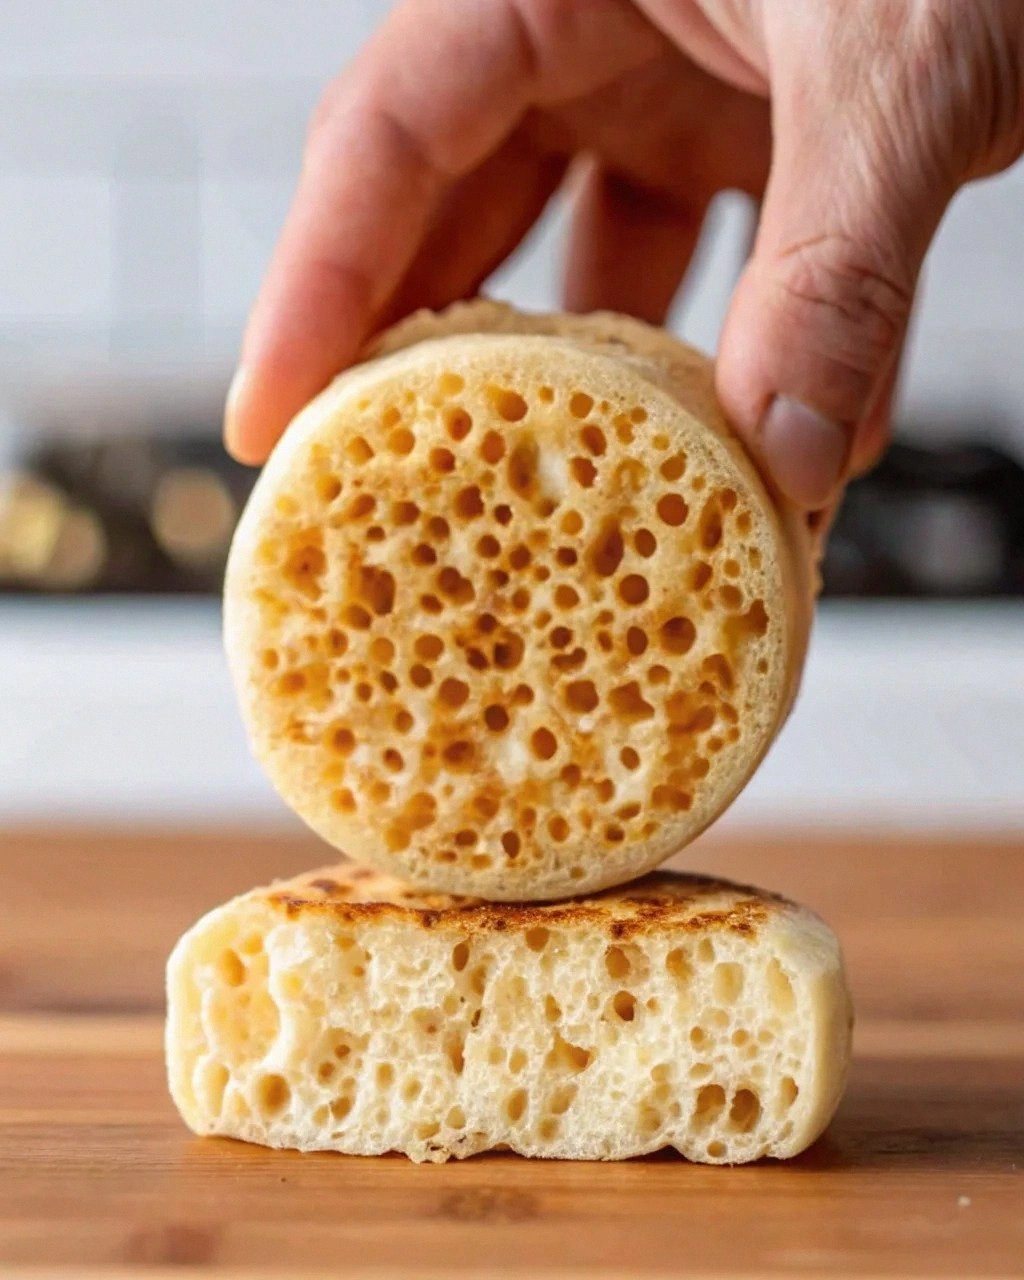
Hole-Perfect Surface: Those signature crumpet holes aren't just for show — they're butter highways. My method guarantees the perfect hole pattern every single time, creating tiny reservoirs that hold melted butter like nature's own sauce dish.
Foolproof Fermentation: Forget about complicated schedules. This recipe works with your life, not against it. You can mix it up before bed and wake up to perfectly fermented batter, or start it in the morning for afternoon tea.
Weekend to Weekday: Most crumpet recipes are weekend-only affairs. Not this one. Once you master the technique (which takes exactly one batch), you can whip these up faster than your coffee maker can brew a pot.
The Butter Effect: Here's what really sets these apart — the way they interact with butter. Warm crumpets fresh off the pan absorb butter like a sponge, distributing it evenly throughout rather than letting it pool on top.
Freezer-Friendly Brilliance: Make a double batch, freeze them properly, and you'll have better-than-store-bought crumpets ready in minutes. The reheating method I'll share actually makes them better than fresh.
Zero Special Equipment: No rings? No problem. I'll show you how to make perfect crumpets with nothing more than a non-stick pan and a ladle. Though honestly, once you taste these, you'll want to invest in proper crumpet rings.
Alright, let's break down exactly what goes into this masterpiece...
Inside the Ingredient List
Every ingredient in this recipe pulls its weight, and skipping even one will leave you with sad, disappointing crumpets. Trust me, I've tested every possible shortcut and substitution. Here's what each component brings to the party and why it matters more than you think.
The Foundation Builders
Strong White Bread Flour: This isn't the time for all-purpose flour, my friend. Bread flour has the protein content we need to develop gluten, creating that signature chewy texture that defines a proper crumpet. The higher protein gives the batter structure during cooking, preventing it from spreading into a sad puddle. If you absolutely must substitute, use all-purpose plus two tablespoons of vital wheat gluten per cup, but honestly, just buy the bread flour.
Instant Yeast: Here's where most recipes go wrong — they use active dry yeast and wonder why their crumpets taste like a brewery. Instant yeast works faster and cleaner, giving you better flavor without that yeasty aftertaste. Plus, you can mix it straight into the flour without proofing, which means fewer dishes and less chance of killing your yeast with too-hot water.
Castor Sugar: Don't even think about skipping the sugar or replacing it with honey. You need the fine crystals to dissolve quickly and feed the yeast, creating those perfect bubbles. The small amount won't make your crumpets sweet — it just helps with browning and flavor development. Regular granulated sugar works in a pinch, but castor dissolves better.
The Texture Masters
Baking Powder: This is my secret weapon for guaranteed fluffiness. The double action gives you lift during the initial mixing and again when it hits the hot pan. Don't add it too early or you'll lose the second rise. Mix it in just before cooking for maximum puff.
Salt: Not just for flavor — salt controls yeast activity and strengthens gluten. Add it too early and it can slow fermentation, but add it too late and it won't distribute evenly. The timing I'll show you ensures perfect flavor and texture every time.
Warm Water: Temperature matters more than you think. Too hot and you'll kill the yeast, too cold and you'll be waiting forever for fermentation. Aim for blood temperature — when you can't feel it on your finger, it's perfect. In winter, I microwave mine for 20 seconds to take the chill off.
The Unexpected Game-Changer
Milk Powder: This is where the magic happens. Milk powder adds richness and helps develop that golden color we all want. It also improves the keeping qualities, so your crumpets stay fresher longer. Fresh milk works too, but the powder is more consistent and doesn't change the liquid ratios.
The Final Touch
Butter for Greasing: Use real butter, not oil or cooking spray. Butter adds flavor and helps create those crispy edges that make crumpets addictive. Clarified butter works best because it doesn't burn, but regular butter is fine if you keep the heat moderate.
Everything's prepped? Good. Let's get into the real action...
The Method — Step by Step
-
Start by whisking together your bread flour, instant yeast, castor sugar, and milk powder in a large bowl. Make sure everything is thoroughly combined — you don't want any pockets of yeast hiding in flour corners. The mixture should look like pale, sandy beach. Now create a well in the center and add your warm water gradually, whisking as you go. The batter will look thin and lumpy at first, but keep whisking until it's smooth and the consistency of heavy cream. This initial mixing is crucial — undermix here and you'll have flour lumps that never dissolve.
-
Cover the bowl with plastic wrap and let it sit in a warm spot for 1-2 hours. This isn't just fermentation time — it's flavor development time. The mixture will bubble and rise dramatically, creating a foamy top that looks alive. Don't rush this step, but don't overdo it either. When it's ready, the surface will be covered in tiny bubbles that pop when you gently shake the bowl. The smell should be pleasantly yeasty, not sour or beery.
Kitchen Hack: If your kitchen is cold, create a proofing box by turning your oven to 200°F for 2 minutes, then turning it off. The residual heat is perfect for fermentation. -
Now comes the critical moment — adding the salt and baking powder. Sprinkle the salt over the surface and let it dissolve for 30 seconds before gently folding it in. Don't stir vigorously or you'll knock out all those beautiful bubbles you just spent hours creating. The baking powder goes in last, folded in with just 3-4 gentle movements. Overmixing here is the difference between fluffy and flat crumpets.
-
Heat your non-stick pan over medium-low heat and brush with melted butter. The pan is ready when a drop of batter sizzles gently but doesn't immediately brown. Too hot and your crumpets will burn before they cook through. Too cool and they'll be pale and rubbery. This is where most people go wrong — they crank the heat trying to speed things up. Patience, grasshopper.
Watch Out: Don't have crumpet rings? Use well-greased metal cookie cutters or clean tuna cans with both ends removed. Plastic rings won't work — they'll melt and create a mess. -
If using rings, place them in the pan and fill each one halfway with batter. Without rings, simply ladle about 3 tablespoons of batter per crumpet, letting it spread naturally. The batter should be thick enough to hold its shape but still flow. If it spreads too much, your batter is too thin — whisk in a tablespoon of flour. If it doesn't spread at all, thin with a teaspoon of water.
-
This is the moment of truth — don't walk away from the stove. Cook for 7-9 minutes until the surface is set and covered in holes. The holes start forming around the edges first, then spread inward. When they stop appearing and the top looks like a lunar surface, it's time to flip. Don't rush this — the holes are what make crumpets magical.
-
Remove the rings (if using) with tongs and flip the crumpets. Cook for just 1-2 minutes on the second side — you're just setting the top, not browning it. The bottoms should be golden brown with crispy edges. Flip too early and you'll have raw centers. Too late and they'll be dry. Trust your nose — they smell nutty and toasty when ready.
-
Transfer to a wire rack and let them cool for at least 5 minutes. I know it's torture, but this rest is crucial. It lets the steam redistribute, giving you that perfect texture contrast — crispy outside, fluffy inside. Eat them warm with butter that melts into all those beautiful holes. The way the butter pools and soaks in? Pure magic.
That's it — you did it. But hold on, I've got a few more tricks that'll take this to another level...
Insider Tricks for Flawless Results
The Temperature Rule Nobody Follows
Your kitchen temperature affects everything. In summer, fermentation happens faster, so reduce the rising time by 30 minutes. In winter, you might need the full 2 hours. But here's the real secret — the batter temperature when it hits the pan should be room temperature. Cold batter straight from the fridge won't develop those signature holes. Let it sit out for 15 minutes before cooking, and you'll see the difference immediately.
Why Your Nose Knows Best
Don't just rely on timing — use your senses. The batter is ready when it smells slightly sweet and yeasty, like fresh bread dough with a hint of beer. If it smells sour or strongly alcoholic, it's over-fermented and your crumpets will taste off. Trust your instincts — if it doesn't smell right, it probably isn't. I've saved countless batches by trusting my nose over the clock.
The 5-Minute Rest That Changes Everything
After mixing in the baking powder, let the batter rest for exactly 5 minutes before cooking. This allows the chemical reaction to start, creating tiny bubbles throughout the batter. Skip this step and your crumpets will be dense and flat. Set a timer — 4 minutes is too short, 6 minutes is too long. This tiny window is where amateur crumpet makers go wrong.
The Ring Rotation Method
If you're using rings, don't just leave them sitting still. Give them a gentle quarter-turn every 2 minutes during cooking. This prevents hot spots and ensures even browning. The batter will pull away slightly from the sides when they're ready to flip. It's like giving each crumpet a little dance that results in perfect color and texture.
The Steam Secret
For extra-tall crumpets, add a splash of water to the pan and immediately cover with a lid for the first 3 minutes of cooking. The steam helps the batter rise higher before it sets, giving you those towering, cafe-style crumpets. Remove the lid for the remaining cooking time to let the holes develop properly. This trick is especially useful if your kitchen is very dry.
Creative Twists and Variations
This recipe is a playground. Here are some of my favorite ways to switch things up:
The Everything Bagel Crumpet
Mix 2 tablespoons of everything bagel seasoning into your flour before adding liquids. The result? Crumpets with all the flavor of your favorite bagel but the fluffy texture of a cloud. Top with cream cheese and smoked salmon for the ultimate brunch. The seasoning toasts beautifully in the pan, creating crispy, aromatic edges that'll make your kitchen smell like a New York deli.
Sweet Cinnamon Swirl
Add 2 teaspoons of cinnamon and 3 tablespoons of brown sugar to the batter for breakfast crumpets that need nothing but butter. The sugar caramelizes slightly, creating golden-brown spots and a subtle sweetness. These are incredible with a smear of honey butter or topped with sliced bananas and a drizzle of maple syrup. Kids go crazy for these, and adults pretend they're for the kids while eating half the batch.
Herb and Cheese Heaven
Fold in 2 tablespoons of chopped fresh herbs (chives, parsley, dill) and 1/4 cup of finely grated Parmesan after fermentation. These savory crumpets are perfect for avocado toast or topped with a poached egg. The herbs stay bright and fresh-tasting, while the cheese adds umami depth. They're sophisticated enough for brunch guests but easy enough for Tuesday breakfast.
Chocolate Chip Indulgence
Add 3 tablespoons of mini chocolate chips to the batter just before cooking. The heat melts them slightly, creating little pockets of chocolate throughout. These are dangerously good warm, when the chocolate is melty and the crumpets are fluffy. Top with a dollop of whipped cream for dessert crumpets that'll make you forget about cupcakes entirely.
Whole Wheat Wonder
Replace half the bread flour with whole wheat flour for nuttier, more substantial crumpets. The flavor is deeper and more complex, plus you can pretend they're healthy. They take slightly longer to cook and won't rise quite as high, but the trade-off in flavor is worth it. These pair beautifully with sharp cheddar and apple slices.
The Gluten-Free Game Changer
Substitute the bread flour with a 1:1 gluten-free baking blend plus 1 teaspoon of xanthan gum. The texture is different — more tender than chewy — but still delicious. They won't develop the same hole structure, but they'll satisfy the craving. Add an extra tablespoon of oil to keep them moist, and don't skip the rings or they'll spread too much.
Storing and Bringing It Back to Life
Fridge Storage
Let crumpets cool completely, then store in an airtight container in the refrigerator for up to 5 days. Layer them between sheets of parchment paper to prevent sticking. The texture actually improves after a day in the fridge — something about the starches retrograding makes them even better when reheated. Just don't store them warm or they'll create condensation and get soggy.
Freezer Friendly
Crumpets freeze beautifully for up to 3 months. Cool completely, then freeze in a single layer on a baking sheet. Once solid, transfer to freezer bags with parchment between layers. This prevents them from freezing into a solid block. Label with the date — frozen crumpets look suspiciously similar to frozen English muffins, and you don't want breakfast confusion at 6 AM.
Best Reheating Method
The toaster is fine in a pinch, but for restaurant-quality results, reheat in a buttered pan over medium heat. Add a tiny splash of water and cover with a lid for 2 minutes — the steam refreshes them perfectly. Flip and cook uncovered for another minute. They'll taste even better than fresh, with crispy edges and a fluffy center. The butter you add during reheating soaks in and creates an almost croissant-like richness.